P-36A Curtiss step by step build is done !!!! 5-7-08

-
supersonicfifi
- Officer - Colonel

- Posts: 1276
- Joined: Wed Jun 01, 2005 2:47 pm
- Location: FRANCE
cant wait
i wish i had time ... & skill
well done
1/18 mirage 2000 & RAFALE should i say more ?
Stunning work… just beautiful….
How about you, me, Spudkopf, the Hun, 1958 Zelda all get together and start our own custom company and get Red to do our catalog/web displays?
How about you, me, Spudkopf, the Hun, 1958 Zelda all get together and start our own custom company and get Red to do our catalog/web displays?
The sign of a great model is that one’s eye is not drawn to any one feature, yet one can study it for hours and continually find something new.
-
pickelhaube
- Officer - Brigadier General

- Posts: 9706
- Joined: Mon Jan 22, 2007 5:52 am
- Location: New Orleans
Thanks guys.
Ohh Ohh there is a little more work to do. I guess you guys are right I will change the rear doors to fit the P-36a.
List of things to do.
1. Change rear gear doors.
2. Make 2 gear door mock ups . Open and closed.
3. Make rear glass.
4. Make blisters for exaust under cowling.
5. Finish panel lines.
6. Split fuse and mount engine.
7. Paint .
The Vac-U-Form arrived today and it is in great shape. It is misiing the holed plate. But I am getting this with the refurbishing kit. I can't wait to try it. This one thing that I always have wanted to do. Not having a way to make canopies has held me back on a lot of projects I have wanted to do in the past. The same thing with armor. Those pesky tracks and there are so many of them. My molding skills are coming along. I am about 50 % on those. One cast great next cast not so great. Practice, practice , practice.
I am going on a trip today at 10:00 this morn. I will be back Sun night.
You guys take care.
Matthew
Kirk Douglas : Mine hit the ground first
John Wayne : Mine was taller

John Wayne : Mine was taller
-
thehun
- Officer - 2nd Lieutenant

- Posts: 364
- Joined: Sun Oct 02, 2005 10:21 pm
- Location: Heart of Dixie (Mississippi)
Yoxford,Yoxford wrote:Stunning work… just beautiful….
How about you, me, Spudkopf, the Hun, 1958 Zelda all get together and start our own custom company and get Red to do our catalog/web displays?
We got the Customs web site up--but not running yet---I'm snowed under with back order customs now, as soon as i catch up, I won' be taking in any more, and I'll be throwing everything into it to get it running, pickelhaube, 58 Zelda, and i are looking for the best scratch builders, customizers we can find, we will be working in several scales, 1/6--1/16--1/18--1/32--At this time All the details have not been worked out, but I welcome any input or ideas.
TheHun
Aka thewoofer
-
pickelhaube
- Officer - Brigadier General
- Posts: 9706
- Joined: Mon Jan 22, 2007 5:52 am
- Location: New Orleans
Slow progress so far. I have customized the front of the engine.Not really worth taking a picture at this point.
I have been trying to get use of the Vac u former and it is not going to smooth. I need to get a timer and see just how long the plastic takes to get soft enough to use. As of yet I have failed 4 times .
Failers:
1.I got the plastic too hot . It melted to the heating element .
2. The plastic was not hot enough. It barley formed to object.
3. I did not get the plastic on the frame just right and it tore from frame.
4.Last time I finaly got it but the object should have been on a platform to get the details.
I made a master of the bottom exaust fairing and this is what I was tring to vacuform.
To date I have lost 2 things from the project. One of the stabalizers and one of the rear glasses . I was going to use the older smaller ones as masters and enlarge them. Kind of hard to do when they are missing.
This lastest update seems as if I am going backwards rather than forwards.
Has any body else used a Mattel Vac u former?
Kirk Douglas : Mine hit the ground first
John Wayne : Mine was taller
John Wayne : Mine was taller
-
Black_Dragon_One
- Officer - Brigadier General
- Posts: 2032
- Joined: Sat Dec 11, 2004 1:23 pm
- Location: California
-
USCGSARdog
- Officer - 1st Lieutenant

- Posts: 619
- Joined: Mon Oct 04, 2004 6:42 pm
- Location: Richmond, VA
picklehaube........ I may be telling you something you already know, but when you go to heat the styrene sheet, heat it just long enough to where it just starts to sag down in the frame, then move quickly to the vac former.
As for the Mattel vac former, I don't have any experience with it, so the above info may be of no use to you at all.
BTW, your P-36 is coming together very nicely. I am looking forward to seeing the finished product. And these minor set backs you are experiencing, don't sweat 'em. Think of them as a chance to regroup and move ahead with a new, better idea.
Heck, you should be proud in the fact that at least you had the beans to tackle that project in the first place. Thats better than most people do.
-Rob
_______________________________
"You have to go out, but you don't have to come back".
"You have to go out, but you don't have to come back".
-
pickelhaube
- Officer - Brigadier General
- Posts: 9706
- Joined: Mon Jan 22, 2007 5:52 am
- Location: New Orleans
Hey guys thanks for the encouragement.
I think that I could have made the fairing the last time if I would have put it on a platform. Also the vacume on the machine is fairly strong or the balsa master I was using was too light. Every time the pump was in the up swing the back pressure moved it or made it hop. This could be rectafied with the platform.
I would like to take the pump off and hook up a shop vac to it. Has anybody heard of this being done to a Mattel Vac u former?
Kirk Douglas : Mine hit the ground first
John Wayne : Mine was taller
John Wayne : Mine was taller
picklehaube, I'm not familair with the Mattel machine but I have researched home built vacuum form machines, and a good shop vac is what they use for the vacuum source.
When you say that the pump is on the up swing it causes the buck to move around is this because of vibration, or is the pump blowing air back at the platten? If it is blowing air back then something is not right. You should have a constant vacuum at your platten when the pump is on. With a good vacuum that should actually help hold the buck down so it doesn't move around.
When you say that the pump is on the up swing it causes the buck to move around is this because of vibration, or is the pump blowing air back at the platten? If it is blowing air back then something is not right. You should have a constant vacuum at your platten when the pump is on. With a good vacuum that should actually help hold the buck down so it doesn't move around.
I fly cartoon airplanes
-
Jay
- Officer - Lt. Colonel

- Posts: 1218
- Joined: Sun Jun 25, 2006 6:19 pm
- Location: Auckland, New Zealand
Pickelhaube, if you go with the shopvac option, you can gain an extra bit of oommff by removing the vac's filter. I've also heard of people who have converted basic bicycle hand pumps to suck rather than blow air (basically involves turning the valves around).
"you get in a steep dive in this thing and you've got almost no maneuvarabilty at all. You couldn't hit the broad side of a barn with the broad side of another barn"
-
supersonicfifi
- Officer - Colonel
- Posts: 1276
- Joined: Wed Jun 01, 2005 2:47 pm
- Location: FRANCE
infos
http://www.gc2-4.com/tablemathist.htm
image and history of the first allied victory :
8 septembre 1939 : La SPA 160 "Diables Rouges" remporte les deux premières victoires aériennes françaises de la seconde guerre mondiale. Deux Me 109, le premier abattu par Sergent-Chef Antoine CASENOBE, le second par l'Adjudant Pierre VILLEY.
Translation
September 8th 1939 : the French wing SPA 160 "red devils" shoot down the 2 first aerial victory of WWII. 2 me 109 ! the first by sgt Antoine CASENOBE, the second by adj Pierre VILLEY.
It must be noted that in the beginning of the war the French Air Force was small but composed of exceptionnals fighter pilots ! they managed to shoot down more than 1000 german planes in a few weeks ! the political inefficencies are the reason of our demise !!!!!!!!!
but the valiant fighter pilots managed to weaken the LUFTWAFFE enough for lifting some pressure for the RAF a few weeks later !
i am still amazed at this story !
Philippe
1/18 mirage 2000 & RAFALE should i say more ?
-
pickelhaube
- Officer - Brigadier General
- Posts: 9706
- Joined: Mon Jan 22, 2007 5:52 am
- Location: New Orleans
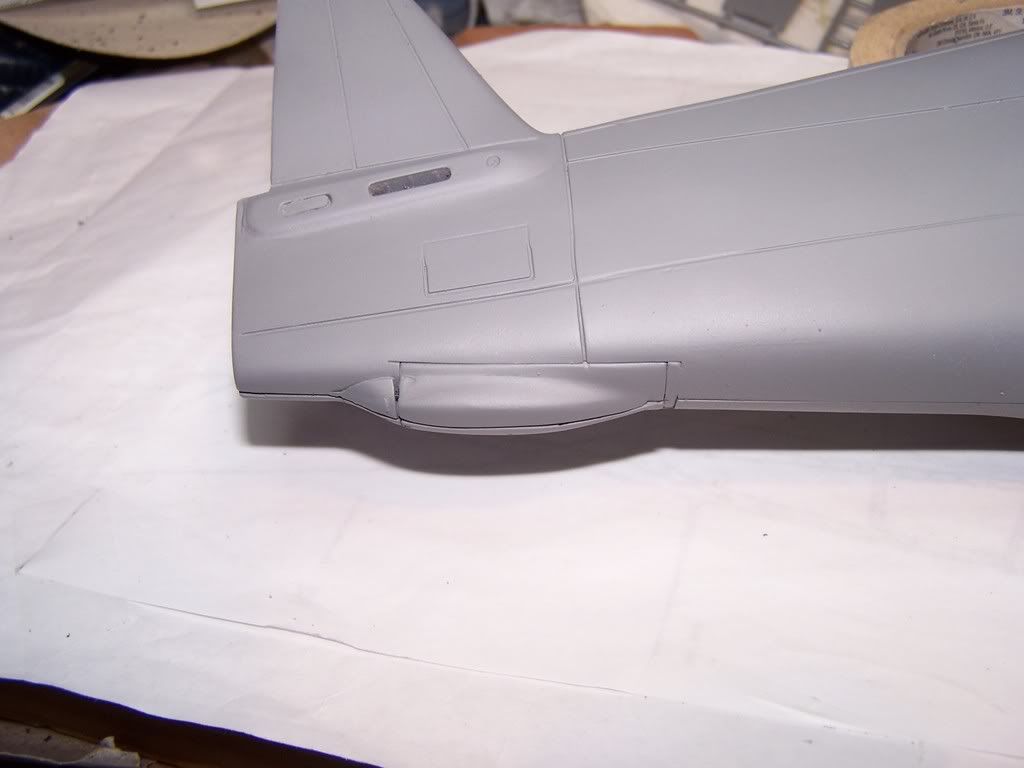
I am almost done with the panel lines. I am using the plastic tape from those lable makers that punch a lettler threw the plastic. I got the idea from the Osprey book Modeling the Wildcat. Somebody also submitted the idea in last month's Fine Scale Modeller. It works real good. This is one step that should not be rushed. I took my time and have quite a few slips. This can be taken care of. But it is a lot easier if you don't have any.
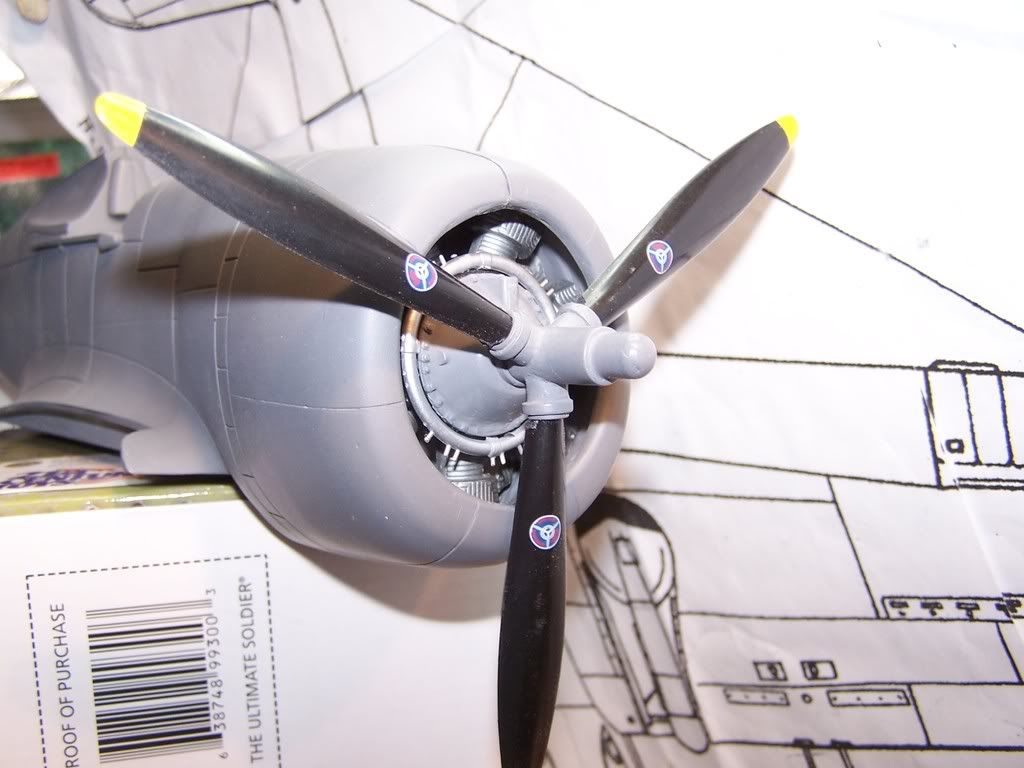
Here is the start of the exaust flaps and the redone motor hub.
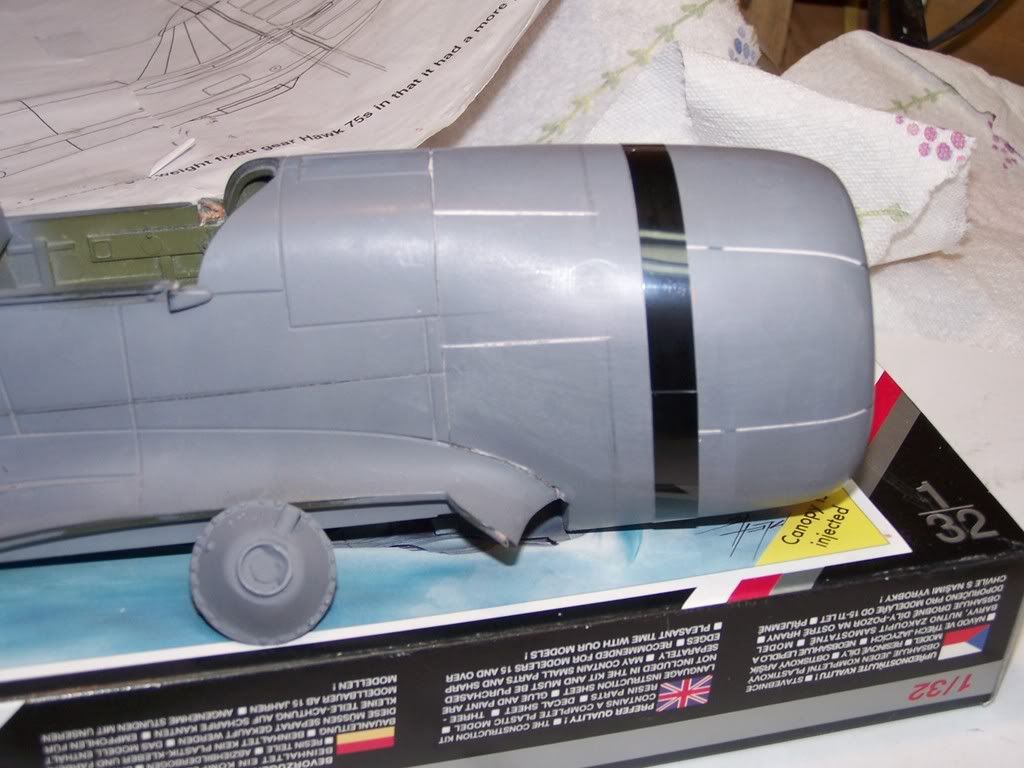
Scribing of the exaust flaps almost done.
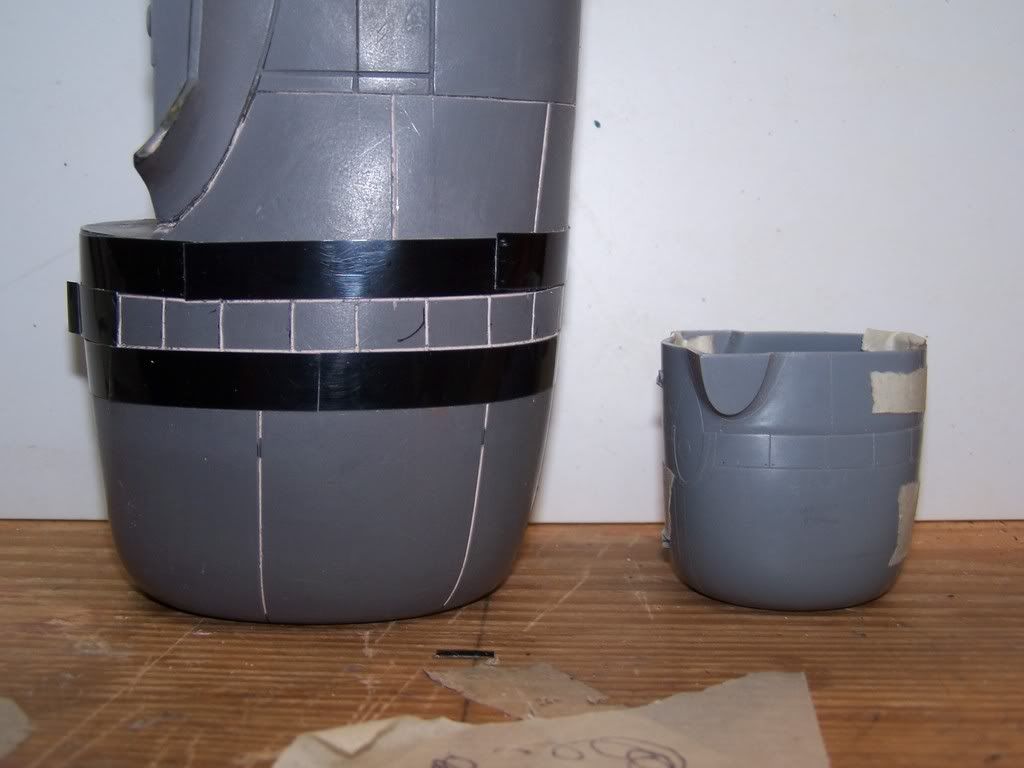
Finished with a coat of primer. After paint dries time for touch ups.
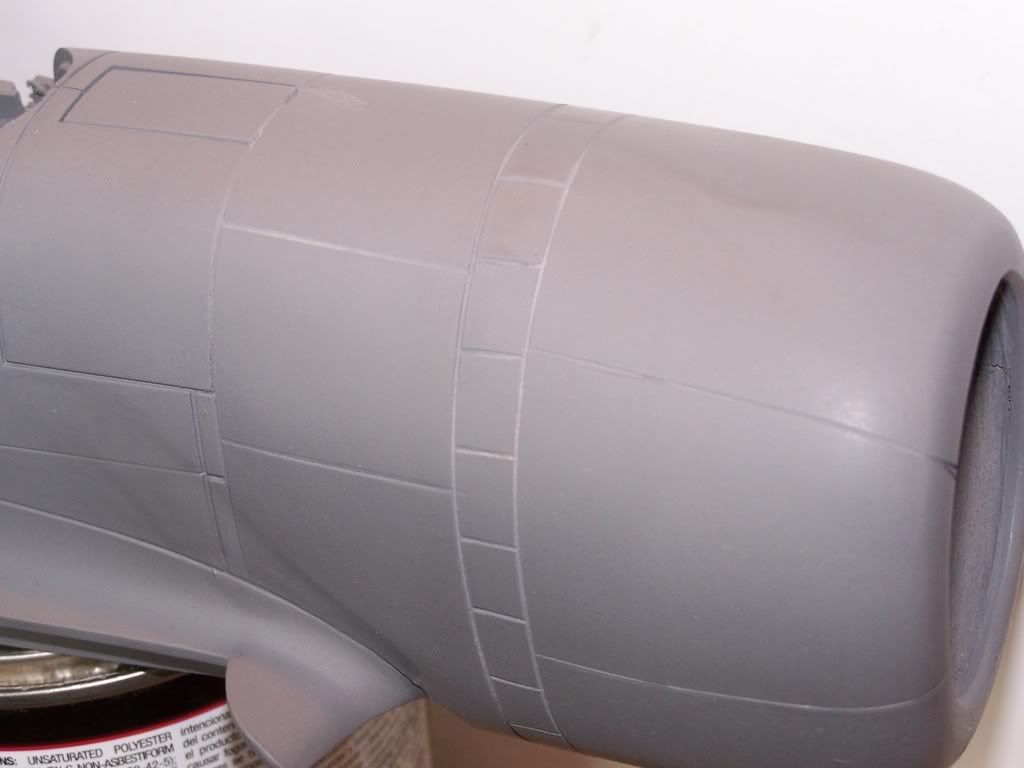
Things are back on track. I am waiting for some thick plastic to vacuform wheel pants (coverings). I will make 2 sets like I said before a set in the clsoed position and those in the down position.
Here is the start of the exaust flaps and the redone motor hub.
Scribing of the exaust flaps almost done.
Finished with a coat of primer. After paint dries time for touch ups.
Things are back on track. I am waiting for some thick plastic to vacuform wheel pants (coverings). I will make 2 sets like I said before a set in the clsoed position and those in the down position.
Kirk Douglas : Mine hit the ground first
John Wayne : Mine was taller
John Wayne : Mine was taller

Looks really good so far brother!!!  I have enjoyed watching this one come along!!!! I just wanted to know what color and markings are you going to put on it when you are done???Keep up the good work!!!---RED---
[size=150][/size]"Take your time.Stay away from the easy going.Never go the same way twice."---GySgt Charles C. Arndt on patrolling on Guadalcanal,1942[color=#BF0000][/color]
-
USCGSARdog
- Officer - 1st Lieutenant
- Posts: 619
- Joined: Mon Oct 04, 2004 6:42 pm
- Location: Richmond, VA
Yeah man, looks great! Glad to see things are back on track.
BTW, what are you you using to scribe the plastic? I have a Squadron scribing tool but the lines it cuts seem a bit undersized for 1/18 scale. I think its geared more towards smaller scales.
-Rob
BTW, what are you you using to scribe the plastic? I have a Squadron scribing tool but the lines it cuts seem a bit undersized for 1/18 scale. I think its geared more towards smaller scales.
-Rob
_______________________________
"You have to go out, but you don't have to come back".
"You have to go out, but you don't have to come back".
-
pickelhaube
- Officer - Brigadier General
- Posts: 9706
- Joined: Mon Jan 22, 2007 5:52 am
- Location: New Orleans
Hey Red I have given this much thought and I will do a natural aluminum paint of the guy at Pearl Harbor who shot down the first Japanese plane of that assult. The second one I will do will be the First French kill of WW2. I think it was a Me -109. When the Germans first invaded France causing the world to fall into the Second World War the P-36 was on the front line to defend freedom. This plane was very busy at the start of the war.I will do a third version with the screaming Indian on the side.
Hey Coast Guard I use the squadron scriber as well. I scribe it 7 times and I come back with a thin V shaped file to enlarge the line. This works OK but my lines are not as heavy as the 21st. But they look close enough. If they made one that had a thicker cut it would make things much more easier.
Hey Coast Guard I use the squadron scriber as well. I scribe it 7 times and I come back with a thin V shaped file to enlarge the line. This works OK but my lines are not as heavy as the 21st. But they look close enough. If they made one that had a thicker cut it would make things much more easier.
Kirk Douglas : Mine hit the ground first
John Wayne : Mine was taller
John Wayne : Mine was taller
-
pickelhaube
- Officer - Brigadier General
- Posts: 9706
- Joined: Mon Jan 22, 2007 5:52 am
- Location: New Orleans
I decided to go ahead and fix the rear stab.

Here I have the engine mounted. It looks cool to me. Almost like progress.
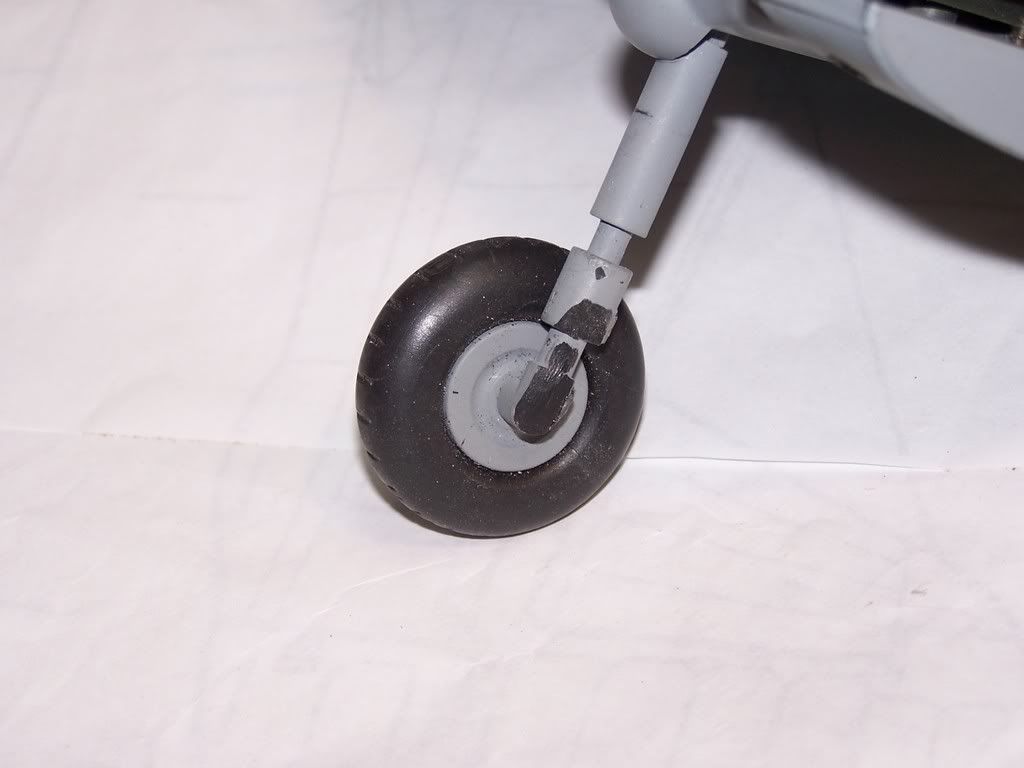
Here is the rear tail wheel fairing reworked.
I took the short cut and just built up the tear drop stream lined fairing. The p-40 tail wheel swings out and the P-36 gear kind of telescopes out. This would have been REAL hard to replicate. So here is the end result looks real good in the up positon so-so in the down. If we can live with the canopy the way it is we can live with this set up.
Here I have the engine mounted. It looks cool to me. Almost like progress.
Here is the rear tail wheel fairing reworked.
I took the short cut and just built up the tear drop stream lined fairing. The p-40 tail wheel swings out and the P-36 gear kind of telescopes out. This would have been REAL hard to replicate. So here is the end result looks real good in the up positon so-so in the down. If we can live with the canopy the way it is we can live with this set up.
Last edited by pickelhaube on Sun Apr 20, 2008 6:52 pm, edited 1 time in total.
Kirk Douglas : Mine hit the ground first
John Wayne : Mine was taller
John Wayne : Mine was taller
-
pickelhaube
- Officer - Brigadier General
- Posts: 9706
- Joined: Mon Jan 22, 2007 5:52 am
- Location: New Orleans
Alright guys back on the landing gear. This is the strut you have to do a little work to accept the wheel pants. I also cut off the shocks . These probably could have been left on but I just cut them to get them out of the way.
Here is the wheel well . I put some small chanels in there to center the tire and hold it down. Both sides. The 21st design holding the strut in place kept on sprining up. Interfering with the cover , so by intalling these channels it holds the leg down. Also there was some nipping and tucking to take care of the old original door hinges.
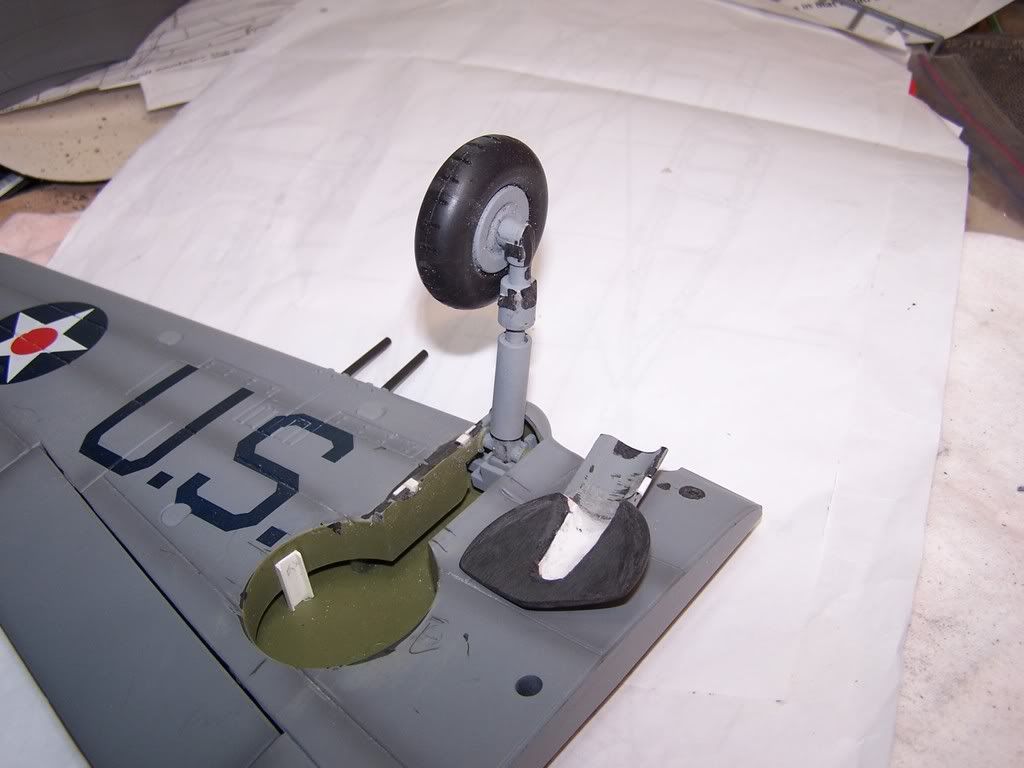
I have finished with the wheel pants. I am waiting for some more RTV to come in. So I can make a master of the pants before I cut them up to make the struts in the UP position.
I have made molds for the rudder, stabs and engine. I need to make molds for the whole fuse, wheel pants and I am going to try to make a mold of the prop hub and prop all in one unit. I will also make molds of the machine guns and exaust fairing. Thes are done. I will try to post them tommmow.
This project is getting real close.
Things left to do,
1. Those confounded rear windows.
2. Finish the landing gear.
3. Make molds.
4. Paint.
5. Take a break.
Here is the wheel well . I put some small chanels in there to center the tire and hold it down. Both sides. The 21st design holding the strut in place kept on sprining up. Interfering with the cover , so by intalling these channels it holds the leg down. Also there was some nipping and tucking to take care of the old original door hinges.
I have finished with the wheel pants. I am waiting for some more RTV to come in. So I can make a master of the pants before I cut them up to make the struts in the UP position.
I have made molds for the rudder, stabs and engine. I need to make molds for the whole fuse, wheel pants and I am going to try to make a mold of the prop hub and prop all in one unit. I will also make molds of the machine guns and exaust fairing. Thes are done. I will try to post them tommmow.
This project is getting real close.
Things left to do,
1. Those confounded rear windows.
2. Finish the landing gear.
3. Make molds.
4. Paint.
5. Take a break.
Kirk Douglas : Mine hit the ground first
John Wayne : Mine was taller
John Wayne : Mine was taller

-
pickelhaube
- Officer - Brigadier General
- Posts: 9706
- Joined: Mon Jan 22, 2007 5:52 am
- Location: New Orleans
It looks like there are a few of you guys left AAE83 and Super Sonic FI FI. Anybody still with me ? Or have you guys given up? I am so close to finishing the build I can taste. So far it has been fun and has kept me busy. This started off as a simple build ( at least I thought it was going to be) and progressed into something a tad complex. Will there be any of you guys who will do this project or seeing what is involved will you all leave it alone?
Matthew
Matthew
Kirk Douglas : Mine hit the ground first
John Wayne : Mine was taller
John Wayne : Mine was taller
-
olifant
- Officer - Brigadier General
- Posts: 2537
- Joined: Fri Jan 14, 2005 2:51 am
- Location: 1, USA, Olympia, Washington
I am with you PH! I am like seeing the progress and am amazed that you have kept hammering at this custom. Best will be when you have photos of the completed bird! 
[url=http://imageshack.us][img]http://img375.imageshack.us/img375/5374/sshqvdjx0.jpg[/img][/url]
[url=http://g.imageshack.us/g.php?h=375&i=sshqvdjx0.jpg][img]http://img375.imageshack.us/img375/5374/sshqvdjx0.937d18e174.jpg[/img][/url]
[url=http://g.imageshack.us/g.php?h=375&i=sshqvdjx0.jpg][img]http://img375.imageshack.us/img375/5374/sshqvdjx0.937d18e174.jpg[/img][/url]
I've been watching all along and your progress on this custom is great. I have a feeling it is going to look fantastic when you get finished. This isn't a custom I had thought about doing, but that is mainly because the P-36/40 family isn't one of my favorite planes. That being said, the lengths you have gone to on this conversion are more than I have ever attempted. The quality of your work is great and I can't wait to see the finished product.
-
pickelhaube
- Officer - Brigadier General
- Posts: 9706
- Joined: Mon Jan 22, 2007 5:52 am
- Location: New Orleans
Thanks Killer 66. What do you think of the step by step was it too long and drawn out?
I just got the box with more RTV in today so I will be making molds of everything. I have never made a cast as something as large as the fuse. But I will give it the ole Cajun try. I am not really Cajun I just thought I will throw that in.
I just got the box with more RTV in today so I will be making molds of everything. I have never made a cast as something as large as the fuse. But I will give it the ole Cajun try. I am not really Cajun I just thought I will throw that in.
Kirk Douglas : Mine hit the ground first
John Wayne : Mine was taller
John Wayne : Mine was taller