Thanks for keeping us up to date PH.
P-36A Curtiss step by step build is done !!!! 5-7-08
-
olifant
- Officer - Brigadier General

- Posts: 2537
- Joined: Fri Jan 14, 2005 2:51 am
- Location: 1, USA, Olympia, Washington
I am still with you and this is looking good. Damn good in fact!  If it wasn't for my 10 thumbs I would begin hacking away at my own collection!
Thanks for keeping us up to date PH.
Thanks for keeping us up to date PH.
[url=http://imageshack.us][img]http://img375.imageshack.us/img375/5374/sshqvdjx0.jpg[/img][/url]
[url=http://g.imageshack.us/g.php?h=375&i=sshqvdjx0.jpg][img]http://img375.imageshack.us/img375/5374/sshqvdjx0.937d18e174.jpg[/img][/url]
[url=http://g.imageshack.us/g.php?h=375&i=sshqvdjx0.jpg][img]http://img375.imageshack.us/img375/5374/sshqvdjx0.937d18e174.jpg[/img][/url]
-
ChairmanMilo
- Officer - 1st Lieutenant

- Posts: 561
- Joined: Thu May 03, 2007 4:37 pm
- Location: Toronto
-
pickelhaube
- Officer - Brigadier General
- Posts: 9646
- Joined: Mon Jan 22, 2007 5:52 am
- Location: New Orleans

-
pickelhaube
- Officer - Brigadier General
- Posts: 9646
- Joined: Mon Jan 22, 2007 5:52 am
- Location: New Orleans
Here is the first one that I will do. The first American to draw blood at the very beginning of WW2 at Pearl Harbor. They said that he was flying in his pajamasaae83 wrote:You're really capturing the look of the P-36, ph. Do you have a paint scheme in mind, or are you going to surprise us?
aae
Then I think that I will do a French one next. They had some cool camos as well as a cool looking Indian on the side of there planes. Or was that the US ? I am not sure , but Lair will . He will be making the decals for the second one. Probably the first one as well.

Thanks guys for all of the kind remarks . It does mean alot. Especially when so much work goes into these things.
This one was actually not that bad. I think that I have about 30 hrs into this custom and it was not as intense as the Tony. I have over 130 hrs into that one and I would guess that I have about 40 hrs left to get it done.
Kirk Douglas : Mine hit the ground first
John Wayne : Mine was taller

John Wayne : Mine was taller
-
pickelhaube
- Officer - Brigadier General
- Posts: 9646
- Joined: Mon Jan 22, 2007 5:52 am
- Location: New Orleans
Things that are left to do.
1. Rework the rear wheel covers. I made them in the shape of a cylinder but it is mre of a clam shell deal.
2. Scribe panel lines on the cowling and rework some on the rear fuse.
3. Make wheel covers.
4. Make cowling guns.
5, Make exaust fairings
6.Vacuform rear glass
7. Paint.
It seems that the list is getting longer not shorter.
Kirk Douglas : Mine hit the ground first
John Wayne : Mine was taller
John Wayne : Mine was taller
-
pickelhaube
- Officer - Brigadier General
- Posts: 9646
- Joined: Mon Jan 22, 2007 5:52 am
- Location: New Orleans
Actualy I have given this some thought but the fuse alone would have to be cut up so much to accept the modifications this could be unfeasable. The other option is for me to cast an entirely new fuse with the rudder rear glass and under wing fairing. This could be the kit but if I use the 21st original fuse and do my thing . We could have another Air Strike thing on our hands.1958Zelda wrote:Any chance you will sell a kit of this in the future?
Kirk Douglas : Mine hit the ground first
John Wayne : Mine was taller
John Wayne : Mine was taller
-
pickelhaube
- Officer - Brigadier General
- Posts: 9646
- Joined: Mon Jan 22, 2007 5:52 am
- Location: New Orleans
So far this project has been going smoothly. Except the landing gear doors I made one set already and they looked like garbage. Real toy like . It also was very hard to get a good looking circle out of the main wheel cover. So I cut plastic drilled a hole and put it in a Dremal chuck. I was able to get a real good circle this way.
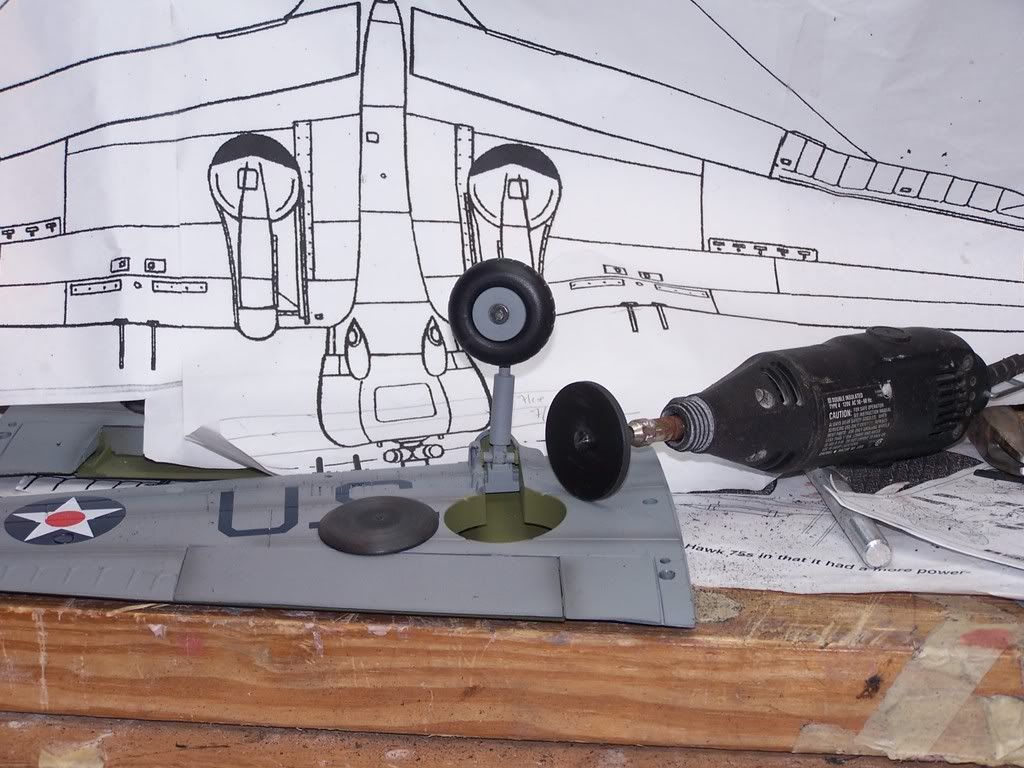
Looking at the model gear doors the Russian prints and a couple of pictures on the real bird this I have got the basis of how I am going to do this. I can't find any good close ups of the wheel covers. There are plenty of shots of the planes with the covers removed. So I put the discs back into the Dremal and have dished these. Then they will go back on the 1/18 and have got to be notched out to accept the gear struts as well as shaped to match the doors. Later a tear drop shape needs to be fabed to match the main strut doors.
The wing has got to be taken apart and gear removed to take out the spring that olds the gear in place. I will put a swivel rod to hold the gear in place kind of like the gear in the 21st F-104. It was a good thing that I did not start with the gear doors first in this project. Because it is such a pain in the A$$ it would have been shelved. But I am on my second set of doors and I am heading in the right direction.
These photos are the result of 8 hours of work 3 of those were for not.
View of the 1/32 model doors
Chucked in the Dremal and spun to shape
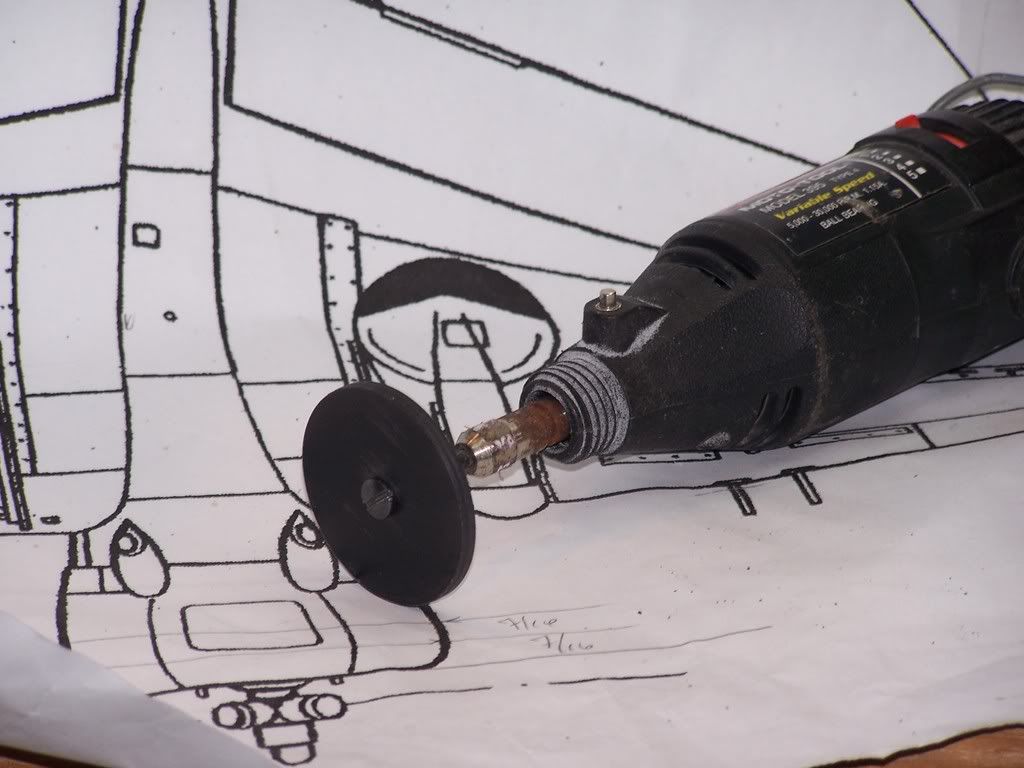
Finished disk dished eith another tured to shape.
Looking at the model gear doors the Russian prints and a couple of pictures on the real bird this I have got the basis of how I am going to do this. I can't find any good close ups of the wheel covers. There are plenty of shots of the planes with the covers removed. So I put the discs back into the Dremal and have dished these. Then they will go back on the 1/18 and have got to be notched out to accept the gear struts as well as shaped to match the doors. Later a tear drop shape needs to be fabed to match the main strut doors.
The wing has got to be taken apart and gear removed to take out the spring that olds the gear in place. I will put a swivel rod to hold the gear in place kind of like the gear in the 21st F-104. It was a good thing that I did not start with the gear doors first in this project. Because it is such a pain in the A$$ it would have been shelved. But I am on my second set of doors and I am heading in the right direction.
These photos are the result of 8 hours of work 3 of those were for not.
View of the 1/32 model doors
Chucked in the Dremal and spun to shape
Finished disk dished eith another tured to shape.
Kirk Douglas : Mine hit the ground first
John Wayne : Mine was taller
John Wayne : Mine was taller
-
pickelhaube
- Officer - Brigadier General
- Posts: 9646
- Joined: Mon Jan 22, 2007 5:52 am
- Location: New Orleans
The saga of the wheel covers continue. These wheel covers for the P-36 are somewhat complicated. They swivwe , they stay in place and they slide. The main wheel covers swivel with the wheel. The strut cover stays in place with the sturt and the top of the strut cover slides up onto the bump out on the leading edge of the wing. Believe me when I tell you this has been the hardest thing to do on this project. The front cowling was a walk in the park. I have already spent twice the time on the gear doors than the cowling. And I ain't done yet.
This is a true step by step on the progress. The doors are done but the movement and application is a slow process.
More pics.
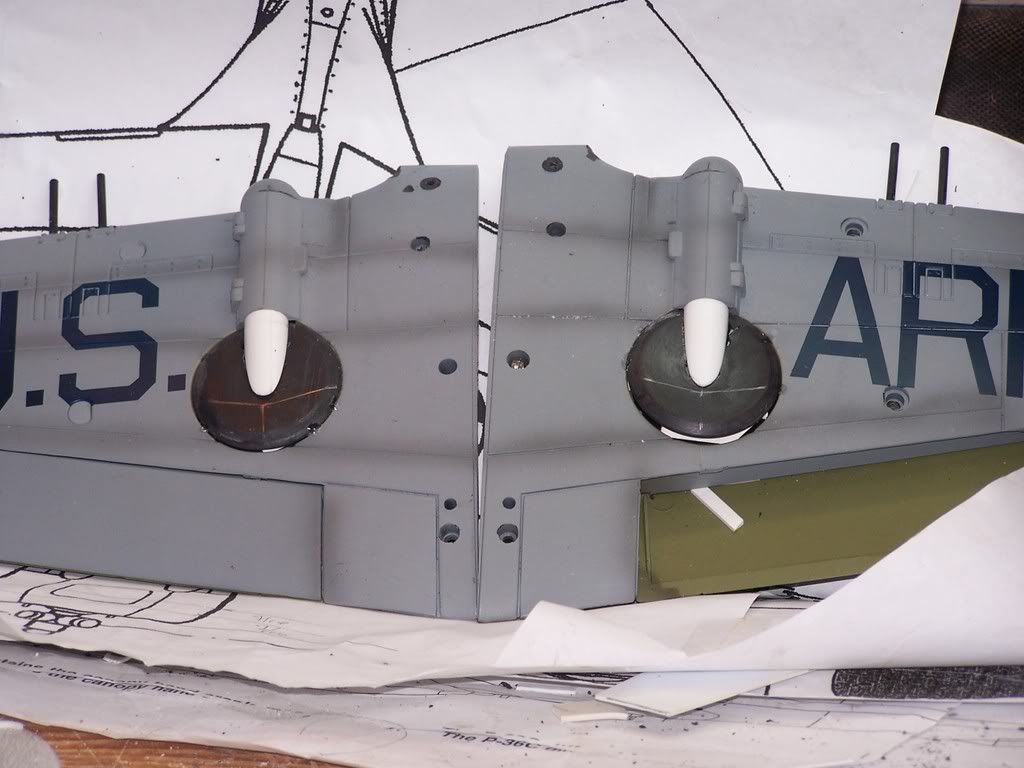
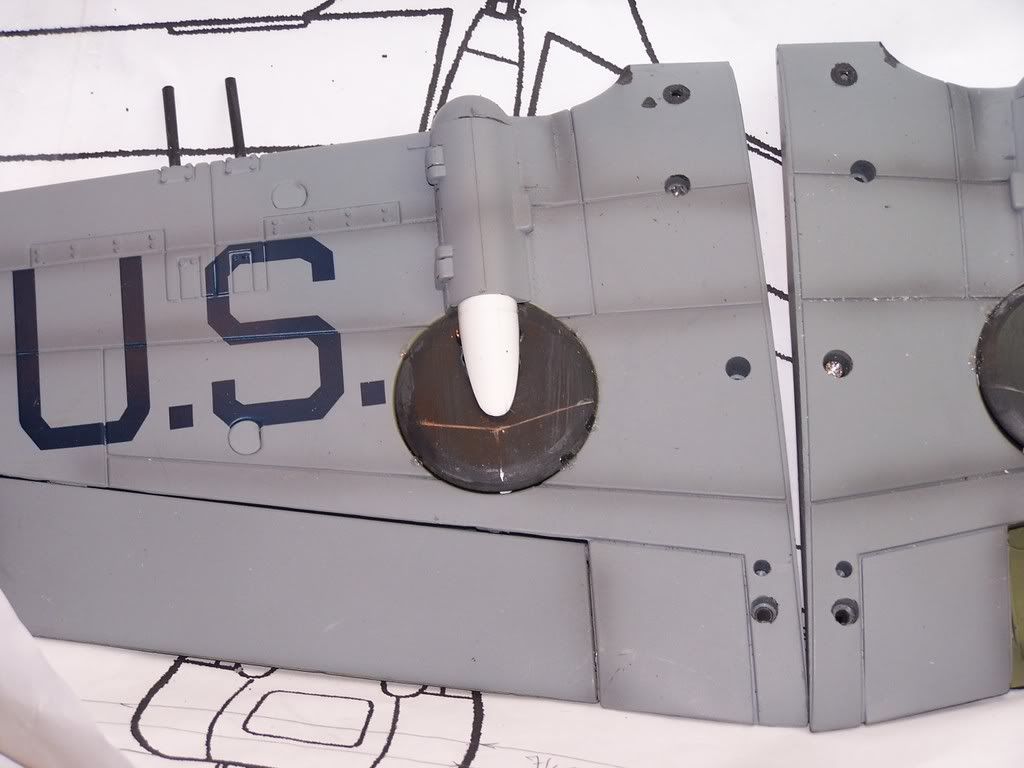

This is a true step by step on the progress. The doors are done but the movement and application is a slow process.
More pics.
Kirk Douglas : Mine hit the ground first
John Wayne : Mine was taller
John Wayne : Mine was taller
-
thehun
- Officer - 2nd Lieutenant

- Posts: 364
- Joined: Sun Oct 02, 2005 10:21 pm
- Location: Heart of Dixie (Mississippi)
Pickel,pickelhaube wrote:The saga of the wheel covers continue. These wheel covers for the P-36 are somewhat complicated. They swivwe , they stay in place and they slide. The main wheel covers swivel with the wheel. The strut cover stays in place with the sturt and the top of the strut cover slides up onto the bump out on the leading edge of the wing. Believe me when I tell you this has been the hardest thing to do on this project. The front cowling was a walk in the park. I have already spent twice the time on the gear doors than the cowling. And I ain't done yet.
This is a true step by step on the progress. The doors are done but the movement and application is a slow process.
More pics.
My hat is off to you-----You have the patience of a oyster
TheHun
-
pickelhaube
- Officer - Brigadier General
- Posts: 9646
- Joined: Mon Jan 22, 2007 5:52 am
- Location: New Orleans
Well guys I am stumped. I need some advice. The scale wheel covers are kicking my butt. In this drawing the first 2 drawings is as they should be. But this will be near impossible to do and function. The last two drawings are the simplified non scale way to do it. I can do the scale way but I will have to do 2 sets of covers one in the gear up positon one in the gear down position. That is a lot of work paw-paw. Any opinions ?

Kirk Douglas : Mine hit the ground first
John Wayne : Mine was taller
John Wayne : Mine was taller
-
supersonicfifi
- Officer - Colonel

- Posts: 1269
- Joined: Wed Jun 01, 2005 2:47 pm
- Location: FRANCE
go the easy way
GO the easy way : i can t wait to see it finished ! in FRENCH AIR FORCE finish !!!!
GOOD SHOW !
Philippe
GOOD SHOW !
Philippe
1/18 mirage 2000 & RAFALE should i say more ?
-
pickelhaube
- Officer - Brigadier General
- Posts: 9646
- Joined: Mon Jan 22, 2007 5:52 am
- Location: New Orleans
Hey John,aae83 wrote:Very impressive, ph! You're making great progress.
When you get there, what do you plan to use for an engine? (Sorry if you've posted this before...)
John
This is the engine step. THANKS TO MILITARY TOYS. KENT AND ISIAHA. We now have an engine for the project. I think that it came off of a Hellcat. This is a Pratt and whitney 2800 I think. We will make a Pratt and Whitney 1380 double wasp . This was about the most produced engine ever made for aicraft. I think that over 170,000 were built. The Hellcats engine will work with no problem. These are steps to make it work for the P-36.
You can sidestep all of this if you want to do a simple version. If you have the molding supplies you can simply make a mold of the 21st P-47 or Corsair. All you have to do is get the prop off spray some release agent on to the engine pour in mold making RTV let it set up pop it out and cast their simple engine.
Reworking the BBI Hellcat engine.
1. Take it off of the plane .OUCH !!!!!!!!
2. Cut the hub and piston rings apart. Take the ignition ring(silver ring) off.
3. There is a 3/8 inch tall ring on the last row of clinders. This has to be ground down to about an 1/8 because the piston rings were closer together.
4. The hub has 2 projections on the front of it. Keep the small one and sand off the big one. Bondo over the hole.
5. Repaint if it if you like.
Or just wait for me to make a cast of the thing myself


Kirk Douglas : Mine hit the ground first
John Wayne : Mine was taller
John Wayne : Mine was taller
-
pickelhaube
- Officer - Brigadier General
- Posts: 9646
- Joined: Mon Jan 22, 2007 5:52 am
- Location: New Orleans
Ok after looking at this all day this is how I am going to do the gear doors. I will use C and D . When the landing gear swings open the strut needs to hit the bump fairing. So when you close the gear there will be a space . So I am forced to make 2 sets of gear doors. Those in the open position and a pair in the closed. Sometimes the easy way is the hard way.pickelhaube wrote:Well guys I am stumped. I need some advice. The scale wheel covers are kicking my butt. In this drawing the first 2 drawings is as they should be. But this will be near impossible to do and function. The last two drawings are the simplified non scale way to do it. I can do the scale way but I will have to do 2 sets of covers one in the gear up positon one in the gear down position. That is a lot of work paw-paw. Any opinions ?
Kirk Douglas : Mine hit the ground first
John Wayne : Mine was taller
John Wayne : Mine was taller
-
pickelhaube
- Officer - Brigadier General
- Posts: 9646
- Joined: Mon Jan 22, 2007 5:52 am
- Location: New Orleans
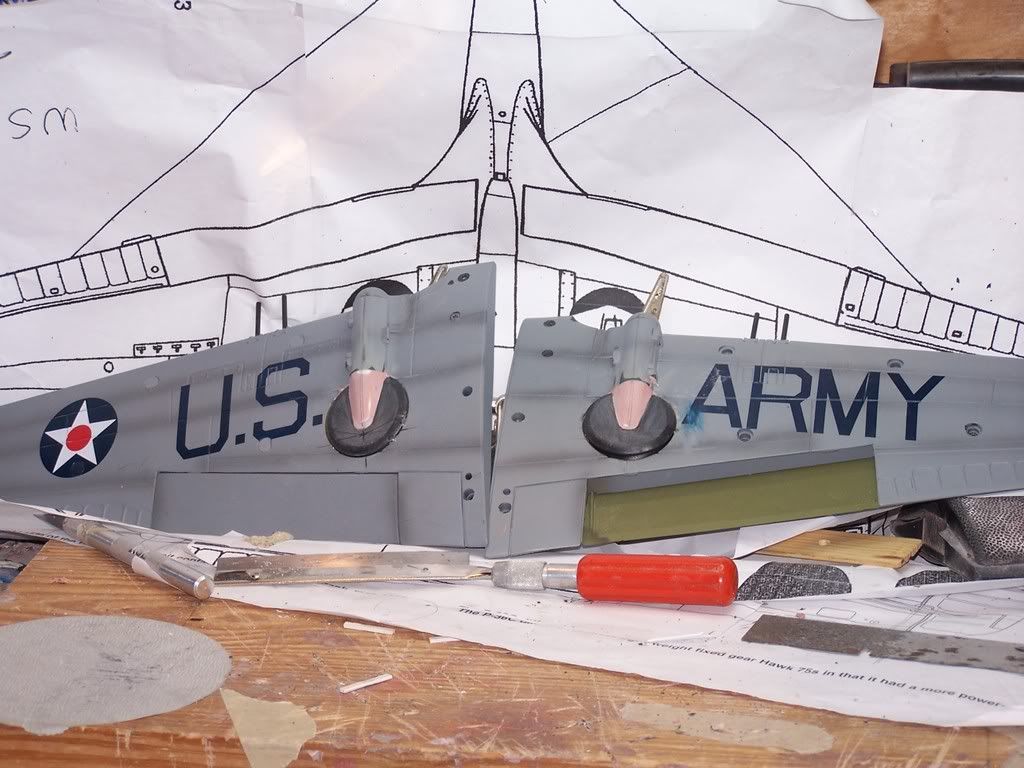
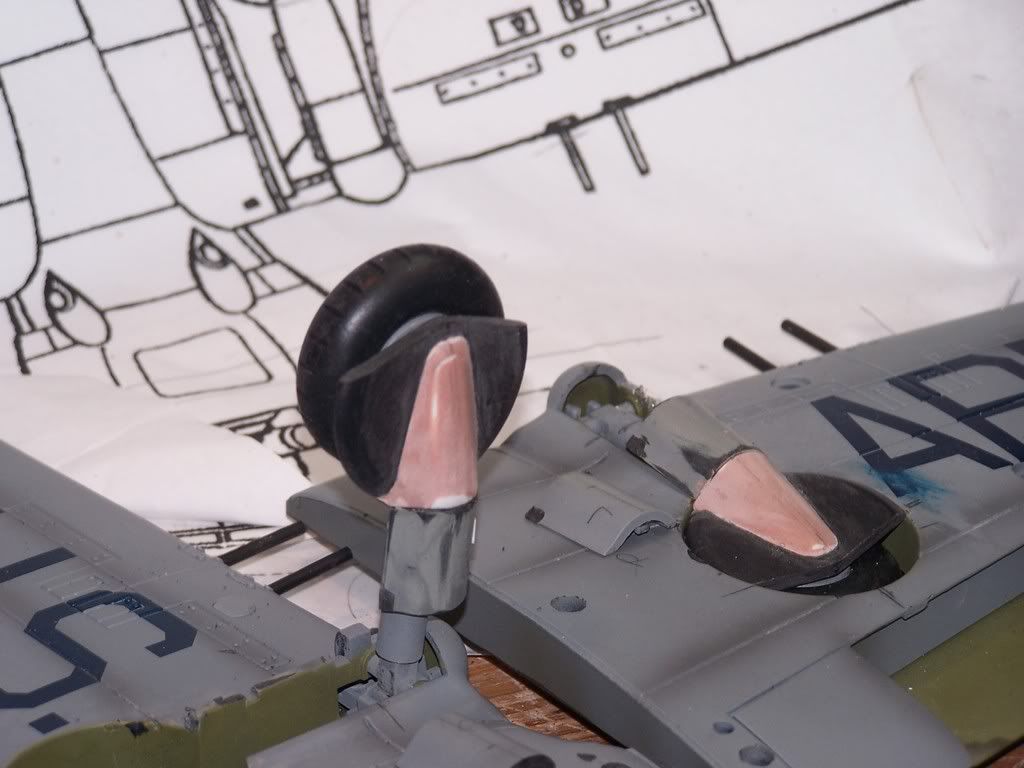
Things are moving ahead nicely. I skipped the landing gear  What a headache . I will get back to them later.
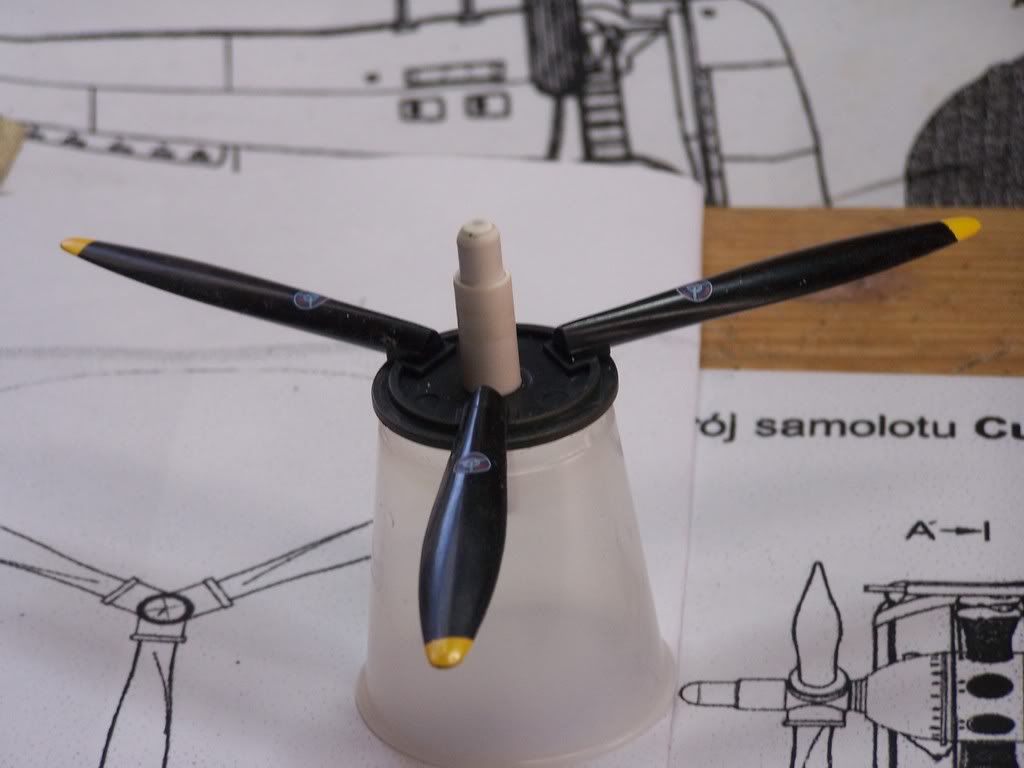
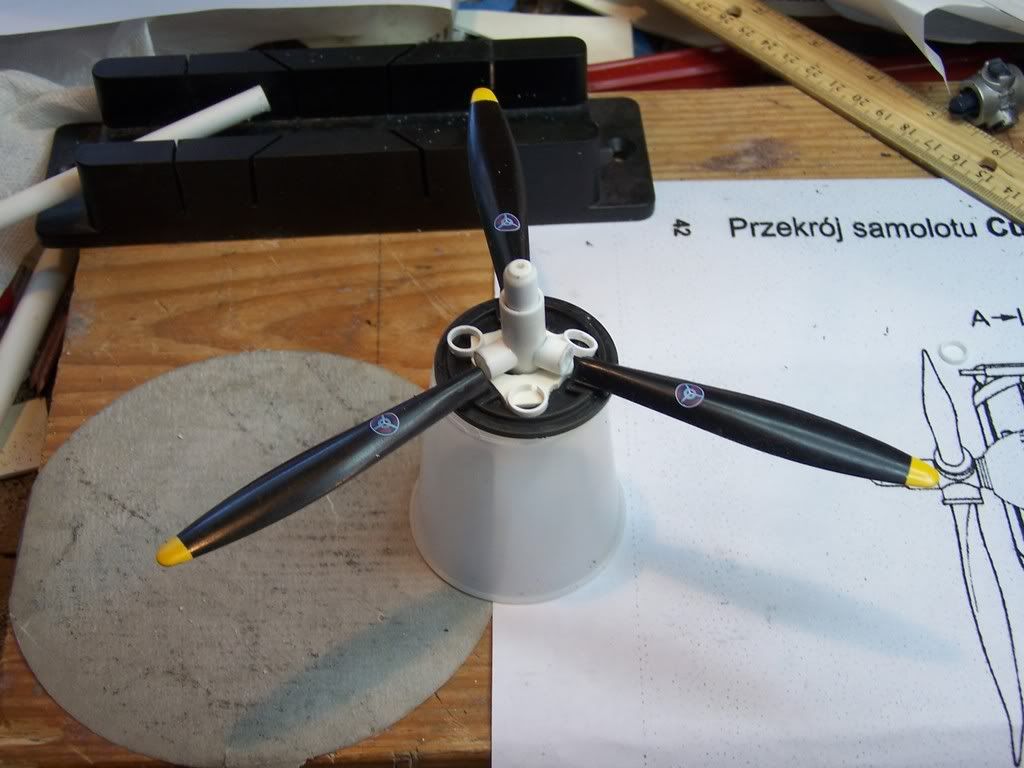
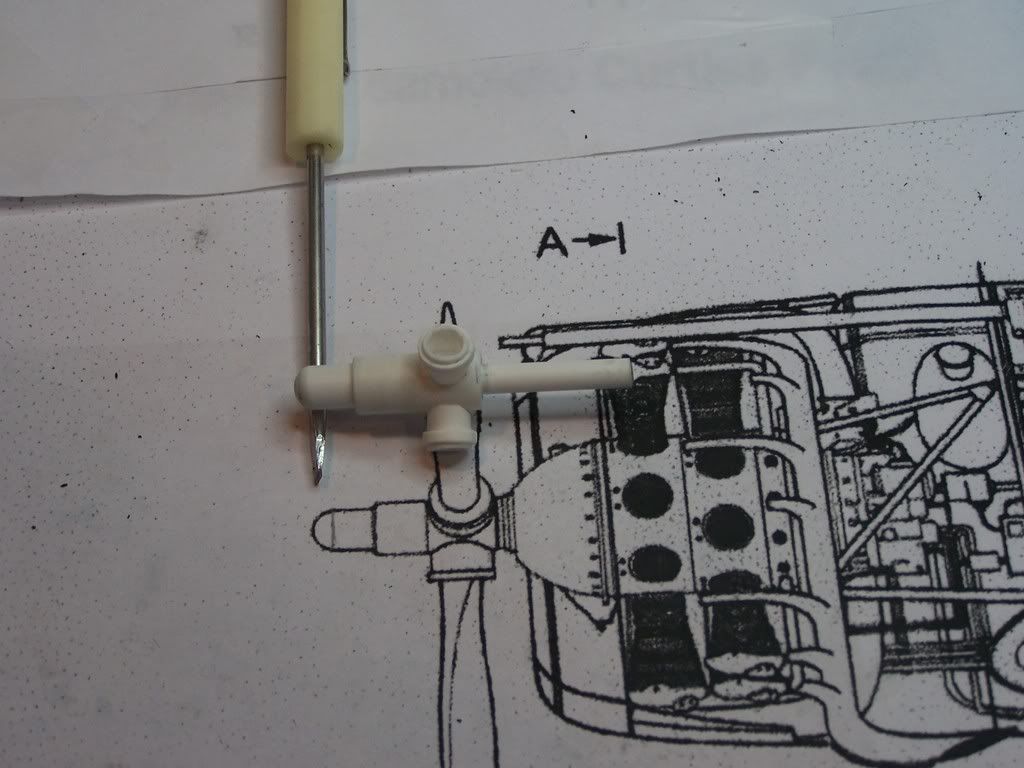
I could not use the Hellcat prop. It was all wrong so I decided to make my own from the P-40s'. This was actually easy to do. I have a bunch of styreen tubes of different sizes. That is all the prop hub is made of tubes.
I used a plastic dixie cup to make a stand. I used the back plate of the P-40's spinner as a guide to line up the stubs for the prop. It went real smooth. Some of the tubing was a little slopy. So if you wrap them with a little masking tape it takes the loseness up. I used CA glue to get everything bonded together.
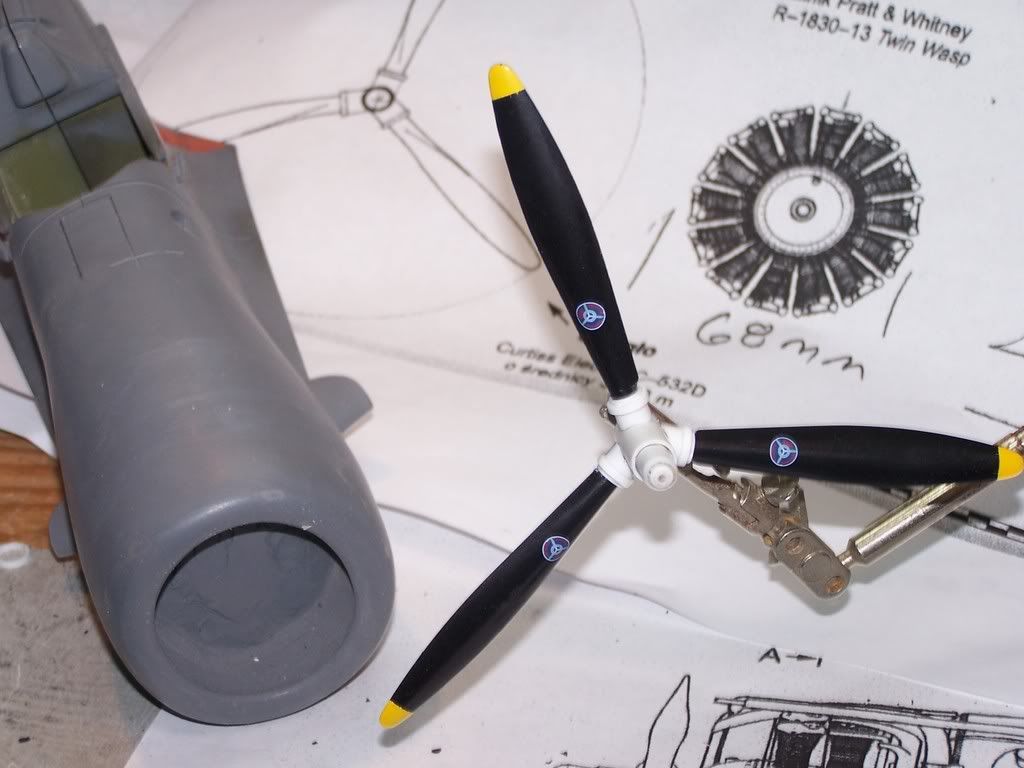
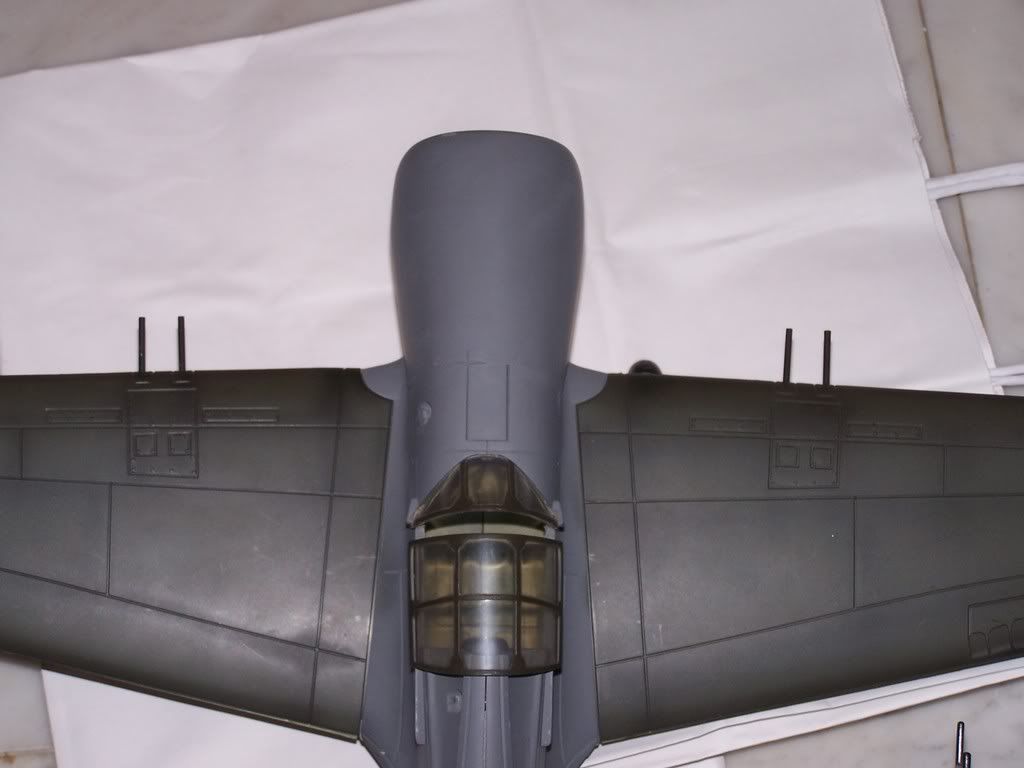
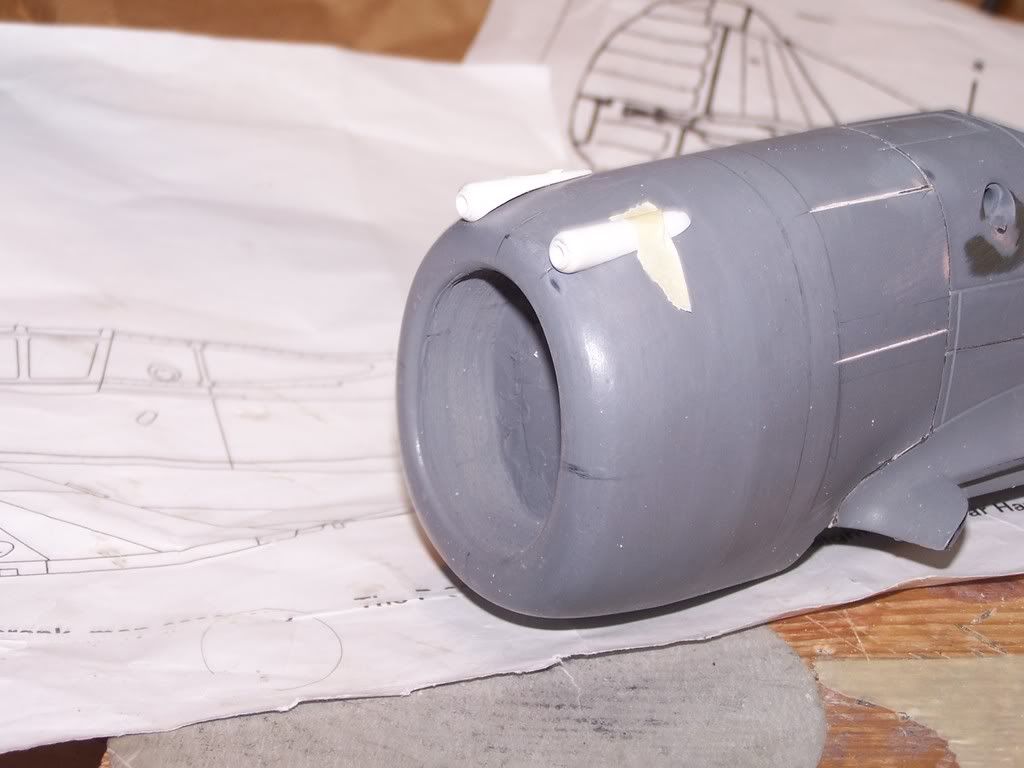
Here is a shot of the gun fairings on the cowling. I have some small tubing that will be used for the blast tubes. This will be done after the fairings are mounted permantly.
I have also started the panel lines.
I could not use the Hellcat prop. It was all wrong so I decided to make my own from the P-40s'. This was actually easy to do. I have a bunch of styreen tubes of different sizes. That is all the prop hub is made of tubes.
I used a plastic dixie cup to make a stand. I used the back plate of the P-40's spinner as a guide to line up the stubs for the prop. It went real smooth. Some of the tubing was a little slopy. So if you wrap them with a little masking tape it takes the loseness up. I used CA glue to get everything bonded together.
Here is a shot of the gun fairings on the cowling. I have some small tubing that will be used for the blast tubes. This will be done after the fairings are mounted permantly.
I have also started the panel lines.
Kirk Douglas : Mine hit the ground first
John Wayne : Mine was taller
John Wayne : Mine was taller
-
pickelhaube
- Officer - Brigadier General
- Posts: 9646
- Joined: Mon Jan 22, 2007 5:52 am
- Location: New Orleans
Thanks Killer F6.
I have been fiddling around with my son's vacuform machine. This is the newer one that has the heating element with a light bulb. It aint got enough juice. So I have won a 1960 Vac-u-form off of e-bay. You know the one were it burned your flesh so they took them off of the market. I have also ordered a update kit for it off of the web. With new multy holed warm plate and updated pump kit . They also have 3 mil clear plastic sheets. They say this is as thick as a credit card! This will get me were I have to go on those rear glass panels. This vac-u-form will also be used for the Ki-61.
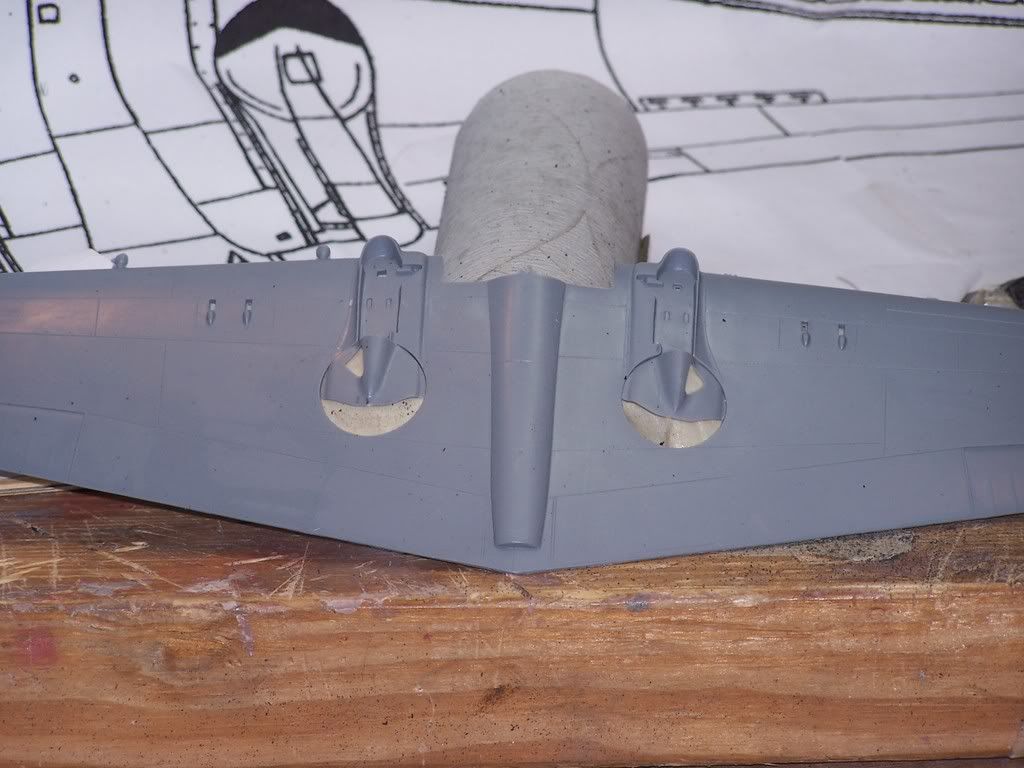
The rear glass is the only thing really left to do on this except paint. Other than a few more panel lines. The one main problem that I have left is the rear tail wheel fairing. I made the doors in shape of a cylinder. They look real good. BUUUUTTTTTTT. They are wrong for the P-36a and right for the P-75. The P-36a's doors should be rounder more of a tear drop shape. I will throw this out to you guys .
Should I change it or let it go as is ?
I have been fiddling around with my son's vacuform machine. This is the newer one that has the heating element with a light bulb. It aint got enough juice. So I have won a 1960 Vac-u-form off of e-bay. You know the one were it burned your flesh so they took them off of the market. I have also ordered a update kit for it off of the web. With new multy holed warm plate and updated pump kit . They also have 3 mil clear plastic sheets. They say this is as thick as a credit card! This will get me were I have to go on those rear glass panels. This vac-u-form will also be used for the Ki-61.
The rear glass is the only thing really left to do on this except paint. Other than a few more panel lines. The one main problem that I have left is the rear tail wheel fairing. I made the doors in shape of a cylinder. They look real good. BUUUUTTTTTTT. They are wrong for the P-36a and right for the P-75. The P-36a's doors should be rounder more of a tear drop shape. I will throw this out to you guys .
Should I change it or let it go as is ?
Last edited by pickelhaube on Tue Mar 25, 2008 6:35 pm, edited 1 time in total.
Kirk Douglas : Mine hit the ground first
John Wayne : Mine was taller
John Wayne : Mine was taller
-
Jay
- Officer - Lt. Colonel

- Posts: 1218
- Joined: Sun Jun 25, 2006 6:19 pm
- Location: Auckland, New Zealand
My opinion is change it. It appears (from the model kit box pictured) to basically be a small bubble on the under surface. You've come this far, so it would be a shame to miss out on an original rear end.
"you get in a steep dive in this thing and you've got almost no maneuvarabilty at all. You couldn't hit the broad side of a barn with the broad side of another barn"
-
AirstrikeToys
- Sergeant

- Posts: 121
- Joined: Sun Feb 17, 2008 9:29 am
- Location: Lewisville, TX, USA
- Contact:
I agree with Jay, you've done a great job so far, I'd keep it as accurate as possible.
Also, if the vacu-form for the canopy doesn't work out, you can also try Alumilite Clear. Since you're already casting, you have the rubber mold material but you'd have to pick up a pressure pot from them to do it right.
Keep up the good work!
Patrick
Also, if the vacu-form for the canopy doesn't work out, you can also try Alumilite Clear. Since you're already casting, you have the rubber mold material but you'd have to pick up a pressure pot from them to do it right.
Keep up the good work!
Patrick