Page 1 of 2
Huey XM-21 Armament System (WIP) Pictures- UPDATE 6/24/07
Posted: Mon Jan 01, 2007 6:05 pm
by Birddog
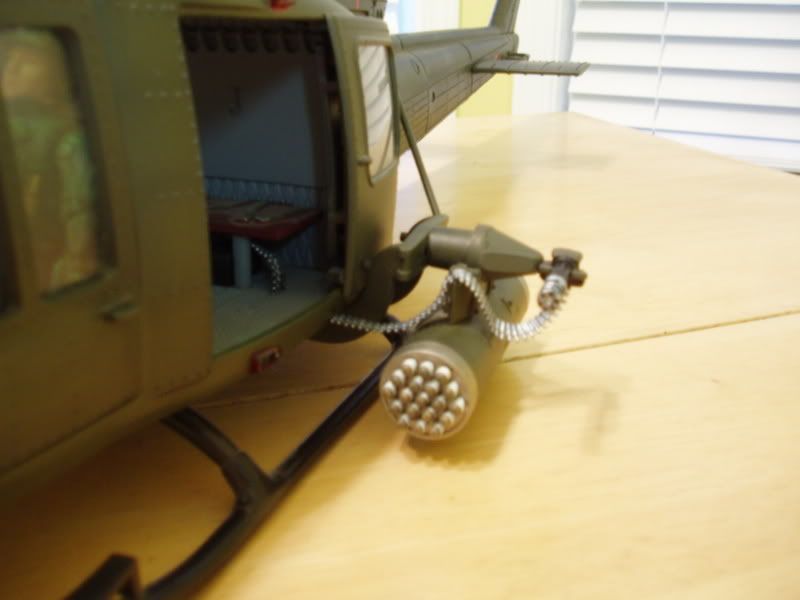
I've been gathering the materials and waiting for enough free time to attempt this project on one of my Hueys. Over the holidays I had enough time from work to sit down and work on it. I wanted one of my Hueys to be a bit more heavily armed so I decided to arm it with the XM-21 armament system. I'm currently working on the opposite side and I still have the ammo belts, ammo storage lockers and paint to add. I thought I'd post some
work in progress pictures of what I have done. I'll post more pictures as the project progresses. Sorry if some of the pictures are a little out of focus, my camera isn't the best at close up shots. I have tried to make it as accurate as my abilities and materials will allow. I'm sure it could use some improvement in areas, but I'm happy with it so far. If you have any suggestions, please let me know. Hope ya'll like it......(Unlike the other pieces in my collection this Huey needs dusting......

)......


Here is what I have used for the poject so far:
Materials:
Miniguns from GI Joe Road Block Spytroops x 2
Plastruct .040"/1.0mm Styrene Sheet
Plastruct .045 Styrene Round Rod
Estes Model Rocket Accessories NC-20 Nose Cones (the two smaller nose cones in the pack)
The tools:
Exacto Knife: Razor Blade, Saw Blade
Dremel Tool
Testors Model Glue
Testors Contour Putty
Sand Paper
Reference Material:
Squadron/Signal Publication UH-1 Huey Gunship Walk Around #36
xd
Posted: Mon Jan 01, 2007 6:12 pm
by kevrut
Cool.

Posted: Tue Jan 02, 2007 2:09 am
by steelbonnet
HAPPY NEW YEAR
Very nice

Ja
Steel Bonnet
looks good
Posted: Tue Jan 02, 2007 6:11 am
by jeffrowse
Nice work - can't wait to see the end result!
Posted: Tue Jan 02, 2007 6:05 pm
by kenhil2
looks good, one question though, is the door permanently stuck shut now?
Posted: Tue Jan 02, 2007 6:11 pm
by Birddog
Thanks guys for the kind words...
kenhil2 wrote:looks good, one question though, is the door permanently stuck shut now?
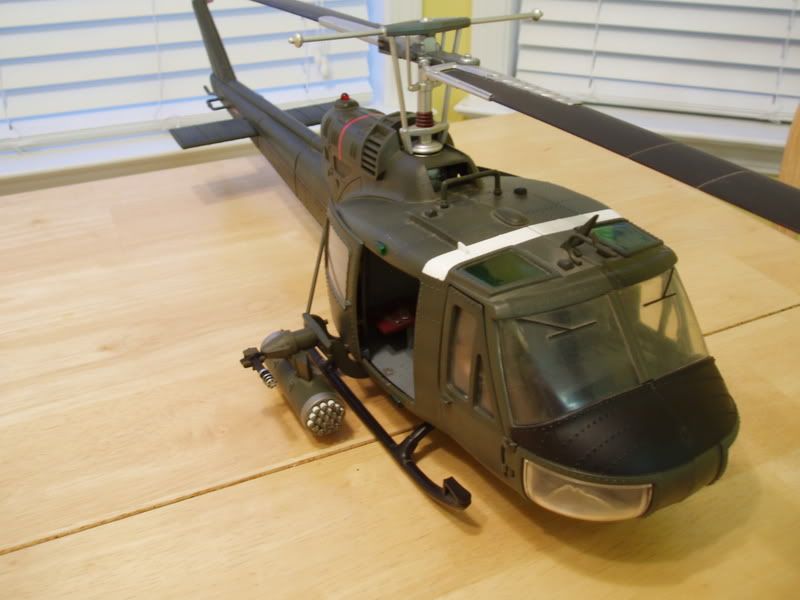
Nope...the door opens perfectly fine. I still have to add the ammo lockers under the bench and run the ammo belts through the fuselage and floor to them.
Posted: Wed Jan 03, 2007 1:05 pm
by RED
KICK-ASS!!!
Nice work!!!!

---RED---
Posted: Wed Jan 03, 2007 9:11 pm
by Birddog
Thanks RED!!
Here is a picture to show the doors will still be able to open:

Posted: Sat Jan 06, 2007 6:27 pm
by Birddog
xd
Posted: Sat Jan 06, 2007 8:04 pm
by kevrut
Look'n good!

Posted: Sun Jan 07, 2007 8:22 pm
by KAMIKAZE
Very cool Birddog!
Mark
Posted: Sun Jan 07, 2007 9:42 pm
by VMF115

Holy Crap that looks great!!!!!!!
Posted: Sun Jan 21, 2007 8:42 pm
by Birddog
Posted: Sun Jan 21, 2007 9:06 pm
by RED
HOTDAMN!!!!

---Looking good Sir!!!
---RED---
Posted: Mon May 07, 2007 6:31 pm
by Birddog
Thank you Red for your support!!
I finaly got to work on my Huey custom again and made some more progress. I added the minigun to the other side, added the braces to both sides, and added some more paint applications. I still have the ammo belt to add on the one side, finish the ammo lockers under the bench, and finish paint applications. Here are some pictures of the my recent work, hope you enjoy.
<a href="
http://photobucket.com" target="_blank"><img src="
http://i144.photobucket.com/albums/r191 ... stem28.jpg" border="0" alt="Photo Sharing and Video Hosting at Photobucket"></a>
<a href="
http://photobucket.com" target="_blank"><img src="
http://i144.photobucket.com/albums/r191 ... stem29.jpg" border="0" alt="Photo Sharing and Video Hosting at Photobucket"></a>
<a href="
http://photobucket.com" target="_blank"><img src="
http://i144.photobucket.com/albums/r191 ... stem30.jpg" border="0" alt="Photo Sharing and Video Hosting at Photobucket"></a>
<a href="
http://photobucket.com" target="_blank"><img src="
http://i144.photobucket.com/albums/r191 ... stem31.jpg" border="0" alt="Photo Sharing and Video Hosting at Photobucket"></a>
<a href="
http://photobucket.com" target="_blank"><img src="
http://i144.photobucket.com/albums/r191 ... stem32.jpg" border="0" alt="Photo Sharing and Video Hosting at Photobucket"></a>
<a href="
http://photobucket.com" target="_blank"><img src="
http://i144.photobucket.com/albums/r191 ... stem33.jpg" border="0" alt="Photo Sharing and Video Hosting at Photobucket"></a>
<a href="
http://photobucket.com" target="_blank"><img src="
http://i144.photobucket.com/albums/r191 ... stem34.jpg" border="0" alt="Photo Sharing and Video Hosting at Photobucket"></a>
<a href="
http://photobucket.com" target="_blank"><img src="
http://i144.photobucket.com/albums/r191 ... stem35.jpg" border="0" alt="Photo Sharing and Video Hosting at Photobucket"></a>
<a href="
http://photobucket.com" target="_blank"><img src="
http://i144.photobucket.com/albums/r191 ... stem36.jpg" border="0" alt="Photo Sharing and Video Hosting at Photobucket"></a>
Posted: Tue May 08, 2007 4:46 am
by Birddog
Thank you for the support Hawkeye.
Posted: Wed May 09, 2007 12:11 pm
by blaster_e11
[jaw dropping on the keyboard]
that's a sweet improvement of the huey's armament
Posted: Fri May 11, 2007 9:56 am
by ChairmanMilo
Wow, that is one Slick that I wouldn't want to mess with!
Great job, Birddog.
Posted: Fri May 11, 2007 2:06 pm
by pokeyjtc
Very nice work!
Posted: Fri May 11, 2007 7:25 pm
by Spudkopf
G'day Birddog
Can I ask what paint brand and colour you used to match the 21stCT colour?
Posted: Fri May 11, 2007 8:12 pm
by Birddog
Thank you blaster_11, ChairmaMilo, and pokeyjtc!!! I'm glad ya'll like it.
Spudkopf wrote:G'day Birddog
Can I ask what paint brand and colour you used to match the 21stCT colour?
You sure can...
I used
Testor's Model Master Acrylic Green Drab (#4727) straight out of the bottle. It's an almost perfect match and the difference looks fine with the weathered areas already on this particular Huey. I'm using the S1 Huey (Hog Head II). I still have a bit to do before it's finished...
Huey Weapons
Posted: Fri May 11, 2007 9:50 pm
by MiG29K
Birddog,
Thats some very clean, precise work you did with the ammo chutes/belts and clean paint work. Keep up the great skills. I know the next installment won't disappoint.
R
Posted: Fri May 11, 2007 10:25 pm
by VMF115
Bird Dog that is first rate work


