Page 1 of 2
DAK Bf-109 - Work in progress
Posted: Sat Sep 09, 2006 4:41 pm
by grunt1
Ok, here is the latest in my quest to customize everything that might have ever worn the DAK Afrika Braun colors.

The original (real) plane:

Progress so far:

I still need to attach some parts to make it flight worthy, weather it a bit and tune the base paintjob. Also debating on whether to remove the nose/wing blisters and the under wing guns which were not on the original.
xd
Posted: Sat Sep 09, 2006 4:50 pm
by kevrut
That really looks great! Good start.
Man, I wish I could do something like that.

Posted: Sat Sep 09, 2006 6:31 pm
by Jay
This is great, seeing all these german custom planes. My 2 cents worth of recommendations is take the blisters off, and go for an accurate look. Anyways - nice work!
Posted: Sat Sep 09, 2006 9:27 pm
by Moth
Is it me, or is that 109 fake?
It doesnt have MGs, it's filled in

Do you know what version it is? Because if it is a G-4/5/6 it should have the bumps on top.
If the 109 is fake, the bumps would most likey be removed along with the MGs.
Either way, remove the bumps on the wings (the cannon also)
Posted: Sat Sep 09, 2006 10:34 pm
by RED
Nice work on the paint job!!!!! Looks like it will work out real nice with the new DAK figs in a dio!!!!!Again great custom!!!!
---RED---
Posted: Sun Sep 10, 2006 12:10 am
by steelbonnet
Hey Grunt1,
Very Nice mate<very nice so far
I too say go for the removal of the nose blisters.
Looking forward to seeing this completed.
Ja
Steel Bonnet
Posted: Sun Sep 10, 2006 5:22 am
by grunt1
Thanks guys!
Yes, I was also suprised when I found the picture to see an early BF-109G in the desert scheme so I did some further investigation.
Turns out that Black 6 is real, still flying and has an extremely well documented history!
http://www.taphilo.com/photo/pictures/bf109/index.shtml
There is also a book about it called "Black 6".
Posted: Sun Sep 10, 2006 5:32 am
by steelbonnet
Hey Grunt1 if you have any or access to some of the Old German Propoganda magazines,there are some Great photos of Mess BF109s in Africa serving with the DAK.
One in particular (I`ll see if I can find the photo if interested) is a nicely camo`d Mess 109 that blends in really well with the land below for Allied planes to miss if they were flying above it.
Nice to see that you found some more out about the one your doing too
Ja
Steel Bonnet
Posted: Sun Sep 10, 2006 5:45 am
by Jay
Is this the one you were thinking of steelbonnet? Bf 109E-4 of I/JG 27 over the Libyan desert.

Posted: Mon Sep 11, 2006 4:51 am
by flpickupman
That is one sweet ass 109G! Very nice.
The newest G model that made it to North Africa was the G-2. These had neither the cowl blisters nor the underwing cannon.
Here's one example of a Tropical 109G-2

and another

TKO has said the 109G mold was designed with different variants in mind. If you look at the underwing pods and cowl blisters, you will see that they are indeed separate pieces, and not part of the fuselage/wing molds. If I was doing this custom, I would remove the pods/blisters. This, however, isn't my plane.

Posted: Tue Sep 12, 2006 8:57 am
by scope uk
very cool it looks really nice in desert colouring
Posted: Wed Sep 13, 2006 7:34 am
by Rogue
Do the extra work now while you can, you won't reget it.
Nice project, I need to do one too.
Since my father in law was there ( in NAfrica during Torch) working on P-40F's
He got close enough to a 109 to see the pilots blue eyes.

Posted: Wed Sep 13, 2006 9:23 am
by flpickupman
I just decided to turn my Seemann 109G-6 into a G-2. Step one was to gently pry one of the cowl blisters off. The one I pulled off required very little effort and came of pretty clean. This was due to there only being glue on the blister's tab. There might be glue all the way around the blister's edge, so your results may vary. I don't have a camera here but I'll try to describe it. Here's approximately what the slot in the cowl looks like. It should be easy enough to fill in.

The underwing cannon pods are held on by only two round tabs with a small amount of glue on the tabs themselves. I didn't see any glue along the edges of the pod. While the pod required more effort to pop off, it wasn't excessive and didn't cause any damage to the wing. The larger of the two holes is only about 1/8" in diameter, and the smaller about 3/32". They should be easy to fill as well.
The blisters on top of the wings are part of the mold, however, and beyond my ablities. This should be fun. Thanks for the inspiration!
Posted: Sat Jan 13, 2007 7:53 pm
by grunt1
Finally got around to moving this project forward..
Mixed up some paint for the lower fuselage that worked pretty well.
Also took off the engine blisters, wing ammo blisters and the under wing cannons (will soon be attached to a DAK Stuka..).
As FL indicated, the engine blisters and wing cannons pop off fairly easily.
The ammo blisters on the wings were the only ones that were actually part of the mold but those dremeled out nicely. Waiting for the squadron putty to dry now.


Posted: Sat Jan 13, 2007 8:02 pm
by chunks
Very nice, you'd actually hit on my favorite scheme.
Posted: Sun Jan 14, 2007 12:46 am
by Spudkopf
G'day Grunt
Good to see you that your going all out to alter the aircraft to a correct G2 state, just one point though the blisters in the wings are not ammo blisters but were to allow the thicker cord wheels of the I think the G4, 5 and 6 to fit into the wheel wells, the cord was increased again on the k models and this is why they have a blistered panel the runs the complete cord of the wing.
The engine cowl blisters were for the ammo feeds of the MGs however, this was necessary to allow the feeds to fit around the mountings of the new engines of the G4, G5, G6 and G14 models, again the Ks, G10 and G14AS had a further alteration to accommodate their even larger power plants.
Posted: Sun Jan 14, 2007 12:55 am
by chunks
Cool, then getting rid of it for the G2 still works!!
Posted: Sun Jan 14, 2007 1:20 am
by grunt1
Thank goodness..
Since I've already chopped her up..

Thanks for the detail spud!
Btw, if on the first photo I posted in this thread of the real G2, if I was able to get a closer shot of the nose art would you be able to do your magic on it?
Posted: Sun Jan 14, 2007 3:51 am
by Spudkopf
G'day Grunt
Remember to always check before you chop, anyway the wing blisters were actually introduced with the G3, one model before what I remembered, I went and checked.
The G2 pictured Black 6 was reportedly captured by Australian troops just a little trivia.
Now if what you are referring to as nose art is the Brown "RLM 26 " Rotring (oil) triangles, well I have already created these as they were used on my Stuka decal sheets (even though mine are a little more a red than brown due to the printer output) and I'd expect that they would be the same as those used on the Bf109 the Oxygen stencil for example should also be simular if not the same.
Heres a quick 10 minute stencil example I put together, all except the electrical inlet are artwork from the existing Stuka sheet.
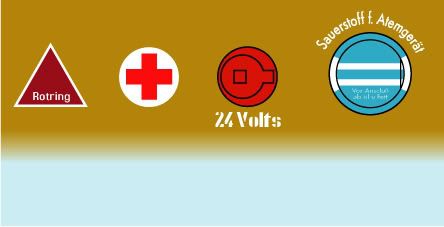
Let me know if this is what you are talking about.
As I'm going to be the owner of a Bf109G6 soon myself, I am contemplating working up some decals and stencils for this aircraft, however I still have to complete some F16 decals first and may also be working on some custom Avenger decals soon fore FieroDude.
Posted: Sun Jan 14, 2007 4:09 am
by Spudkopf
Now Grunt
Now that your going to all the trouble to convert your Bf109 to a G2 it would a shame to see you add the under wing cannons to your Ju87B.
Putting the guns on any Stuka let alone Ju87B

, well that might work for Hollywood or comics but I’d advise against it, instead you should get a pair of Bf109 drop tanks and convert your Stuka to a long range Ju87R model very much in use in Africa.
The 4 left over bombs could then all be used on a custom made multiple ejector rack which could be attached the centreline of your 109 for Jabo missions.
Much more historic, but hey that's just me
Posted: Sun Jan 14, 2007 8:37 am
by grunt1
Ok, first off your decal work (as always) is amazing..
As for the cannons, you are totally right. It wasn't until I had them removed from the 109 that I really thought about it. From the reference books I have they are clearly undersized.
Now the good news is even though the pods are undersized, the barrels are spot on for the MG 151/20s that replaced a lot of the MG17s.

Only question is whether or not those upgrades started in Afrika or later because the Stuka I am working on right now is also a DAK.
If that doesn't pan out research wise then the 87R is a great suggestion. (We must be looking at the same books).
Regarding pre-chop checking, I did that in this case (not always)..
Here is a sample of what I had to work with. Note that the nose art I was referring to was _not_ in the above photo as I mentioned. Sorry bout that!

But it _is_ in this first photo:


More here:
http://www.taphilo.com/Photo/Pictures/BF109/index.shtml
The 32x DAK 109 from 21st Century is also a nice reference.
No blisters..
Posted: Sun Jan 14, 2007 10:13 am
by tmanthegreat
Great work on that DAK Bf-109! For whatever reason I really like the 109 in desert tan and your model is doing it justice! I've seen the actual Bf-109G-2 you are using as a reference. If you ever get the chance to go to England, its currently on display at the RAF Museum at Hendon, which is a suburb just north of London. The museum is deffinitely worth a visit, especially for the rare British and German WWII aircraft they have on display
 I took this photo in March of 2005.
Posted: Sun Jan 14, 2007 12:26 pm
by Spudkopf
G'day Grunt
You are right in saying the Ju87 were armed with wing cannons but unfortunately it was not on the B or R models that the 21stCT example can represent.
The first cannon armed examples were the Ju87D5, the Ds had the redesigned engine cowl, canopy and landing gear spats. The spats had a fabric or leather section to allow for the compression movement of the landing gear oleo, which is evident in your image, some early D models retained the B/R spats but these were well a truly gone by the time of the D5 production.
Sorry to be bearer of bad news, but to make up for it I will check into my references for the unit emblem you seek.
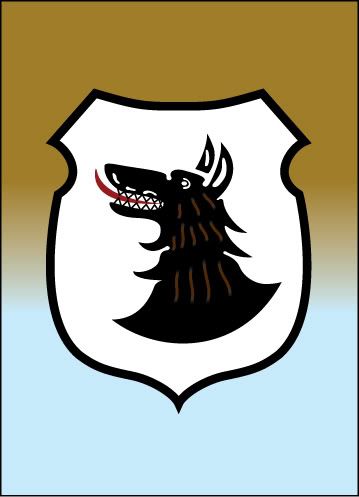
Bf. 109 Unit Badge
Posted: Sun Jan 14, 2007 1:42 pm
by Jackson
III./J.G. 77 from what I see of it.......
Posted: Sun Jan 14, 2007 3:18 pm
by Spudkopf
Yep Jackson is correct.
Here is one I just made but it is based on a Google searched item so I can not vouch for the accuracy, this would not be my first choice as a reference but it is all that I have access to at the moment.