Your skills are super and your step by step instructions are amazing.
If I may just point out about the Marsden PSP, in Vietnam, we used PSP which were new or at least unused before when we got our hands on it. This was in the 60's.
Besides the original use in WW2, of airfield repair, we used PSP, linked together as flooring sitting on sandbags to keep us up and out of the mud. We were stationed near Bein Hua Airbase and we "borrowed" truckloads of PSP by "midnight requisitions" from the Air Force to keep us out of the mud.
Very useful stuff.
TTT
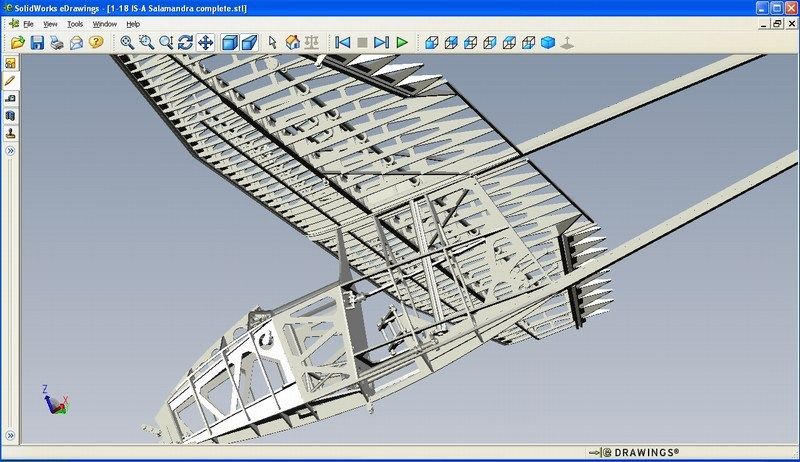
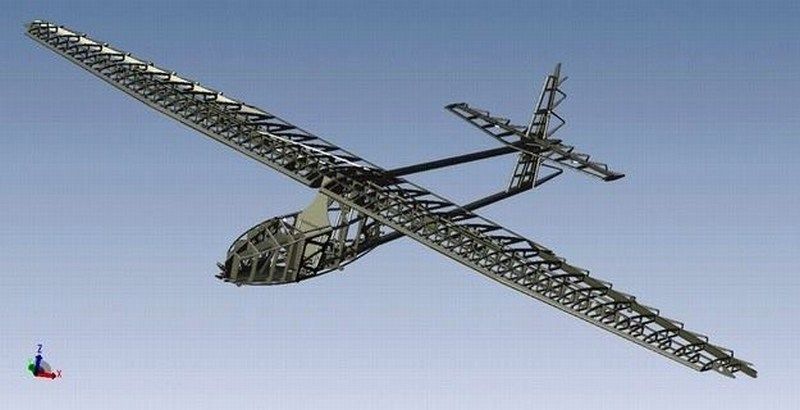
1/18 scale Instytucie Szybownictwa IS-A Salamandra scratch
-
Threetoughtrucks
- Officer - Brigadier General

- Posts: 5405
- Joined: Tue Oct 05, 2004 9:46 am
- Location: SOUTH JOISEY
- Contact:
Re: 1/18 scale Instytucie Szybownictwa IS-A Salamandra scrat
Sometimes I am the windshield, sometimes, I am the bug.
-
Nick_Karatzides
- Officer - 2nd Lieutenant

- Posts: 286
- Joined: Fri May 01, 2009 4:53 pm
- Location: Valley of Death
Re: 1/18 scale Instytucie Szybownictwa IS-A Salamandra scrat
CHAPTER IX - Anchor & tie down
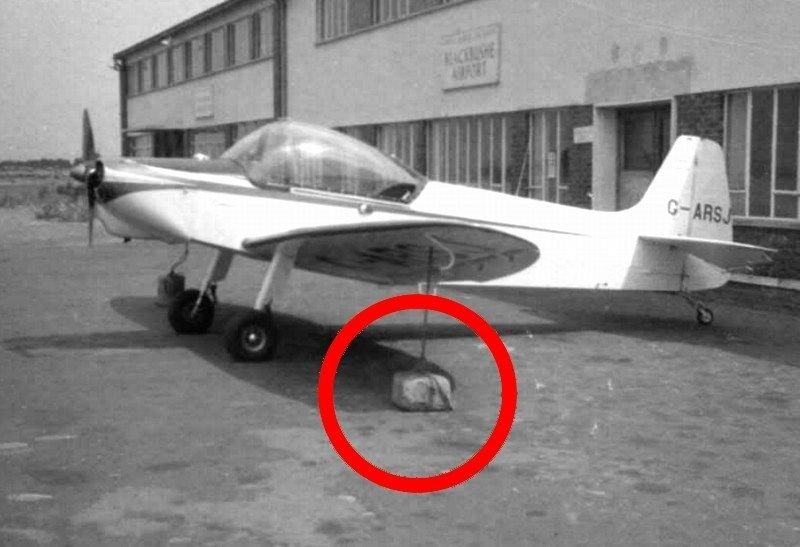
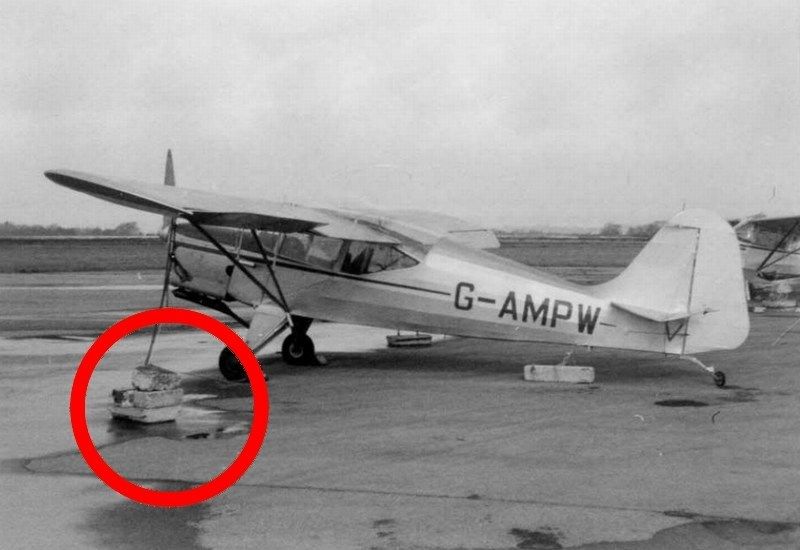
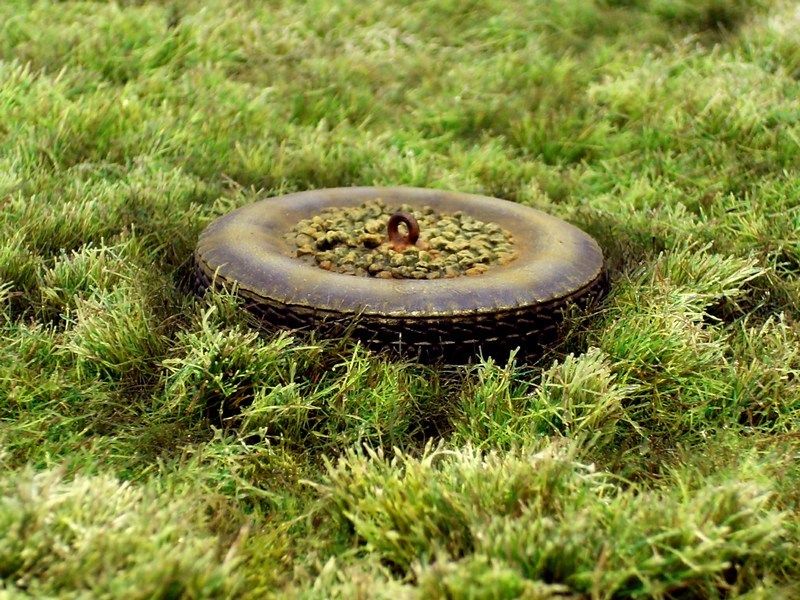
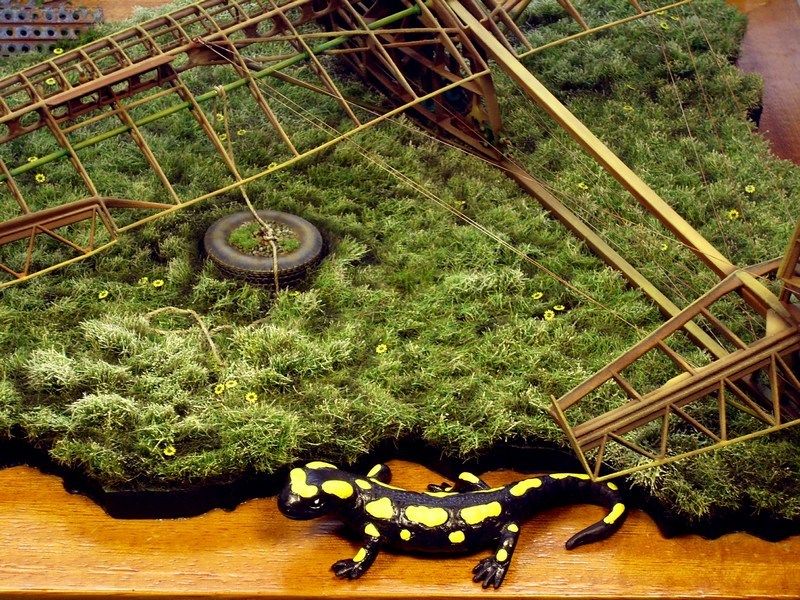
I 've noticed that pilots & airfield supporting personel, use a number of improvised anchors types, to tie down the gliders, ultralights or even single engine aircrafts such as Cessna 172s, especially when operating from some grass covered airfield, without any permanent anchorage points & lashing hoops installation on ground. These improvised anchors are made of concrete filled tires or cement block bricks also known as CMU - Concrete Masonry Units).

The tying is part of the checklist and therefore gliders, ultralights, gyrocopters etc, should remain tied and with wheel chocks instaled when grounded, because even the slightest breeze can cause to aircraft start rolling or flip the wings and hit wingtips on ground or worst. I've watched a video on YouTube, where a RAF's BAe Harrier GR.7 aircraft with no wheel chocks installed, began trundling because the wind gust, gone away from the apron and finally stopped on the grass, several meters away from the initial parking position. During this special "ride", the ground personnel just stood and watched the embarrassing view. Fortunately, no big damage caused that day, if we exclude some taxiway sign & the fence fell down and of course the groundcrew chief's pride. So, if this can happen on a mighty fighter jet that weighs 13 tons, why not also happen on a glider or an ultralight?
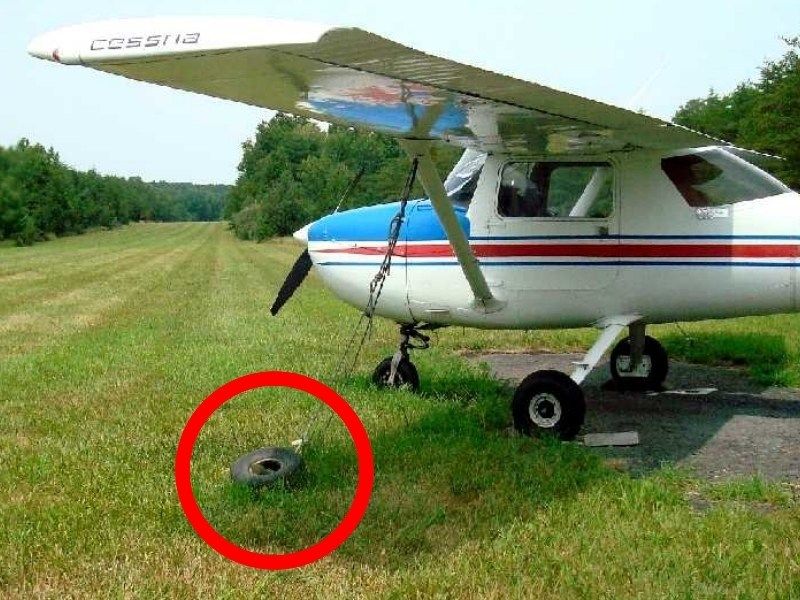
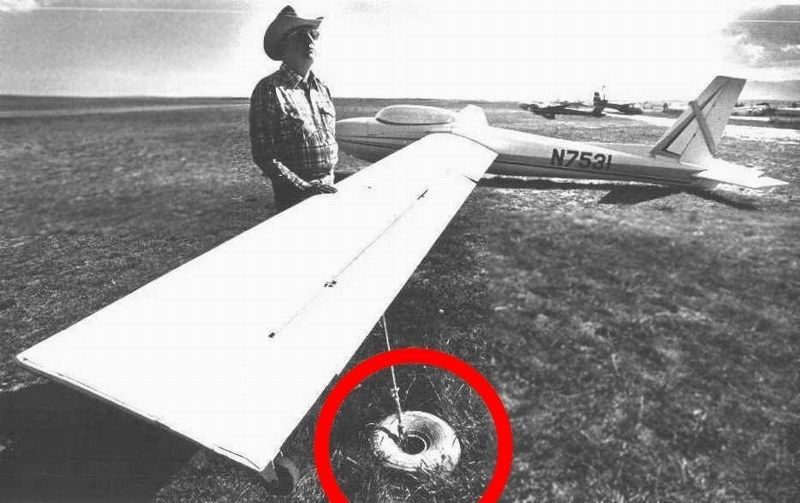
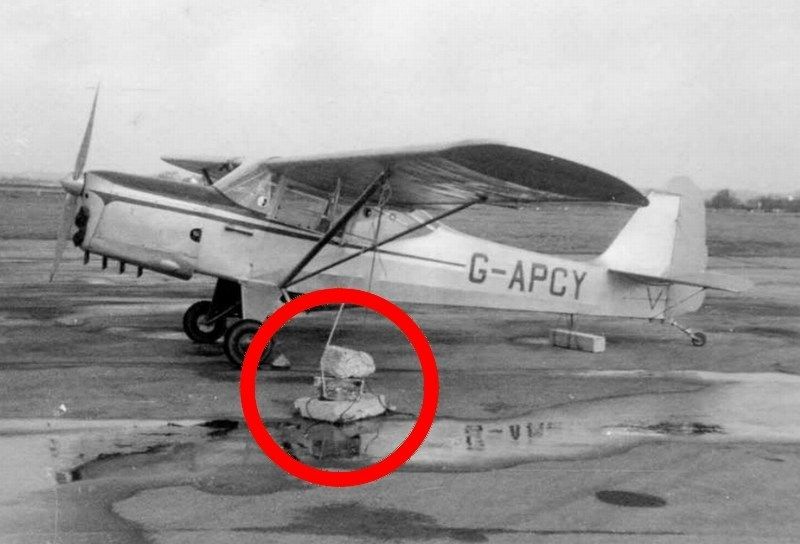
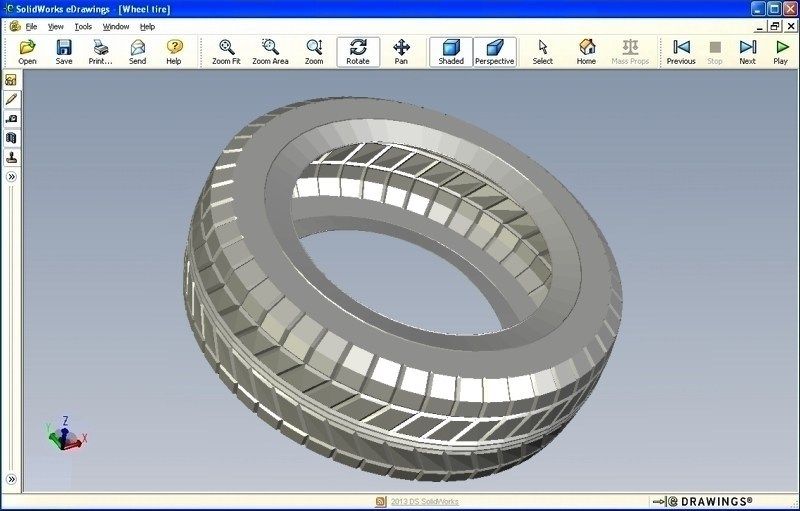
Building this improvised anchor made by concrete filled tire under scale, seemed OK to me. My first thought was to 3D print it and for this reason I actually, had just the right CAD model waiting for this purpose, in my laptop’s HD. Not having anything more to do that afternoon, I took my Mrs for a ride in town and some shopping at local Mall.
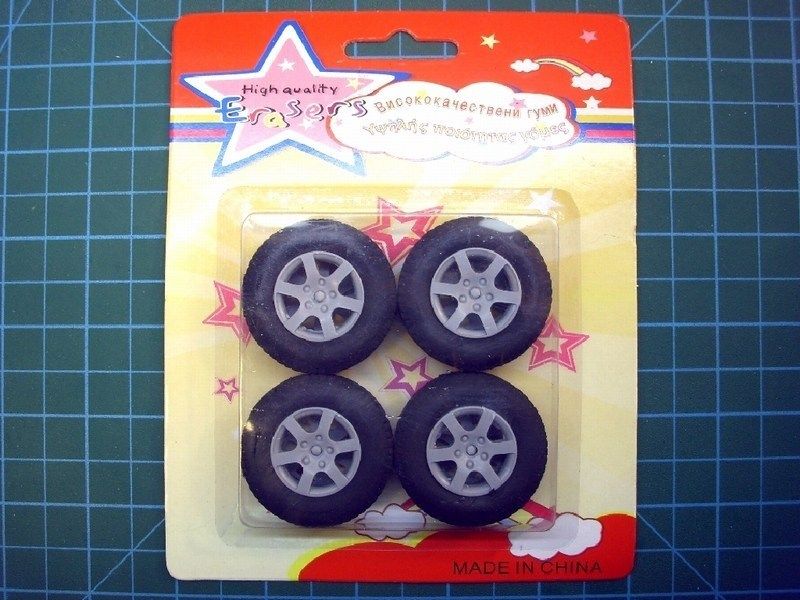
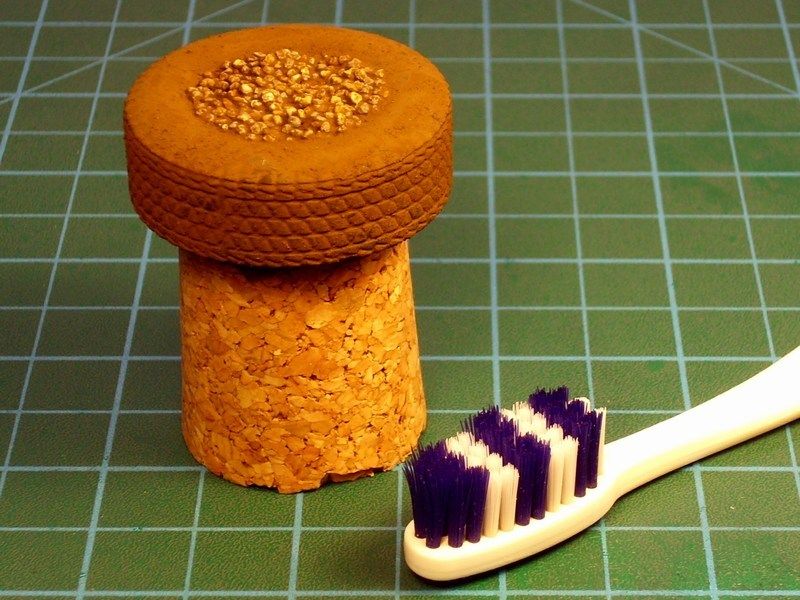
As people say, everything starts with a wish. And then, just like that, while shopping at the supermarket, I found the following item (actually a pencil eraser set for kids), for 0.5 € only. Sometimes the simplest idea can make the biggest difference and it looks like someone had the idea to produce & sell some pencil erasers that look like car wheels, waiting for me to find it, when I need it. Since I found this item which looks like a weathered wheel tire and seems to meets the criteria for 1/18 scale size, for a cheaper than dirt cost, I had no reason to 3D print the tire.
PS. Damn’d, I should wish for “World Peace” instead of “I need a 1/18 scale tire”.
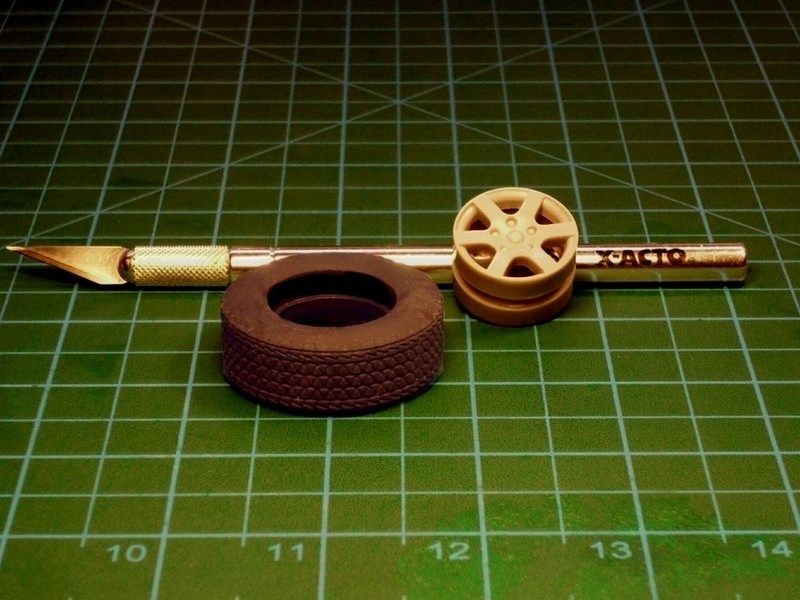
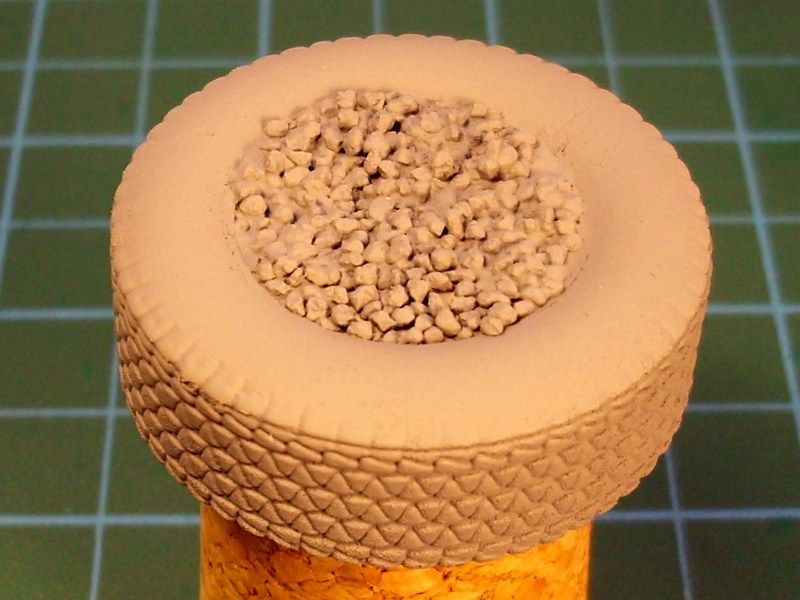
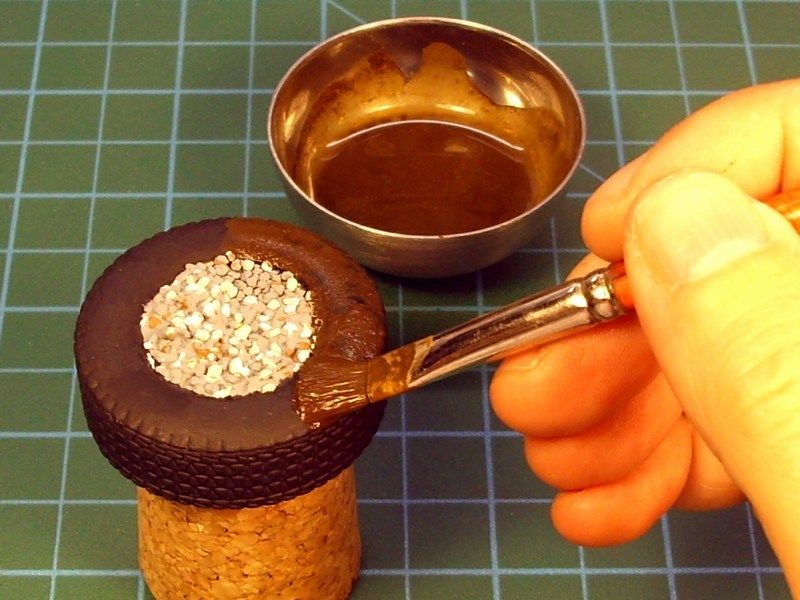
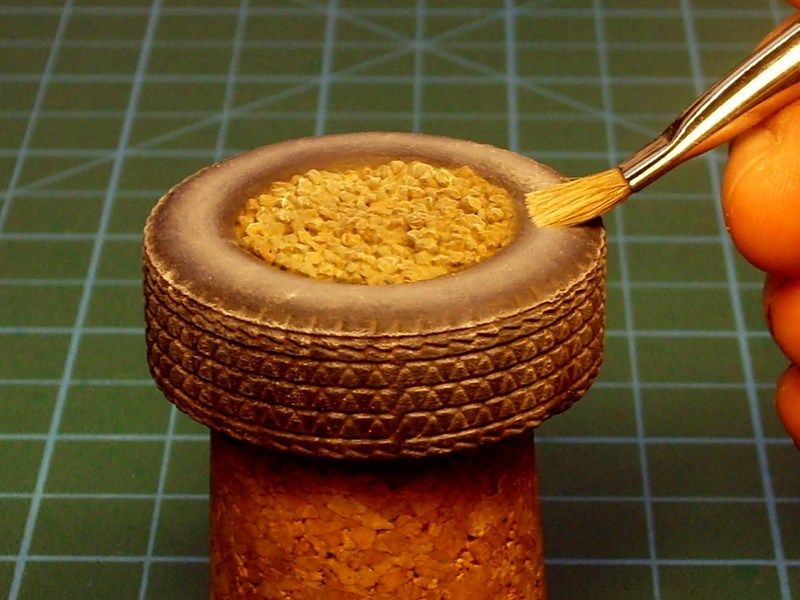
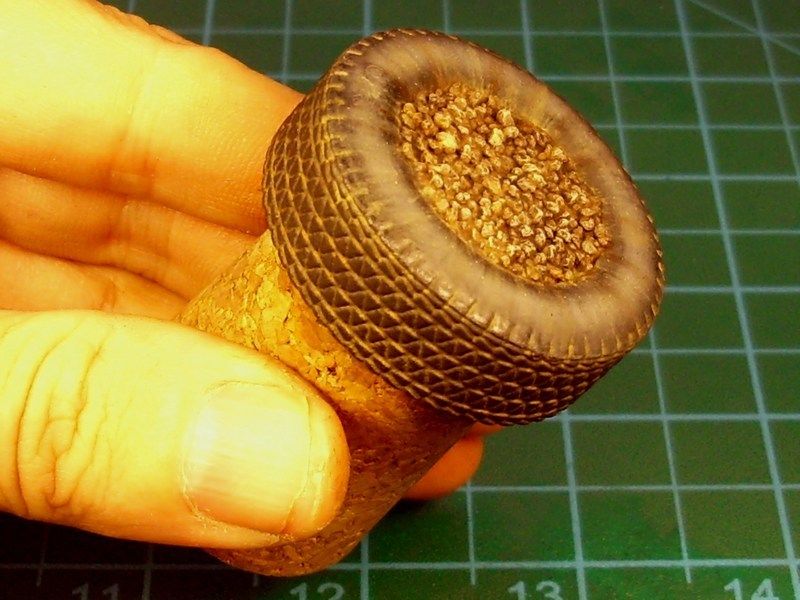
I removed the rim and filled the inside of the wheel with plaster to recreate as closely as I could the rough surface of cast cement & gravels. Because the plaster mixture was quite watery, I had plenty of time until become hard. So I also added some grains of volcanic sand into the plaster mix, hoping to recreate gravels. These volcanic sand grains (hand picked during summer vacations at the island of Santorini) seem to be ideal for the purpose and weight much less than normal beach sand.

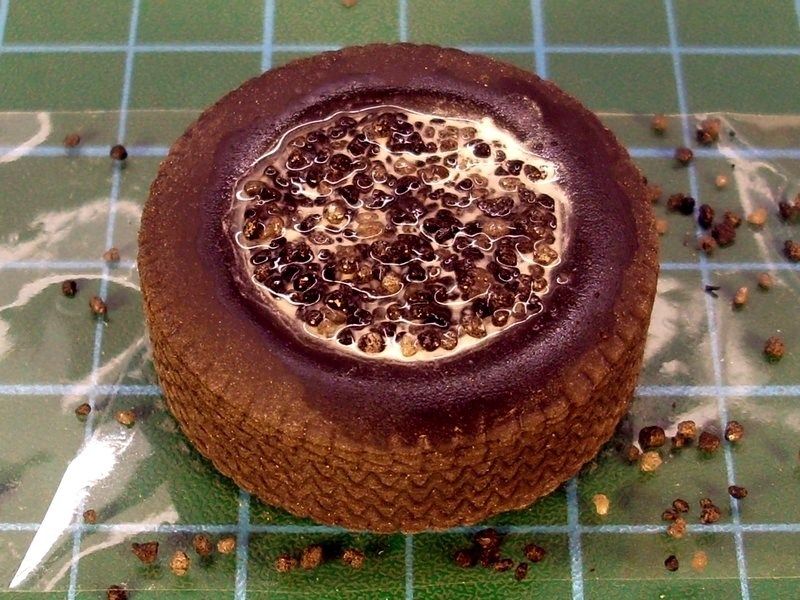
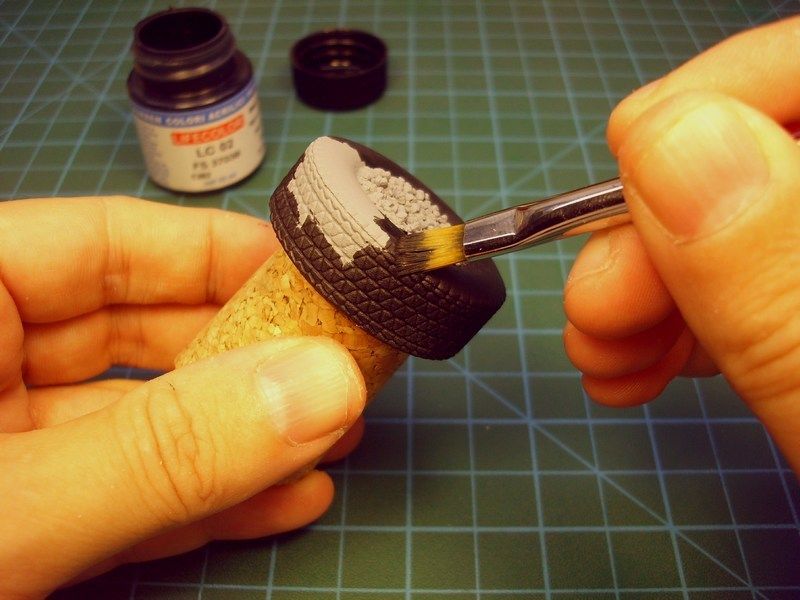
As soon as the plaster cast got harden, the anchor was sprayed over with Humbrol light grey acrylic primer to get prepared for the FS 37038 "Matt Black" available by Life Color as LC02 acrylic. Later, the gravels were also painted with light gray & sand shades.
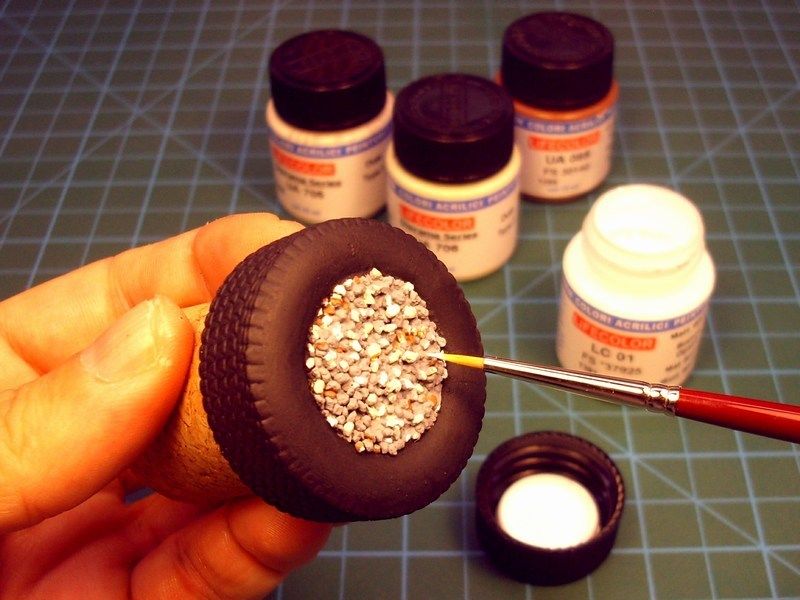
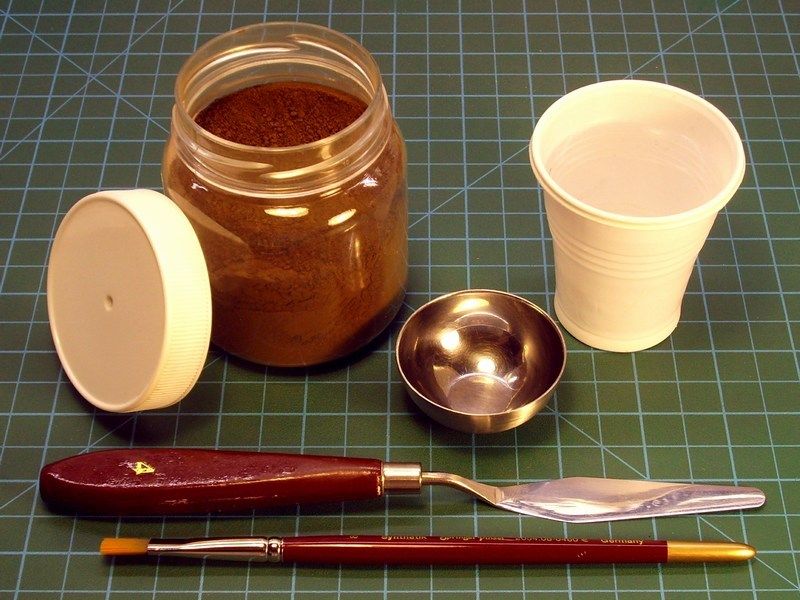
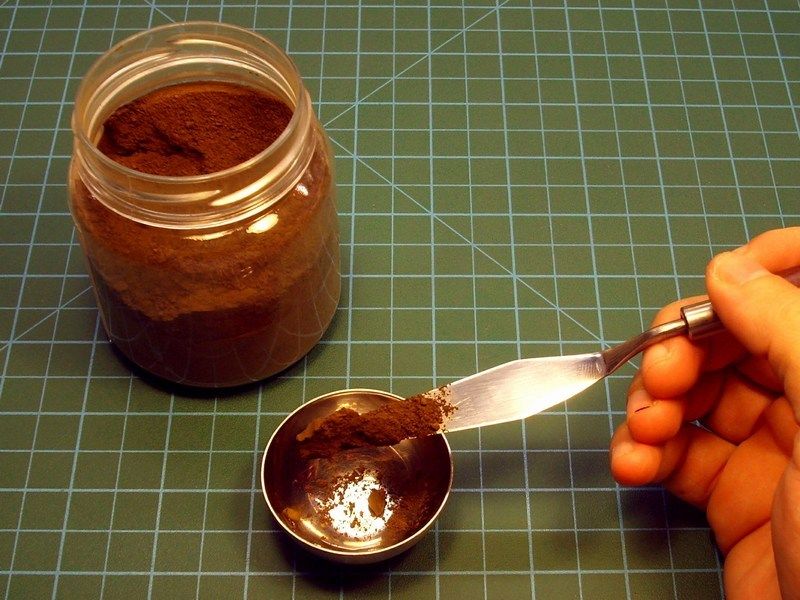
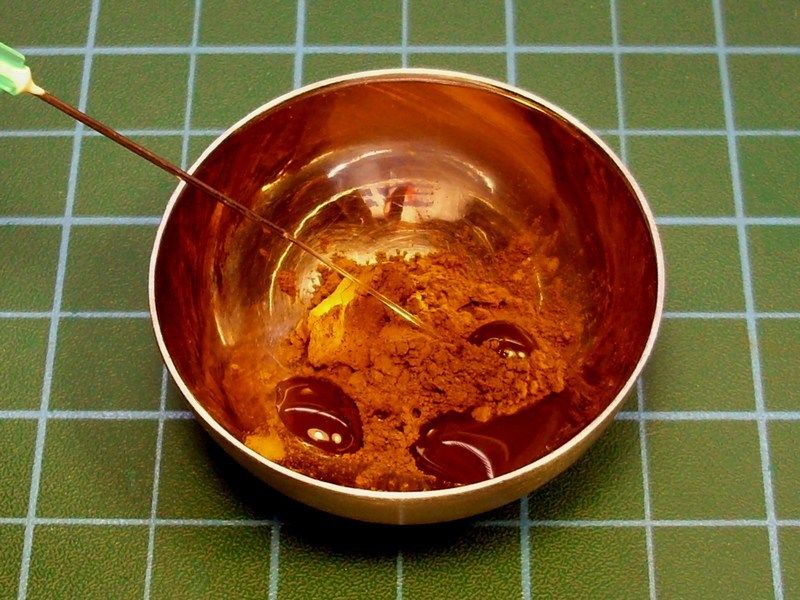
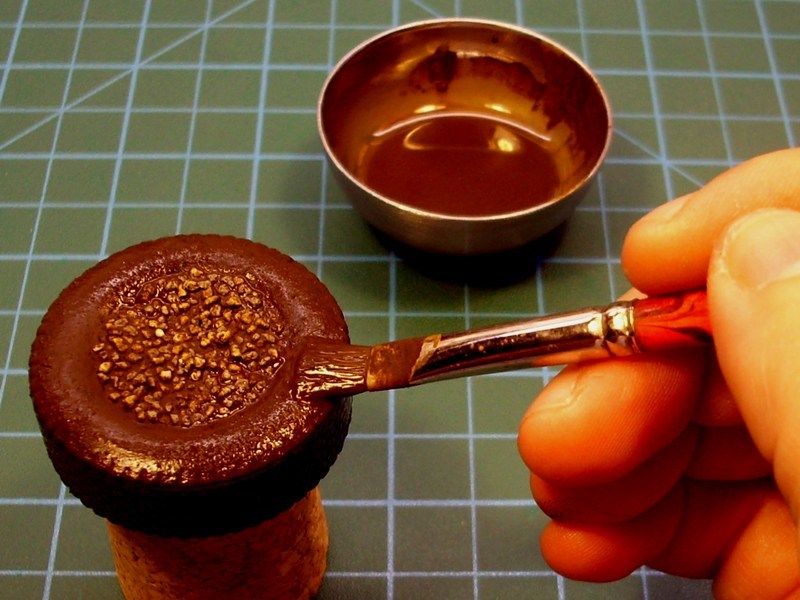
The paint allowed to dry for a couple of hours before starting the dusting process. The next two steps involve the use of pigments, which would give visual interest on the old & weathered tire. To get best results, I used "Raw Umber" pigment, a small metal cup, a flat brush and a bit of water. I add some grams of pigment powder and few drops of water into the cup to make the right mixture. It is important to add a tiny amount of water in order to make the mixture look like mud - not like soup. For this reason, I use a syringe to add just few drops on the pigment powder and I stir using the brush. The pigment applied with paintbrush with pressure, over the whole surface.
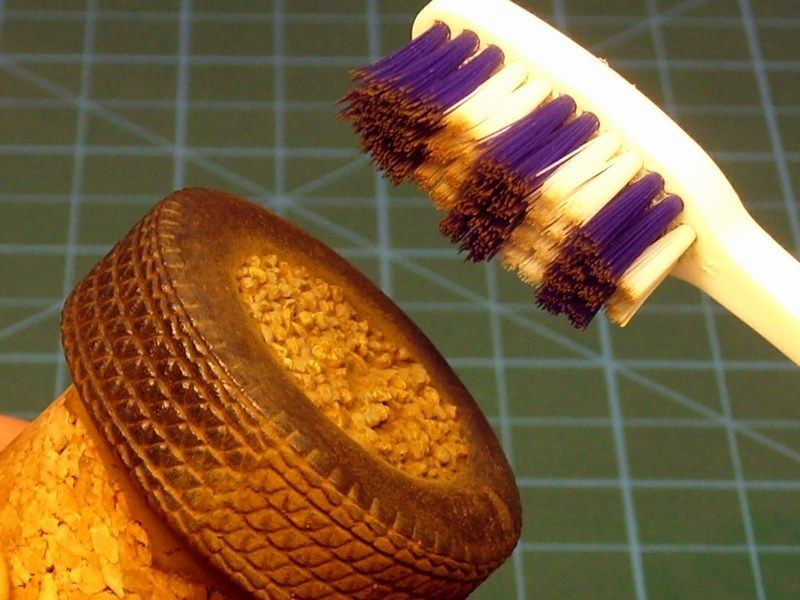
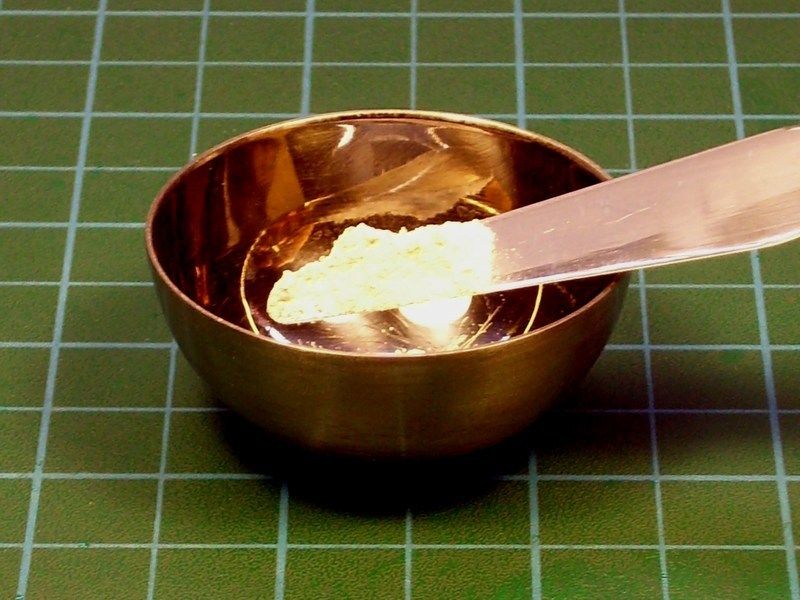
When the pigment wash dried, I rubbed off the high spots with a hard toothbrush and removed the dust excess. The high spots were cleaned to the basic finish and the low spots were left dusty. As soon as it looked OK to me after brushing & removing "Raw Umber" pigment dust, I continue to second step and add some grams of White pigment powder in the metal cup. Using a flat brush, I tried a pigment powder drybrushing, on the areas that supposed to be more enlighted.
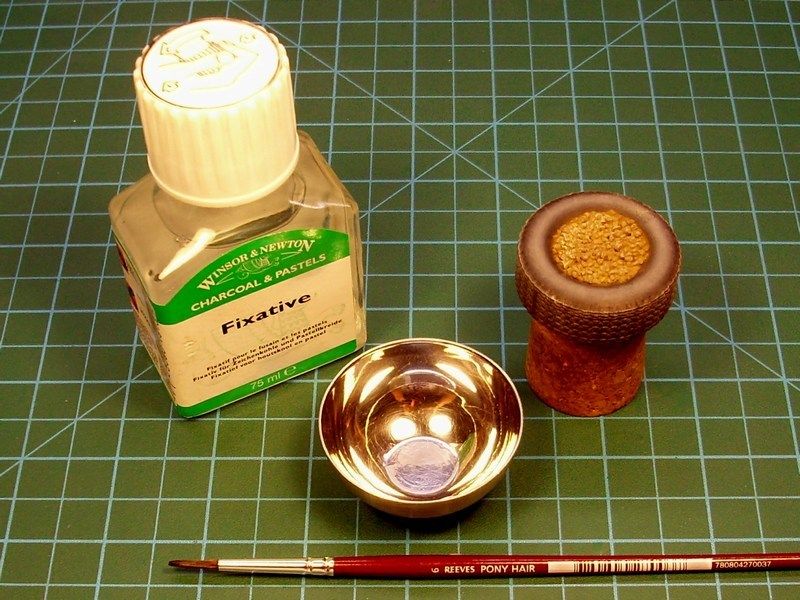
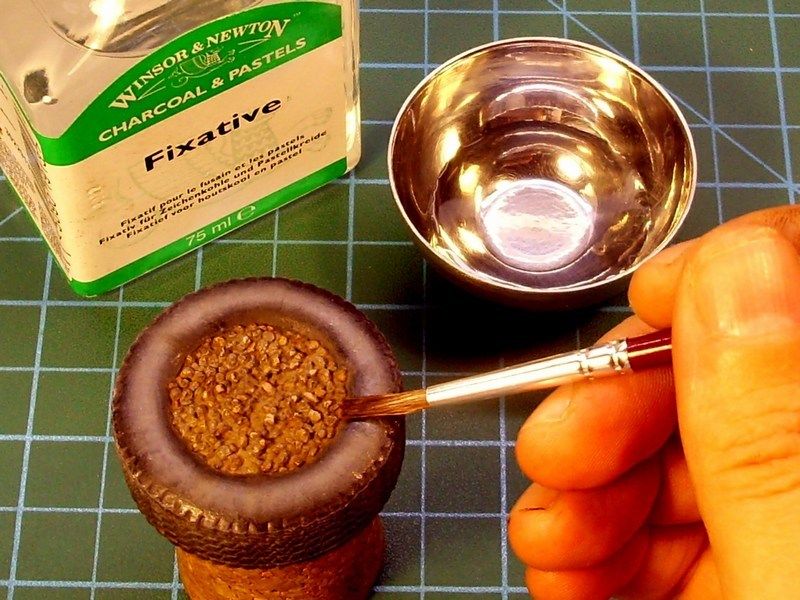
Afterwards, the surface was soaked with fixative by Winsor & Newton, to fix the previously applied pigments, moving in a motion outwards the center of the wheel. As a final touch, I tried some drybrushing on gravels, using light gray & sand acrylic paint.
I 've noticed that pilots & airfield supporting personel, use a number of improvised anchors types, to tie down the gliders, ultralights or even single engine aircrafts such as Cessna 172s, especially when operating from some grass covered airfield, without any permanent anchorage points & lashing hoops installation on ground. These improvised anchors are made of concrete filled tires or cement block bricks also known as CMU - Concrete Masonry Units).
The tying is part of the checklist and therefore gliders, ultralights, gyrocopters etc, should remain tied and with wheel chocks instaled when grounded, because even the slightest breeze can cause to aircraft start rolling or flip the wings and hit wingtips on ground or worst. I've watched a video on YouTube, where a RAF's BAe Harrier GR.7 aircraft with no wheel chocks installed, began trundling because the wind gust, gone away from the apron and finally stopped on the grass, several meters away from the initial parking position. During this special "ride", the ground personnel just stood and watched the embarrassing view. Fortunately, no big damage caused that day, if we exclude some taxiway sign & the fence fell down and of course the groundcrew chief's pride. So, if this can happen on a mighty fighter jet that weighs 13 tons, why not also happen on a glider or an ultralight?
Building this improvised anchor made by concrete filled tire under scale, seemed OK to me. My first thought was to 3D print it and for this reason I actually, had just the right CAD model waiting for this purpose, in my laptop’s HD. Not having anything more to do that afternoon, I took my Mrs for a ride in town and some shopping at local Mall.
As people say, everything starts with a wish. And then, just like that, while shopping at the supermarket, I found the following item (actually a pencil eraser set for kids), for 0.5 € only. Sometimes the simplest idea can make the biggest difference and it looks like someone had the idea to produce & sell some pencil erasers that look like car wheels, waiting for me to find it, when I need it. Since I found this item which looks like a weathered wheel tire and seems to meets the criteria for 1/18 scale size, for a cheaper than dirt cost, I had no reason to 3D print the tire.
PS. Damn’d, I should wish for “World Peace” instead of “I need a 1/18 scale tire”.
I removed the rim and filled the inside of the wheel with plaster to recreate as closely as I could the rough surface of cast cement & gravels. Because the plaster mixture was quite watery, I had plenty of time until become hard. So I also added some grains of volcanic sand into the plaster mix, hoping to recreate gravels. These volcanic sand grains (hand picked during summer vacations at the island of Santorini) seem to be ideal for the purpose and weight much less than normal beach sand.
As soon as the plaster cast got harden, the anchor was sprayed over with Humbrol light grey acrylic primer to get prepared for the FS 37038 "Matt Black" available by Life Color as LC02 acrylic. Later, the gravels were also painted with light gray & sand shades.
The paint allowed to dry for a couple of hours before starting the dusting process. The next two steps involve the use of pigments, which would give visual interest on the old & weathered tire. To get best results, I used "Raw Umber" pigment, a small metal cup, a flat brush and a bit of water. I add some grams of pigment powder and few drops of water into the cup to make the right mixture. It is important to add a tiny amount of water in order to make the mixture look like mud - not like soup. For this reason, I use a syringe to add just few drops on the pigment powder and I stir using the brush. The pigment applied with paintbrush with pressure, over the whole surface.
When the pigment wash dried, I rubbed off the high spots with a hard toothbrush and removed the dust excess. The high spots were cleaned to the basic finish and the low spots were left dusty. As soon as it looked OK to me after brushing & removing "Raw Umber" pigment dust, I continue to second step and add some grams of White pigment powder in the metal cup. Using a flat brush, I tried a pigment powder drybrushing, on the areas that supposed to be more enlighted.
Afterwards, the surface was soaked with fixative by Winsor & Newton, to fix the previously applied pigments, moving in a motion outwards the center of the wheel. As a final touch, I tried some drybrushing on gravels, using light gray & sand acrylic paint.
Last edited by Nick_Karatzides on Thu Jan 28, 2016 10:45 pm, edited 2 times in total.

-
Nick_Karatzides
- Officer - 2nd Lieutenant
- Posts: 286
- Joined: Fri May 01, 2009 4:53 pm
- Location: Valley of Death
Re: 1/18 scale Instytucie Szybownictwa IS-A Salamandra scrat
CHAPTER X - Alles zusammen
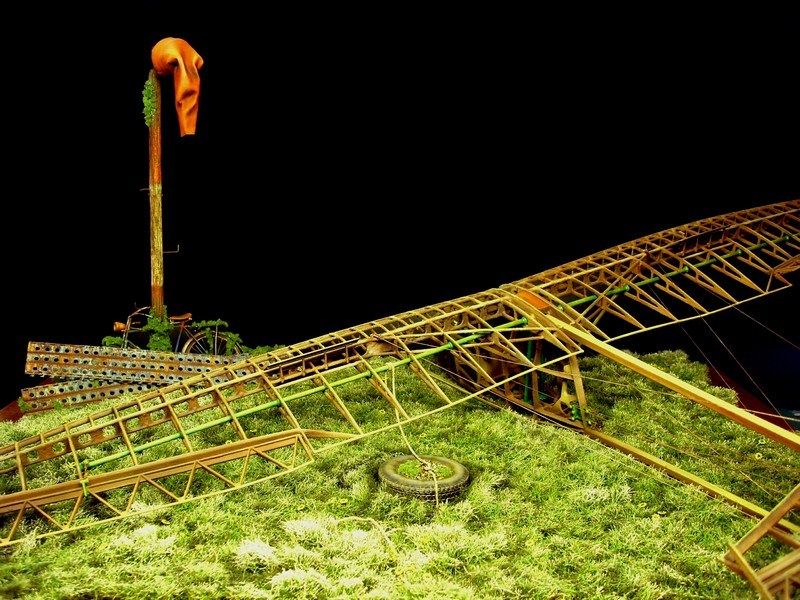
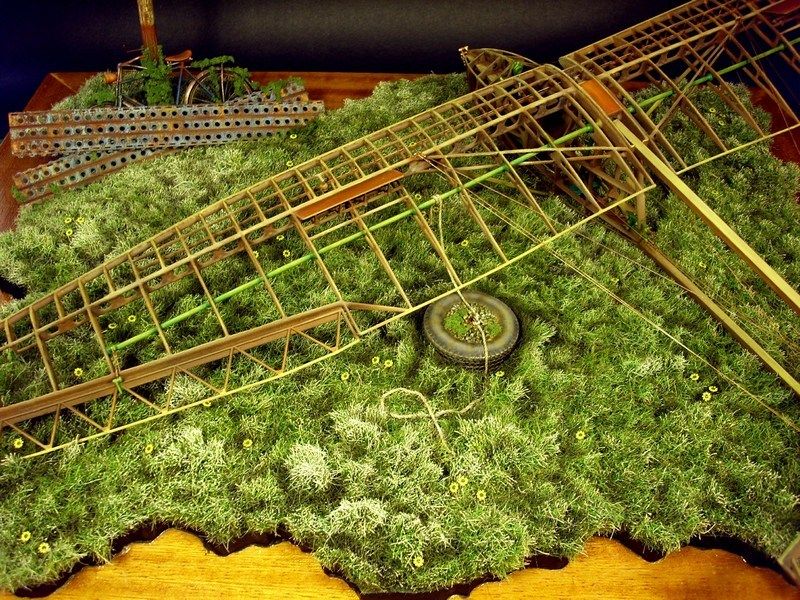
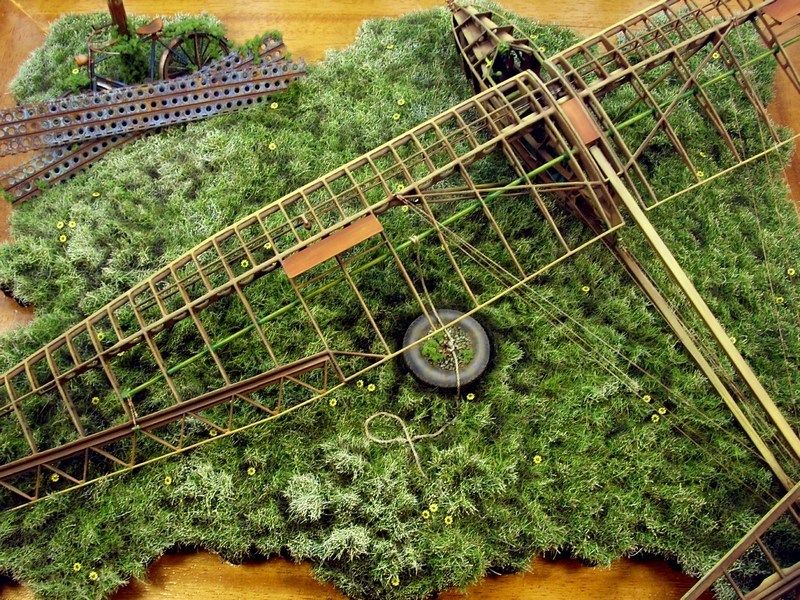
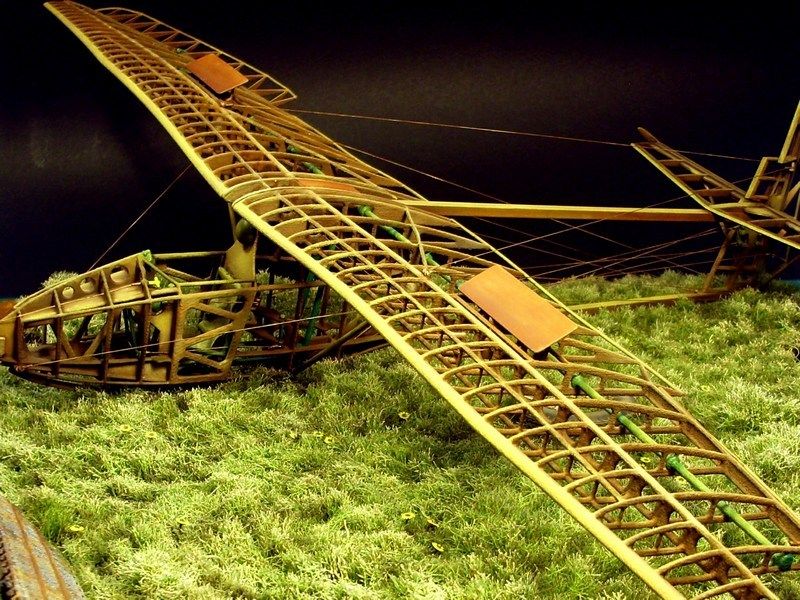
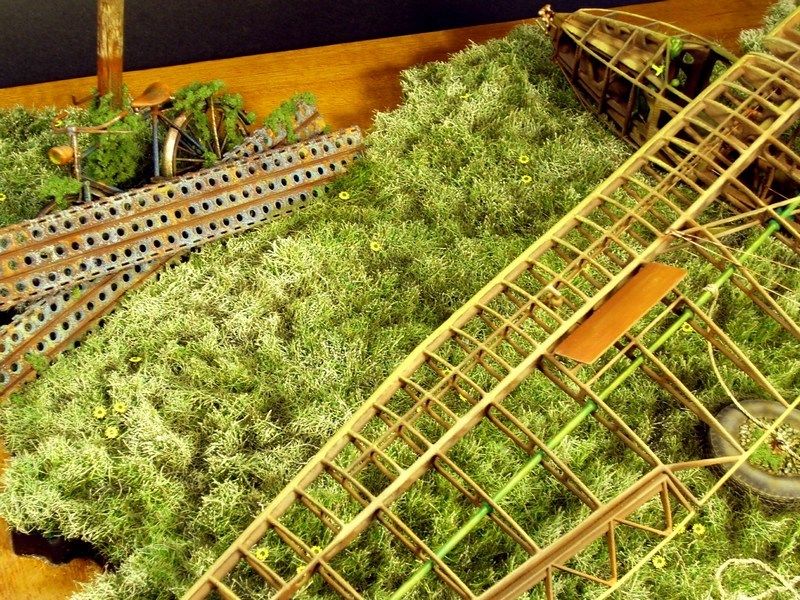
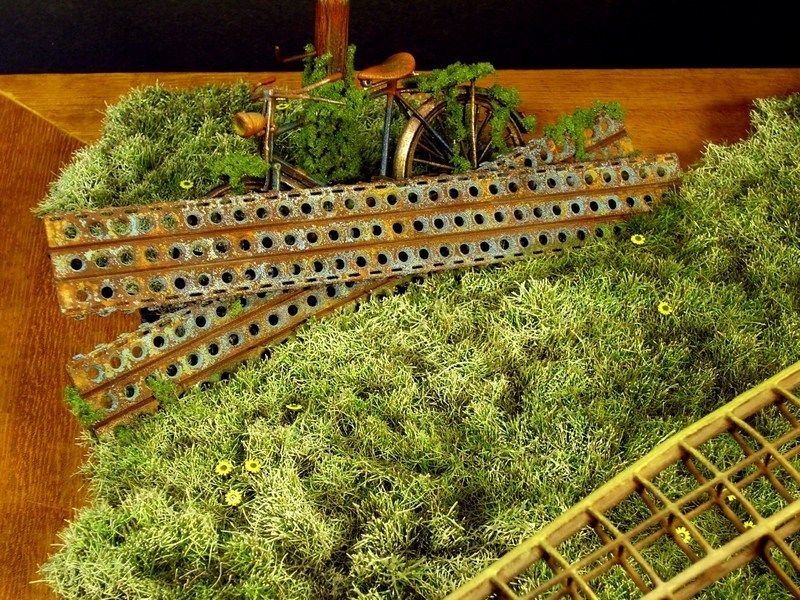
Daily watering was successful and the green grass is now high & wild enough on the field display base. At last, I had to conclude the "alles zusammen" final step. To assemble all individual parts in one scene, without damaging the glider's construction, the paint, the weathering and the rust & dust effects. That’s why I had to constantly monitor and try some dryfit tests all time, to ensure that I will not face any nasty surprises later. The windsock & the PSP plates, would be the first to be placed on the green grass display base and secured in place with hidden metal pins encased in the polished beechwood base through balsa wood sheet & glued with CA super glue. A last moment’s addition, an also 3D printed Fahrrad NSU bicycle model, painted in light blue colour (ammo box removed) not to remind it’s German military origin, placed against the windsock wood pole. Some rust effects also applied on bike’s metal frame.

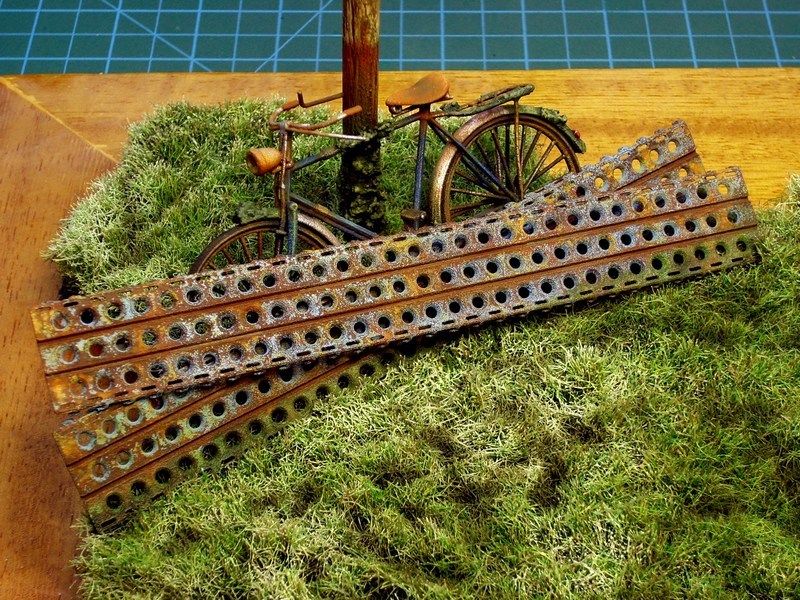
Later, the improvised anchor made by concrete filled tire and the IS-A Salamandra glider model, both secured in place with hidden metal pins and glued on the ground with transparent silicon. Final details were added, such as the seat belts & buckles in cockpit, the clear windscreen, some extra dust & rust weathering effects on tension wires, etc. As soon as the result was OK for me, the scene sprayed over with Humbrol enamel mat coat, to seal the work so far and left it overnight to dry. The next day, I did a final inspection on result and set it up to shoot some pictures.
Daily watering was successful and the green grass is now high & wild enough on the field display base. At last, I had to conclude the "alles zusammen" final step. To assemble all individual parts in one scene, without damaging the glider's construction, the paint, the weathering and the rust & dust effects. That’s why I had to constantly monitor and try some dryfit tests all time, to ensure that I will not face any nasty surprises later. The windsock & the PSP plates, would be the first to be placed on the green grass display base and secured in place with hidden metal pins encased in the polished beechwood base through balsa wood sheet & glued with CA super glue. A last moment’s addition, an also 3D printed Fahrrad NSU bicycle model, painted in light blue colour (ammo box removed) not to remind it’s German military origin, placed against the windsock wood pole. Some rust effects also applied on bike’s metal frame.
Later, the improvised anchor made by concrete filled tire and the IS-A Salamandra glider model, both secured in place with hidden metal pins and glued on the ground with transparent silicon. Final details were added, such as the seat belts & buckles in cockpit, the clear windscreen, some extra dust & rust weathering effects on tension wires, etc. As soon as the result was OK for me, the scene sprayed over with Humbrol enamel mat coat, to seal the work so far and left it overnight to dry. The next day, I did a final inspection on result and set it up to shoot some pictures.
Last edited by Nick_Karatzides on Thu Jan 28, 2016 10:47 pm, edited 2 times in total.
-
Nick_Karatzides
- Officer - 2nd Lieutenant
- Posts: 286
- Joined: Fri May 01, 2009 4:53 pm
- Location: Valley of Death
Re: 1/18 scale Instytucie Szybownictwa IS-A Salamandra scrat
CHAPTER XI - Epilogue & aknowledgments
Although I had other plans at the beginning of this WIP, I was not really sure about the ending and especially the display base for the model. I changed my mind during the building process and finally decide to present as found in a small green grass covered airfield, now used by general aviation pilots for their weekend excursions, where the Salamandra glider is now resting tilted sideways, with one wingtip touching the ground and the other on air. A kind of wordless symbolism for the old fella who tirelessly offered training services to thousands aviators, weary lying on the ground but still turning wing high in the sky, where it belongs.
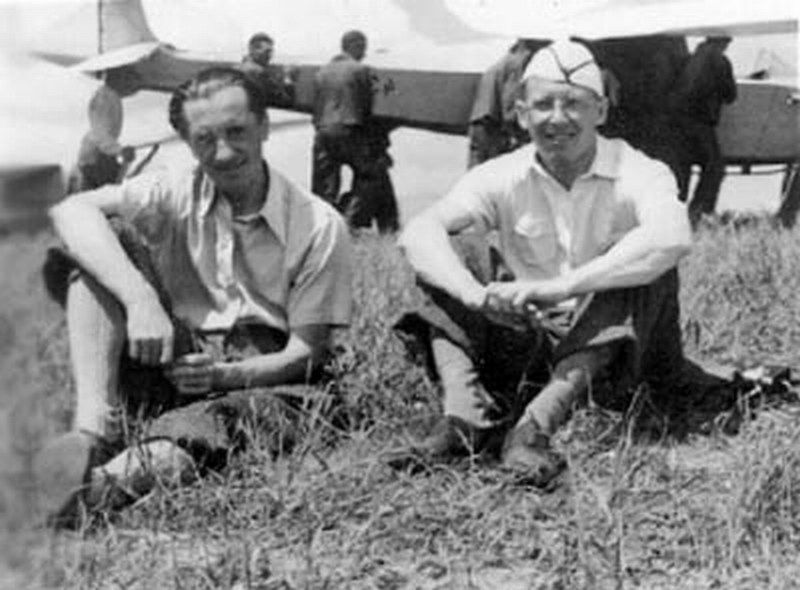
I ‘d like to share with you, a rare photograph. It takes us back to autumn of 1936, possibly in Lwow, Poland (now Lviv, Ukraine). The man with the hat (right), is Mr. Waclaw Czerwinski, one of the leading aircraft designers and head of the "WWS - Wojskowe Warsztaty Szybowcowe" (meaning “Military Gliding Workshops” in Polish language). The WWS-1 Salamandra glider (re-engineered as "Instytut Szybownictwa IS-A" after the WWII), was the first project which was created under his leadership during the mid 1930ies. The other man (left) is Mr. Tadeusz Chlipalski, the head engineer who established the plant for the gliders production in Bielsko Biala at south Poland.
It was a pleasant surprise to discover that an American guy named Scott J Grunewald found the model kit build interesting enough and dedicated an article on 3D printing related site. For more info, feel free to click HERE.
I would like to express my special thanks to:

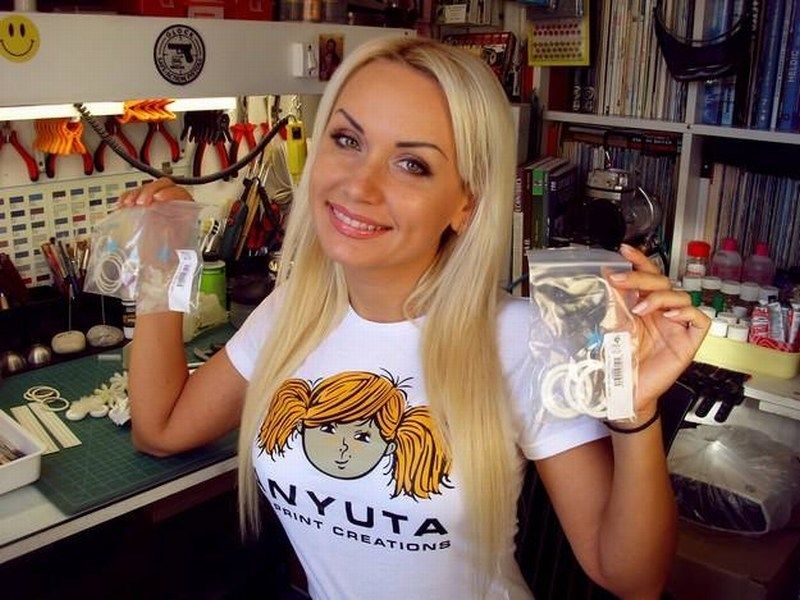
Finally, for those who are interested to check more info & pics, feel free to have a look on our Anyuta 3D printed scale models products catalog. Wife as website operator & sales cordinator is always ready to answer customer questions regarding 3D printed scale model kit & diorama accessories products. Thank you all for following this thread and I hope you enjoyed reading this article. I’ll meet you soon, on my next WIP - possibly a 3D printed.one.
Regards,
Nick

Although I had other plans at the beginning of this WIP, I was not really sure about the ending and especially the display base for the model. I changed my mind during the building process and finally decide to present as found in a small green grass covered airfield, now used by general aviation pilots for their weekend excursions, where the Salamandra glider is now resting tilted sideways, with one wingtip touching the ground and the other on air. A kind of wordless symbolism for the old fella who tirelessly offered training services to thousands aviators, weary lying on the ground but still turning wing high in the sky, where it belongs.
I ‘d like to share with you, a rare photograph. It takes us back to autumn of 1936, possibly in Lwow, Poland (now Lviv, Ukraine). The man with the hat (right), is Mr. Waclaw Czerwinski, one of the leading aircraft designers and head of the "WWS - Wojskowe Warsztaty Szybowcowe" (meaning “Military Gliding Workshops” in Polish language). The WWS-1 Salamandra glider (re-engineered as "Instytut Szybownictwa IS-A" after the WWII), was the first project which was created under his leadership during the mid 1930ies. The other man (left) is Mr. Tadeusz Chlipalski, the head engineer who established the plant for the gliders production in Bielsko Biala at south Poland.
It was a pleasant surprise to discover that an American guy named Scott J Grunewald found the model kit build interesting enough and dedicated an article on 3D printing related site. For more info, feel free to click HERE.
I would like to express my special thanks to:
- All fellow scale modelers, who have expressed their ideas through this forum and suggested solutions to technical issues encountered during this WIP.
- Mr. George Papadimitriou, owner of Hobby Gallery hobby shop and exclusive distributor for LifeColor & AK Interactive products in Greece, for his kind support and providing all the goodies I asked for - from A to Z.
- Mr. Nikolaos Kountouris, owner of MDC - Model Display Case store, who personally supervised the construction of the polished beechwood base after my request and made sure superior quality work.
- Spartan king Agesilaus, from whom I borrowed the cue "today, the prowess died", later rephrased by me as "today, the scratch building died", which became the main motto during this WIP presentation.
- My sweetheart “4-star General in home” wife, who actively participated in the project as an indispensable assistant, offering me relaxing neck massage while working on my bench.
Finally, for those who are interested to check more info & pics, feel free to have a look on our Anyuta 3D printed scale models products catalog. Wife as website operator & sales cordinator is always ready to answer customer questions regarding 3D printed scale model kit & diorama accessories products. Thank you all for following this thread and I hope you enjoyed reading this article. I’ll meet you soon, on my next WIP - possibly a 3D printed.one.
Regards,
Nick