Page 1 of 2
Building, Painting and Weathering Techniques
Posted: Sat Jan 19, 2013 9:03 am
by CW4USARMY
Hey Aferg and all, I was wondering if it would be OK to have a permanent topic/sticky for Building, painting and Weathering Techniques in this customs and mods forum. Little to no painting tips or tricks in the current sticky so would like to have a dedicated sticky so we could learn from some of our members who have incredible skills.
With he future of 1:18 mostly with our outstanding forum members creating awesome kits from Resin and plastic, those of us who want them need to start learning and practicing quickly!

There are painting tips scattered throughout posts but are hard to track down. If we have a permanent sticky, I will do my best to round them all up and put them in the sticky, and will keep it updated with building or painting techniques that get posted in another thread as part of another topic.
Just a thought, hope you'll consider it.
Thanks,
Andy
Re: Building, Painting and Weathering Techniques
Posted: Sat Jan 19, 2013 9:18 am
by [CAT]CplSlade
Yes, that would be nice and handy.
Re: Building, Painting and Weathering Techniques
Posted: Mon Jan 21, 2013 3:55 pm
by granch
Oh yes, it could help a lot! I'm interested in the most simple technics, since I'm not a good painter! Go forward!
Re: Building, Painting and Weathering Techniques
Posted: Sat Jan 26, 2013 8:15 pm
by CW4USARMY
Washes:
Here is a first question: When applying washes, either oil or acrylic, must the finish of the paint be gloss or flat. I have seen several You Tube videos and some say put a gloss finish first so the wash will run correctly, then after the wash is dried the way you want, then apply a flat finish. Is this correct, or just apply the wash on a flat finish. thanks.
Re: Building, Painting and Weathering Techniques
Posted: Sat Jan 26, 2013 8:17 pm
by CW4USARMY
Weathering decals:
Andrew,
You want to bleach the color out....fade the color..... If the decals are on the model try spraying them with
dull coat. Let the area dry, then use artists pastels, color you want...rubbed in with a Q-tip, spray and
let dry and then do the same with the second color.
If you choose this method its easy. Take a knife, razor blade what ever you have and scrape the pastel
until you have a small pile of the color needed. As mentioned above spray dull coat, let dry, apply pastel
with Q-tip, spray let dry. You'll want to spray thin coats each time......Ya don't want to end up with
a pitchers mound.
Try this technique on an index card or piece of sheet plastic. Now have at it!
Oh, there's always the old airbrush.... Kidding Andrew.... I use this technique often ( not for changing the color of
roundels but it should work) and I'm pleased with the results.
Good Luck.
Normandy.
Re: Building, Painting and Weathering Techniques
Posted: Sun Jan 27, 2013 12:45 pm
by CW4USARMY
Painting (figures)
"Any basic repainting tutes out there for figures?
Enamel or acrylic?" -AJW2
"Acrylic water based. That testors crap will never dry to the "softer plastic" parts of the figures."
"I like acrylics. Vallejo is great for brush work. I would stay away from Tamiya unless you are using an airbrush.
Here is a very basic guide for Vallejo colors and U.S. Airborne uniforms for D-Day. Keep in mind that Airborne uniforms were changed between D-Day and Market Garden. 2 very different colors and styles of uniform. " - Trigger1
http://www.artizandesigns.com/guides/US ... olours.pdf
Use an acrylic flat coat. Enamel flat coats with ruin the soft plastic. There's a chemical reaction.
Laquer is another solvent based paint like Enamel, but stronger! It is the strongest paint, but lots of care has to be taken when applying. I would say Acrylic is the easiest. Plus, It seems most professional artists use Vallejo Color to paint their figures.
Re: Building, Painting and Weathering Techniques
Posted: Sun Jan 27, 2013 12:53 pm
by CW4USARMY
Painting: (Airbrush)
"Tower hobbies for Tamiya Acrylics. Those are great paints to airbrush with! Thin with 70% rubbing alcohol." - flyboy_fx
Re: Building, Painting and Weathering Techniques
Posted: Sun Jan 27, 2013 12:58 pm
by CW4USARMY
Painting (figures)
"If finding Vallejo,Andrea Miniatures or Tamiya acrylic paints becomes dificult in your area or want to give a "break" to the wallet, consider the acrylic paints at your local arts and craft store...yes those that come y the tall plastic bottles y quite a variety of colors. The mix very well...you can get any color/shade you need, they can be deluted with water very nice and apply smooth.
The secret of painting with acrylics is getting the right consistency and pigment in the paint for a smooth a full coverage of the painted area without heavy buildup or fragile finish...AKA...lifting paint with the touch. I usualy buy several color only and mix my custom colors to get the shade needed without breaking the wallet. The basics...flat black,white,blue,dark brown,light tan,light pink,yellow,dark green,red...will give you almost any uniform color..by mixing...you may need..as well as blending and highlights and detail painting...the are also great for some armor weathering jobs/details.
Hope thi info is of help to your needs." - plasticfanatic
"Yes wash them with water & and very deluted dish soap in a sink,then rinse them in clean water and dry them with a towel,let them dry overnite or use an airbrush to blow the water from the joints,I like Vallejo model color paints for figure painting,Andrea color are great too." 1058Zelda.
Re: Building, Painting and Weathering Techniques
Posted: Wed Jan 30, 2013 8:55 pm
by Folkwulfe
I'd be careful of applying pastels if you intend to coat them either with "Future" or clear flat. Every time I have tried to "fix" pastels so they won't come off, the color of the pastel has darkened alot. Ruins the effect most of the time and then you are stuck. A massive removal is the only recourse. Decals need a flat surface (or at least as flat as you can get them) to adhere to the surface best. Regardless of what the final finish is...prep all the areas decals will be applied with Future floor wax sprayed from an airbrush. I usually add a small amount of denatured alcohol to help smooth the finish and reapidly dry the future. Once a coat or two is down, wait 24 hours (let it cure overnight) and them apply your decals. After they dry (overnight again is best) apply at least one and maybe two MORE coats of Future to seal them down. Another night and apply the flat coat overall. If you try to apply decals straight over flat paint (really rough surface) you risk "silvering" which is nothing more than very tiny air bubbles trapped under the decal in the rough surface of the paint. No other cure available than to remove and redo all the decals....again! I have used counter shading and oil washes over acrylic paint for many many (more than I want to count) years. Just remember to TEST, TEST, and TEST some more on old models and model parts you can part with (pun intended). I have one test subject that must have ten coats of paint on it....but it has served well and continues to so why mess with it? I put some pictures up on another thread about counter shading (see below?) so you get the idea.....PARTY ON DUDES!
Re: Building, Painting and Weathering Techniques
Posted: Thu Jan 31, 2013 2:46 am
by 1958Zelda
CW4USARMY wrote:Washes:
Here is a first question: When applying washes, either oil or acrylic, must the finish of the paint be gloss or flat. I have seen several You Tube videos and some say put a gloss finish first so the wash will run correctly, then after the wash is dried the way you want, then apply a flat finish. Is this correct, or just apply the wash on a flat finish. thanks.
My method is apply basic XF Tamiya paint finish(flat),i will use a acrylic satin finish(pledge future floor finish) or Vallejo 100% acrylic resin satin varnish,sprayed from an airbrush in very light coats,and only if i am going to apply decals,let dry for a day,apply decals,let dry ,apply more coats,making sure the decals look like they were painted on,when dry (day later)I begin applying ablack wash to the whole tank/vehicle,if I am not applying decals I apply the wash on the flat finish.

Re: Building, Painting and Weathering Techniques
Posted: Thu Jan 31, 2013 7:26 pm
by CW4USARMY
Great info guys, thanks!
I'm going to keep trying to dig up older tips and techniques and post here . Just got back from working out at white sands missile range for a couple of weeks and free time was limited.

Re: Building, Painting and Weathering Techniques
Posted: Fri Feb 08, 2013 6:44 am
by The_Helicopter_Pilot
The main thing I use in detailing is a Dry Brush Technique, if anyone wants more info on that I'd be alas to share, I'm sure it's pretty commen though, I just got done using it on a custom paint job I did on a 1/32 vehicle.
Re: Building, Painting and Weathering Techniques
Posted: Fri Feb 08, 2013 8:29 pm
by CW4USARMY
Im interested, do you have any before and after pics?
Re: Building, Painting and Weathering Techniques
Posted: Sat Feb 09, 2013 5:00 am
by The_Helicopter_Pilot
CW4USARMY wrote:Im interested, do you have any before and after pics?
Well I don't have any before shots, but I can show some afters, the Dry Brush Technique is just a real easy weathering technique to highlight, make it look like it has ware, and scratches, and in my last picture, welds..
Is what you do, you take your brush, and dab it in in your choice of paint, (ex: metal, use silver or gray) then you remove about 95% of the paint by stroking the brush across a scrap paper, then with the little paint that's still left, you use light strokes to highlight and area, and bring out the scratching and ware.


Re: Building, Painting and Weathering Techniques
Posted: Sat Feb 09, 2013 5:12 am
by The_Helicopter_Pilot
Re: Building, Painting and Weathering Techniques
Posted: Fri Mar 01, 2013 1:57 pm
by CW4USARMY
Great tip and video, thanks!
Re: Building, Painting and Weathering Techniques
Posted: Fri Mar 01, 2013 8:01 pm
by The_Helicopter_Pilot
I don't know if this is something y'all would do, but I was messing around with some stuff and tried mixing paint with water in a small spray bottle, I used it on my 21stCT 1/48 HellCat, and it actually came out looking the way I wanted it to (heavy weathered) I still don't have any of my planes unpacked from moving to Missouri, but once I do I'll post pictures.
Re: Building, Painting and Weathering Techniques
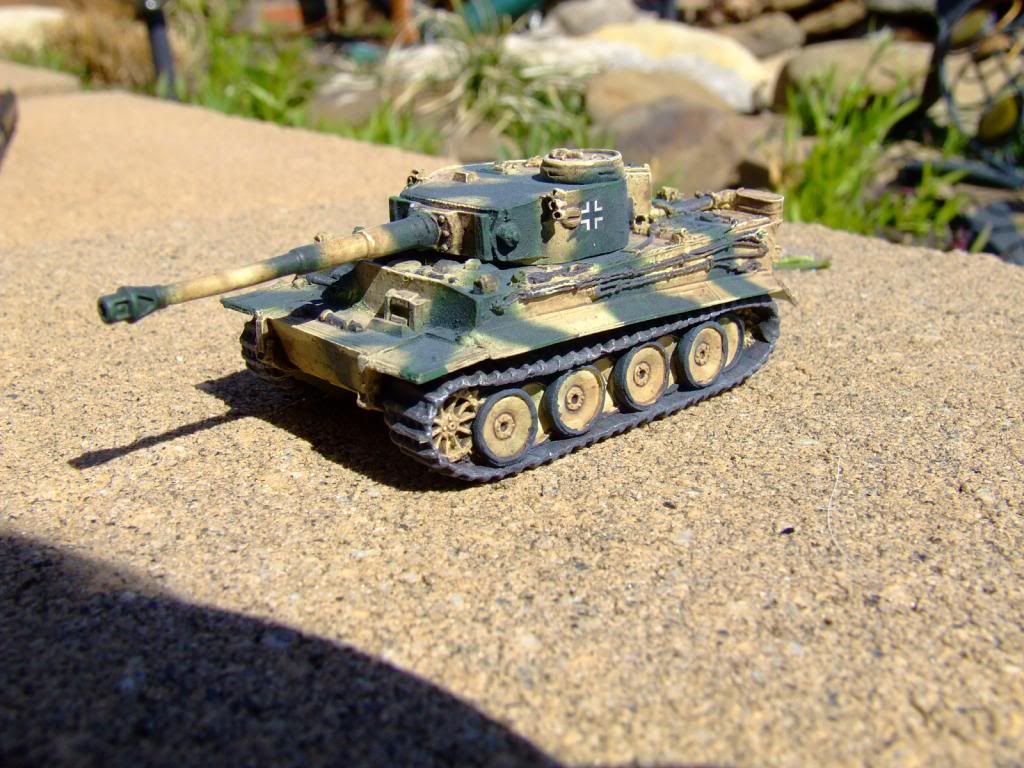
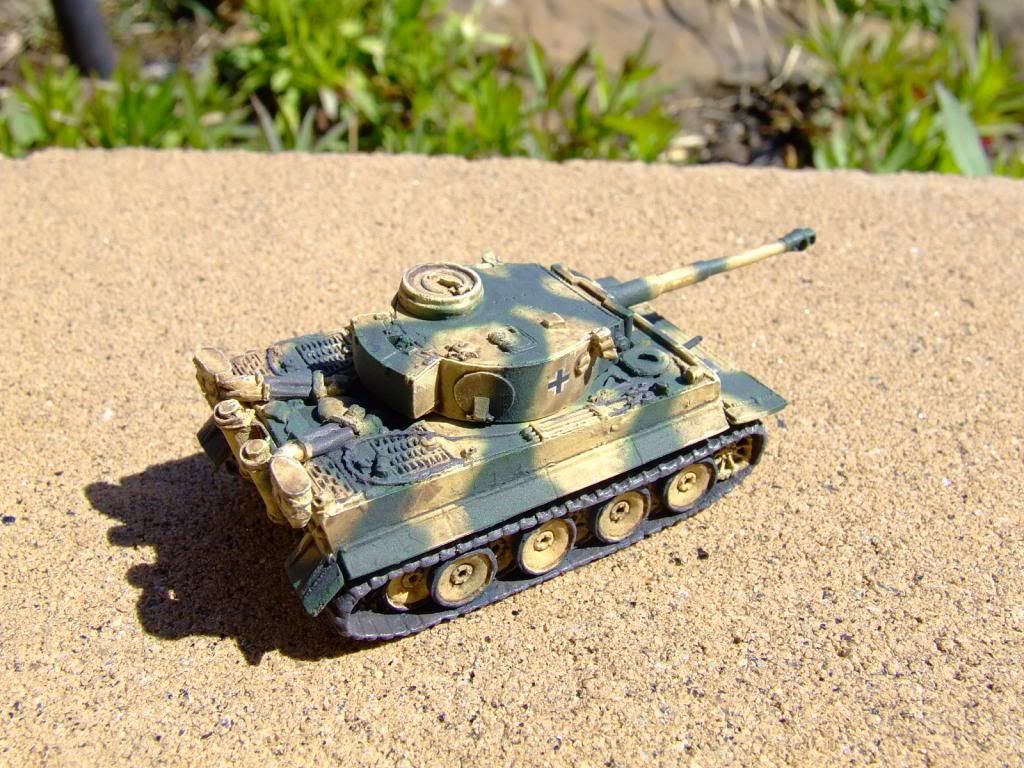
Posted: Sun Mar 03, 2013 11:59 am
by CW4USARMY
Re: Building, Painting and Weathering Techniques
Posted: Sun Mar 03, 2013 2:56 pm
by flyboy_fx
What paints did you use?
Re: Building, Painting and Weathering Techniques
Posted: Sun Mar 03, 2013 6:17 pm
by CW4USARMY
I used all Vallejo model paints (arcrylic) i used and earthen wash from Citadel gaming paint company. Im not sure if their washes are oil based or arcrylic.
Re: Building, Painting and Weathering Techniques
Posted: Sun Mar 03, 2013 8:23 pm
by flyboy_fx
Looks great! Might I also recommend Tamiya paints. They are also a fantastic brand of acrylic based to airbrush with.
XF60 is panzer yellow. XF 64 is a good base for the brown (Can be darkened or lightened) And just pick a good green from them. Like XF 58
Just suggestion. It looks great though!
Re: Building, Painting and Weathering Techniques
Posted: Mon Mar 04, 2013 12:27 pm
by CW4USARMY
Thanks, appreciate the intel!

Re: Building, Painting and Weathering Techniques
Posted: Sun Mar 10, 2013 11:09 pm
by 1958Zelda
that tiger looks great! try dry brushing it,on small scale items dry brushing makes a big difference

Re: Building, Painting and Weathering Techniques
Posted: Tue Mar 12, 2013 6:21 pm
by CW4USARMY
Thanks Zelda. What color to drybrush? Like exposed steel or something like that?
Re: Building, Painting and Weathering Techniques
Posted: Tue Mar 12, 2013 8:57 pm
by flyboy_fx
YOu can dry brush lightly with the base color. That works nice! A little goes a long way. The idea of dry brushing is to lighten the raised surfaces to make the details come out.
 My first attempt at airbrushing and weathering. Trying to get ready for Pickel's King Tiger. This is onyl 1/72nd scale. All you fantastic painters please critique and provide feedback. Thanks!