JSI Tomcat - Super Detailing???

-
Black_Dragon_One
- Officer - Brigadier General

- Posts: 2032
- Joined: Sat Dec 11, 2004 1:23 pm
- Location: California
Re: Main Strut Rebuild
how did you get the wheel off with out breaking it..deankleines wrote:[img][img]http://i273.photobucket.com/albums/jj22 ... ppl-13.jpg[/img][/img]
whats up doc....
-
deankleines
- Corporal

- Posts: 84
- Joined: Mon Dec 21, 2009 6:22 pm
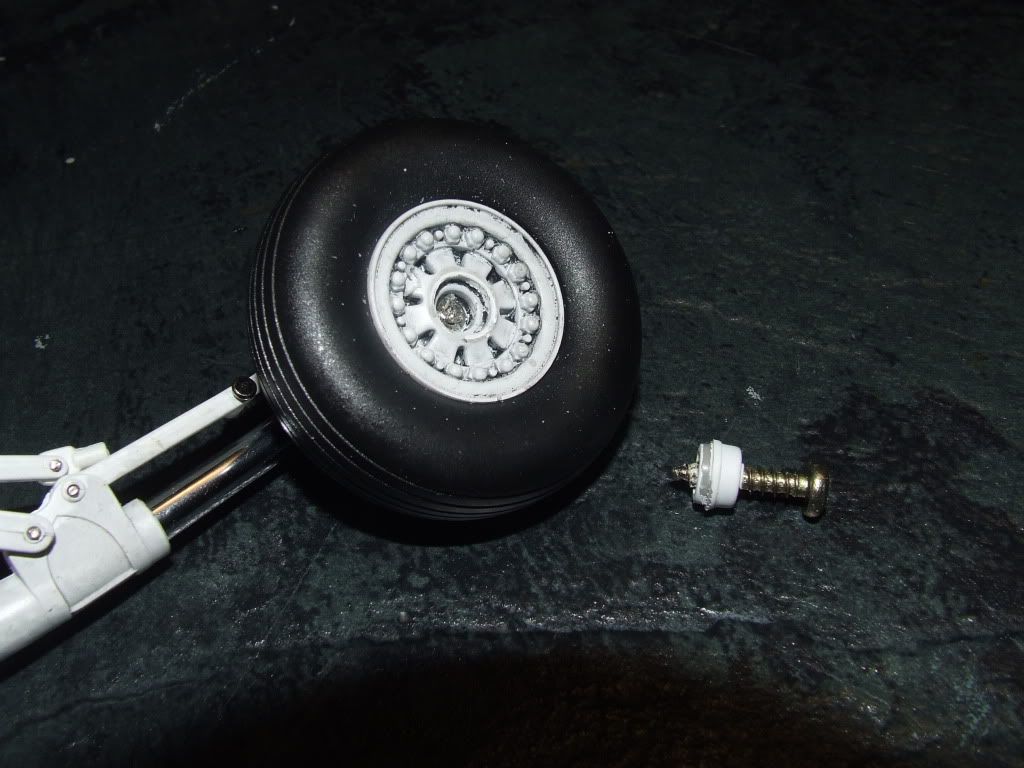
Removing Wheel
The cap on the front of the wheel is pressure fit into the wheel.
I destroyed it in the process of removing it, but it can easily be replaced with a new scratch built one. I latched on to it with a small pair of vice grips and twisted it out.
Inside is a small phillips head screw.
The wheel wobbles on the factory axlel and this way I can reinforce the axle with a brass bushing. This will eliminate the wobble and one variable in the inability of the strut to bear the weight of the plane.
Regards,
Dean
-
deankleines
- Corporal
- Posts: 84
- Joined: Mon Dec 21, 2009 6:22 pm
Removing Wheels - Better Method
Just removed the second wheel without destroying the cap!!!
Here's how:
Drill a small 1/32 hole into the center of the cap where it is recessed.
Turn a phillips head screw into the hole.
As you turn it in, it will contact the screw inside and push out the cap
Turn in till the cap pops out.
This is much better that first try.
[img][img]http://i273.photobucket.com/albums/jj22 ... ppl-14.jpg[/img][/img]
-
Black_Dragon_One
- Officer - Brigadier General
- Posts: 2032
- Joined: Sat Dec 11, 2004 1:23 pm
- Location: California
Re: Removing Wheels - Better Method
deankleines wrote:Just removed the second wheel without destroying the cap!!!
Here's how:
Drill a small 1/32 hole into the center of the cap where it is recessed.
Turn a phillips head screw into the hole.
As you turn it in, it will contact the screw inside and push out the cap
Turn in till the cap pops out.
This is much better that first try.
with u r fix is it strong enough to cary the weight of the f14 with out snamping off
[img][img]http://i273.photobucket.com/albums/jj22 ... ppl-14.jpg[/img][/img]
whats up doc....
-
deankleines
- Corporal
- Posts: 84
- Joined: Mon Dec 21, 2009 6:22 pm
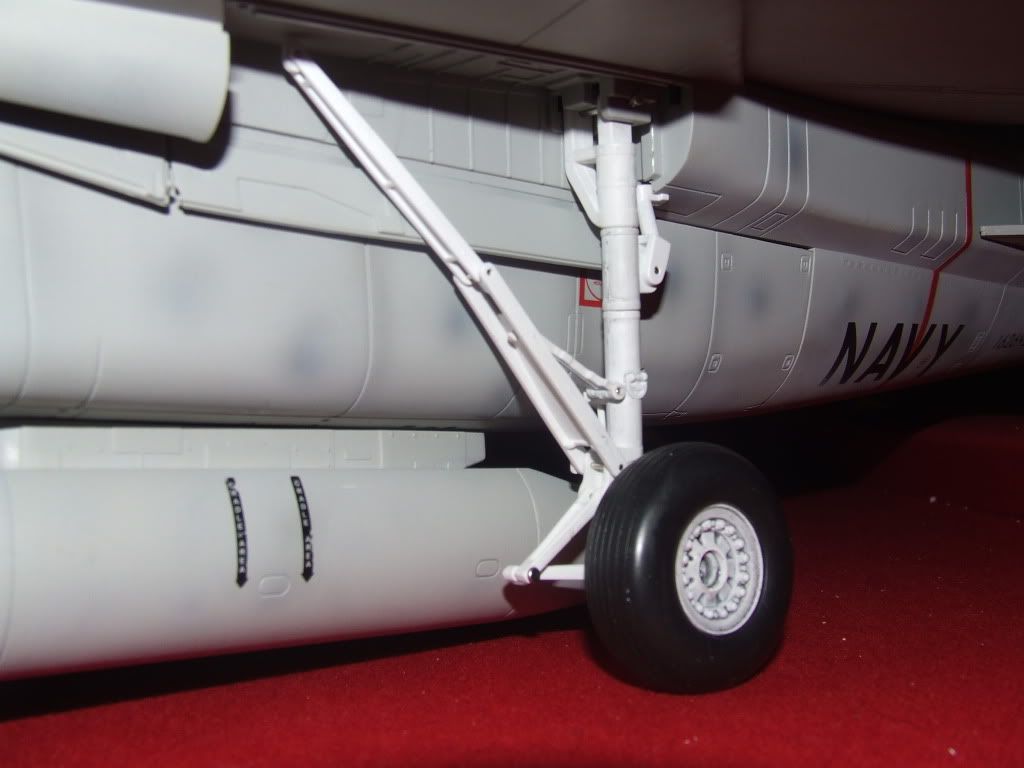
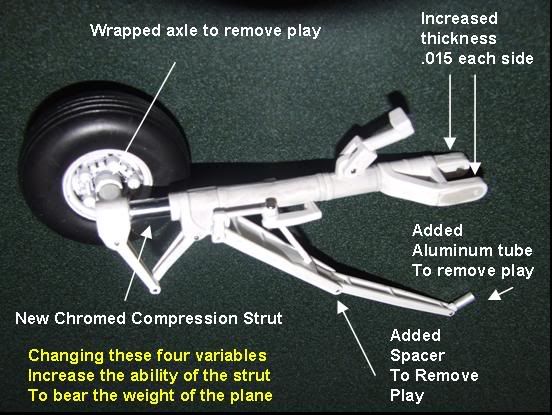
Mods to struts
Note that the compression cylinder has been replaced and basically a 1/8" brass tube runs all the way up through the strut. This provides vertical strength to bear the weight of the plane. At this point, I am looking at some other mods that will protect the strut from lateral stress failure.
I may eventally epoxy the strut in place, as I have no real desire to display the plane with the wheels up.
I'll be posting more progress on the struts in the days ahead.
Regards,
Dean
I may eventally epoxy the strut in place, as I have no real desire to display the plane with the wheels up.
I'll be posting more progress on the struts in the days ahead.
Regards,
Dean
-
deankleines
- Corporal
- Posts: 84
- Joined: Mon Dec 21, 2009 6:22 pm
-
deankleines
- Corporal
- Posts: 84
- Joined: Mon Dec 21, 2009 6:22 pm
 [/img]
-
Black_Dragon_One
- Officer - Brigadier General
- Posts: 2032
- Joined: Sat Dec 11, 2004 1:23 pm
- Location: California
Re: Main Gear Strut Enhancements
deankleines wrote:[img][img]http://i273.photobucket.com/albums/jj22 ... ements.jpg[/img][/img]
More to come!
Dean
what do you mean by wrap axes and how do you ad crome
whats up doc....
-
deankleines
- Corporal
- Posts: 84
- Joined: Mon Dec 21, 2009 6:22 pm
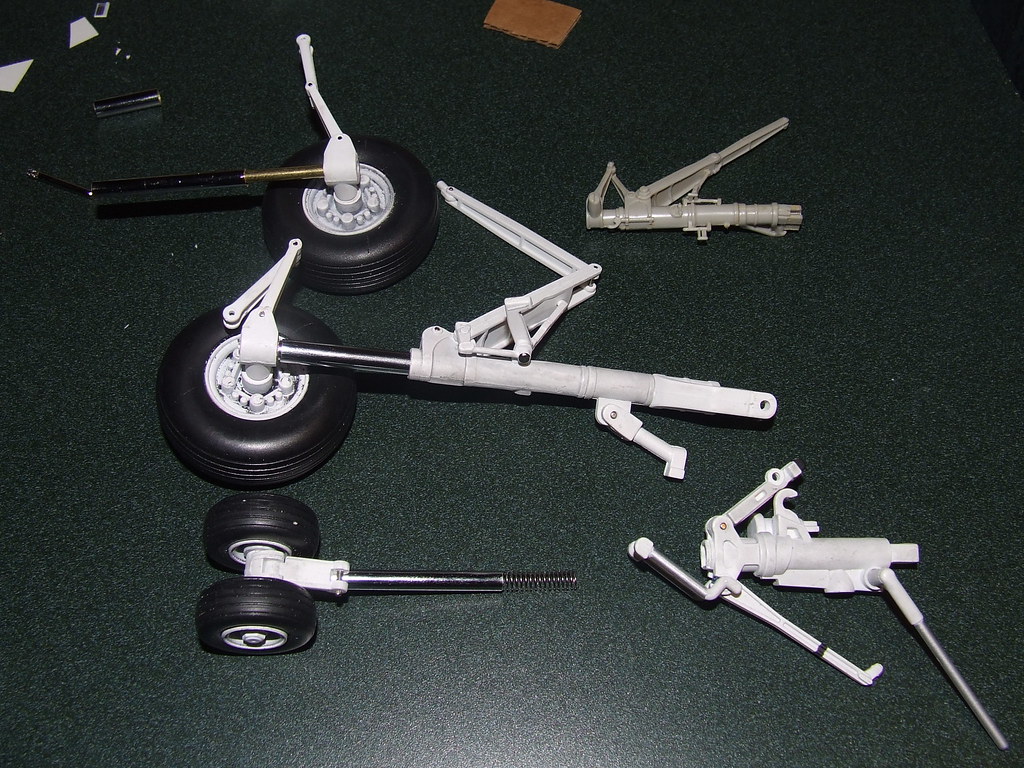
Gear Strut Rebuilds on JSI Tomcat
I replaced the compression struts in my Tomcat with sections of chromed telescoping tv antenna. Previous post shows parts layed out on a piece of paper. The axel section that goes into the wheel was wrapped with clear cello tape to remove the wobble that the factory fit had.
Here is another view of the struts during rebuild.
 [/img]
Here is another view of the struts during rebuild.
[/img]-
pcoughran
- Officer - 1st Lieutenant

- Posts: 596
- Joined: Mon Jun 30, 2008 10:58 am
- Location: 1, USA, MO, St. Louis
Dean,
How easy is it to get the main gear out? I just got the replacement gear from Merit yesterday and want to try and install them this weekend. Do you have any tips for getting the main gear out? Does the plane have to be taken apart to get the pin out that holds the gear in? I haven't taken it off it's acrylic stand since it was put up. I dread opening it up again as I had so much disappointment with the first set of gear.
Any tips would be appreciated.
Phil
"Where's dat waskily wabbit?"
____________________________________________
Good Trades: Ostketten, Pickelhaube, Cornbreadfred, Sledgehammer, Pizzaguy, caesarbc3,jwcarpenter
____________________________________________
Good Trades: Ostketten, Pickelhaube, Cornbreadfred, Sledgehammer, Pizzaguy, caesarbc3,jwcarpenter
-
deankleines
- Corporal
- Posts: 84
- Joined: Mon Dec 21, 2009 6:22 pm
Pulling Main Gear Pins
Phil,
Need to know how much of your main gear pin is extending beyond the surface of the wall it goes into. I used a Zircon Sprue Cutter to grab onto the end of the pin. It pulled right out. I'll try to post a picture later.
You can call me if you need me to talk you through it.
Dean
330-699-3228
Need to know how much of your main gear pin is extending beyond the surface of the wall it goes into. I used a Zircon Sprue Cutter to grab onto the end of the pin. It pulled right out. I'll try to post a picture later.
You can call me if you need me to talk you through it.
Dean
330-699-3228
-
deankleines
- Corporal
- Posts: 84
- Joined: Mon Dec 21, 2009 6:22 pm
Pulling out Main Gear Pins
First you must remove the gear door to expose the pin. I did this by sawing through the front hinge pin with a fine razor saw. I will rebuild the pin with brass tubing when done with the gear and detailing the gear bays.
Next, if enough of the knurled end of the pin is sticking out, grab it with the spru cutter or nail clipper and pull it straight out.
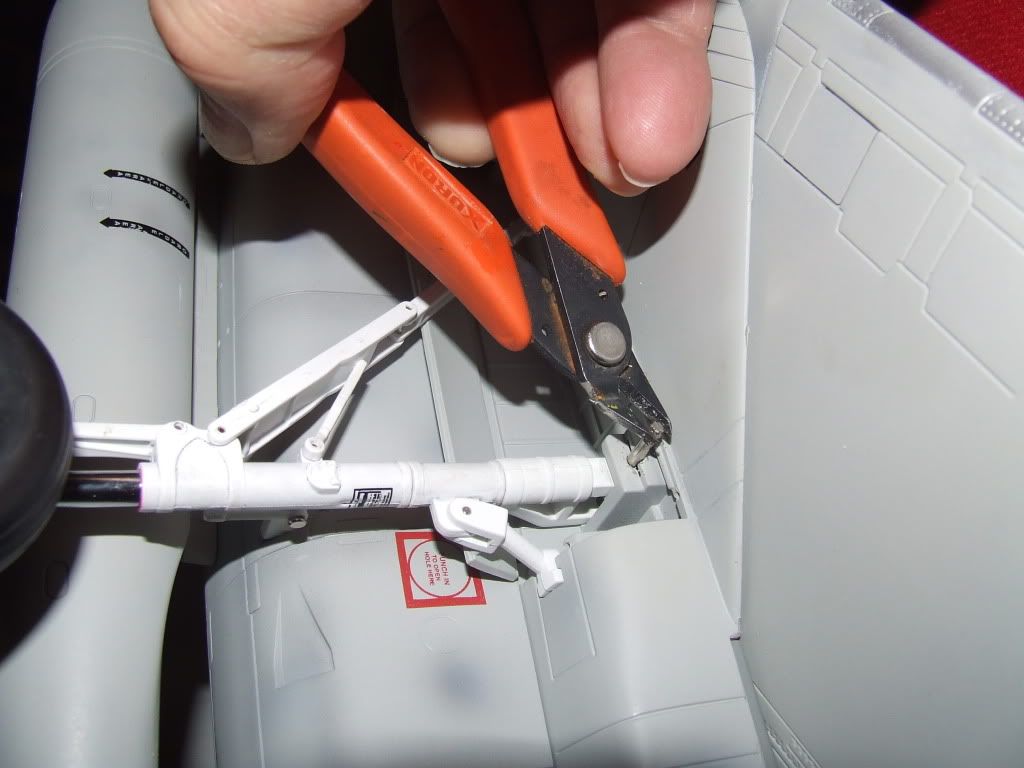
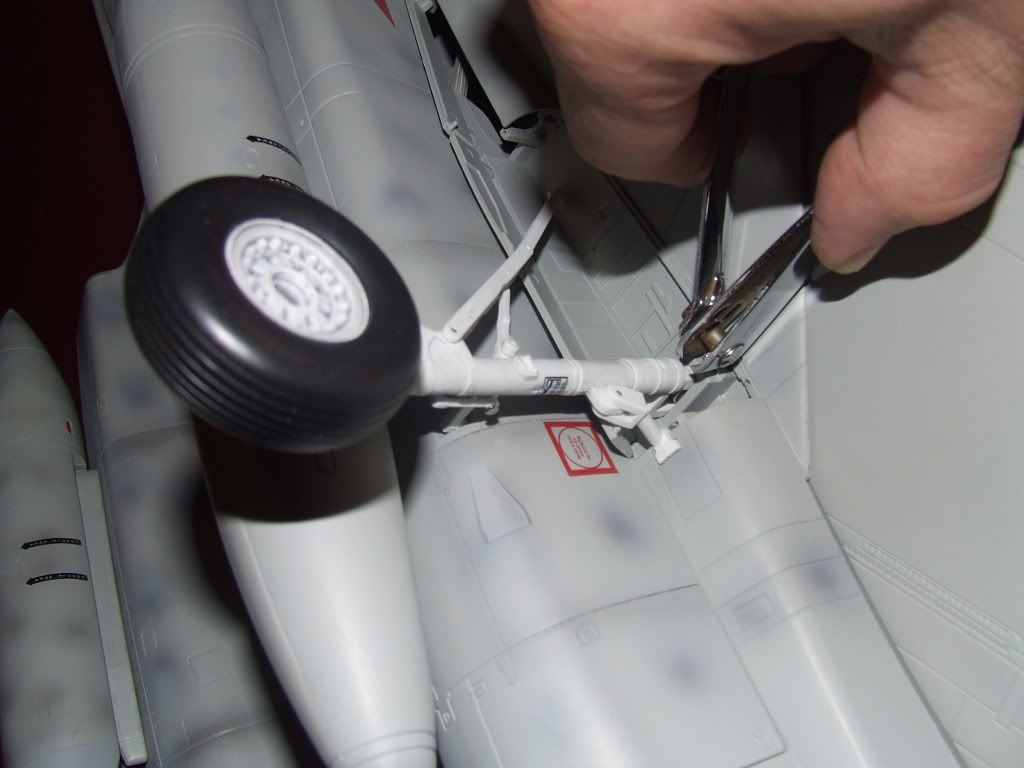
If not enough of the head is exposed to grab onto, it can be pushed out by placing your cutter on top of the pin, inside the strut posts, and pushing the pin out. Once the head is exposed, you can grab it and pull it the rest of the way out.
Hope this helps!!!
Regards,
Dean

Next, if enough of the knurled end of the pin is sticking out, grab it with the spru cutter or nail clipper and pull it straight out.
If not enough of the head is exposed to grab onto, it can be pushed out by placing your cutter on top of the pin, inside the strut posts, and pushing the pin out. Once the head is exposed, you can grab it and pull it the rest of the way out.
Hope this helps!!!
Regards,
Dean

Dean you are the man!
Dean,
A picture is worth a 1000 words! Many thanks... I know it takes some effort to set things up for pictures... it is appreciated.
Regards,
Mike
A picture is worth a 1000 words! Many thanks... I know it takes some effort to set things up for pictures... it is appreciated.
Regards,
Mike
-
Black_Dragon_One
- Officer - Brigadier General
- Posts: 2032
- Joined: Sat Dec 11, 2004 1:23 pm
- Location: California
Re: Gear Strut Rebuilds on JSI Tomcat
some how is u r holding up..deankleines wrote:I replaced the compression struts in my Tomcat with sections of chromed telescoping tv antenna. Previous post shows parts layed out on a piece of paper. The axel section that goes into the wheel was wrapped with clear cello tape to remove the wobble that the factory fit had.
Here is another view of the struts during rebuild.
so is it all the weight on the L end where the wheel meet.. would this soon or later too will snap
whats up doc....
-
pcoughran
- Officer - 1st Lieutenant
- Posts: 596
- Joined: Mon Jun 30, 2008 10:58 am
- Location: 1, USA, MO, St. Louis
Dean,
Thanks for the great pictures. I was hoping I wouldn't have to cut anything (gear door hinge pin), but I guess nothing worth doing is ever as easy as we wish.
Thanks again for the great pics and lessons.
Phil
Thanks for the great pictures. I was hoping I wouldn't have to cut anything (gear door hinge pin), but I guess nothing worth doing is ever as easy as we wish.
Thanks again for the great pics and lessons.
Phil
"Where's dat waskily wabbit?"
____________________________________________
Good Trades: Ostketten, Pickelhaube, Cornbreadfred, Sledgehammer, Pizzaguy, caesarbc3,jwcarpenter
____________________________________________
Good Trades: Ostketten, Pickelhaube, Cornbreadfred, Sledgehammer, Pizzaguy, caesarbc3,jwcarpenter
-
deankleines
- Corporal
- Posts: 84
- Joined: Mon Dec 21, 2009 6:22 pm
-
thatf14guy
- Officer - 1st Lieutenant
- Posts: 521
- Joined: Thu Nov 19, 2009 5:58 am
-
deankleines
- Corporal
- Posts: 84
- Joined: Mon Dec 21, 2009 6:22 pm
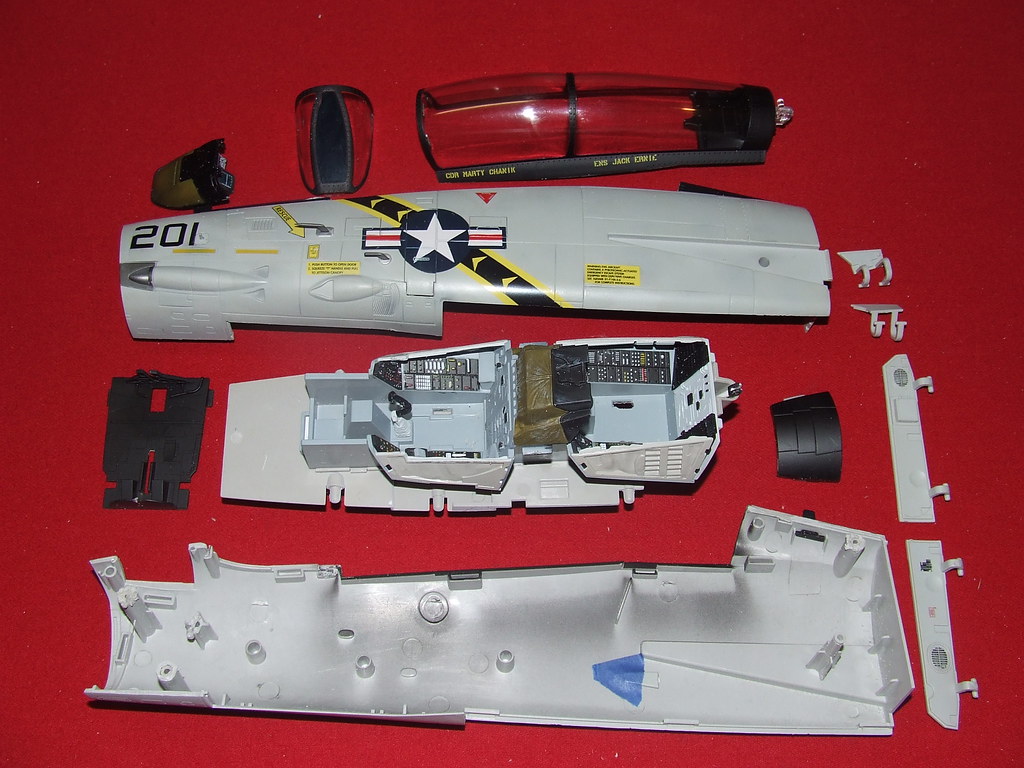
Removal and disassembly of cockpit
I have my cockpit completely disassembled for significant detailing to be done.
Send me your e-mail and I will link you to my flickr account so you can see some of the photos.
I can write a step by step procedure for those who wish to take apart the nose.
E-mail me [email protected]
Dean
Send me your e-mail and I will link you to my flickr account so you can see some of the photos.
I can write a step by step procedure for those who wish to take apart the nose.
E-mail me [email protected]
Dean
-
deankleines
- Corporal
- Posts: 84
- Joined: Mon Dec 21, 2009 6:22 pm
 [/img]
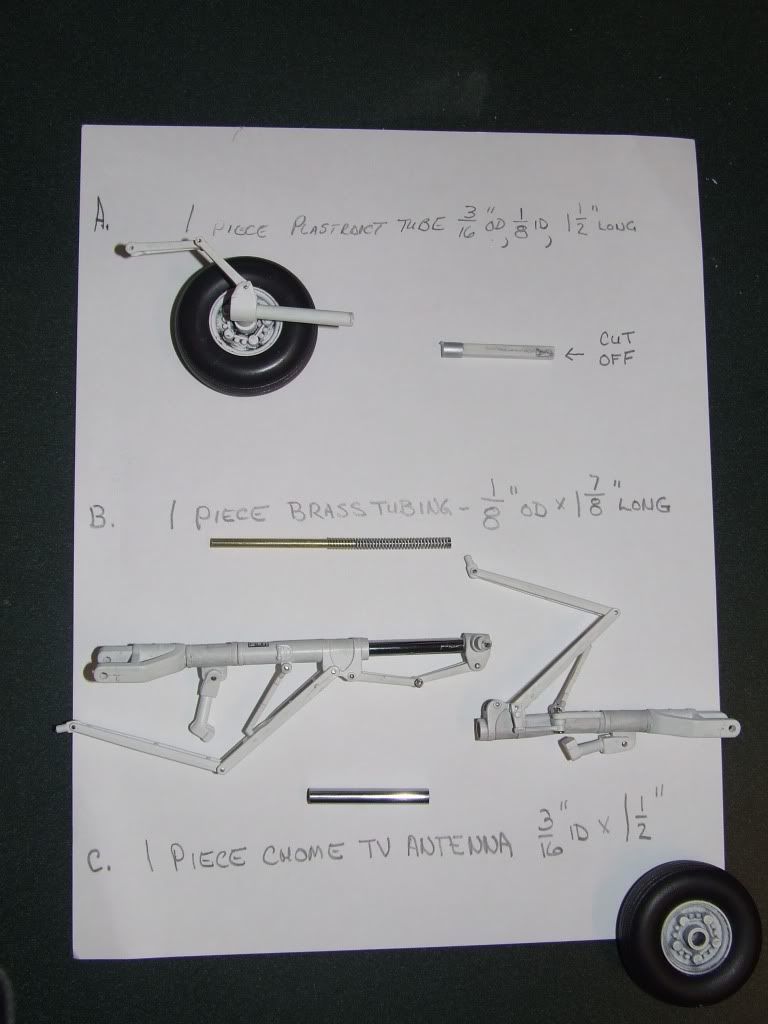
Dean,
I have taken the plunge on the ejection seat. Took it apart and sanded off the old pleated cushions and made new ones with 2 Part Epoxy putty. About half finished with the first one. Will post some pics soon.
Mike
P.S. I could use those directions cause it looks like I'll head into the deep end too.
-
deankleines
- Corporal
- Posts: 84
- Joined: Mon Dec 21, 2009 6:22 pm
Taking apart the nose section
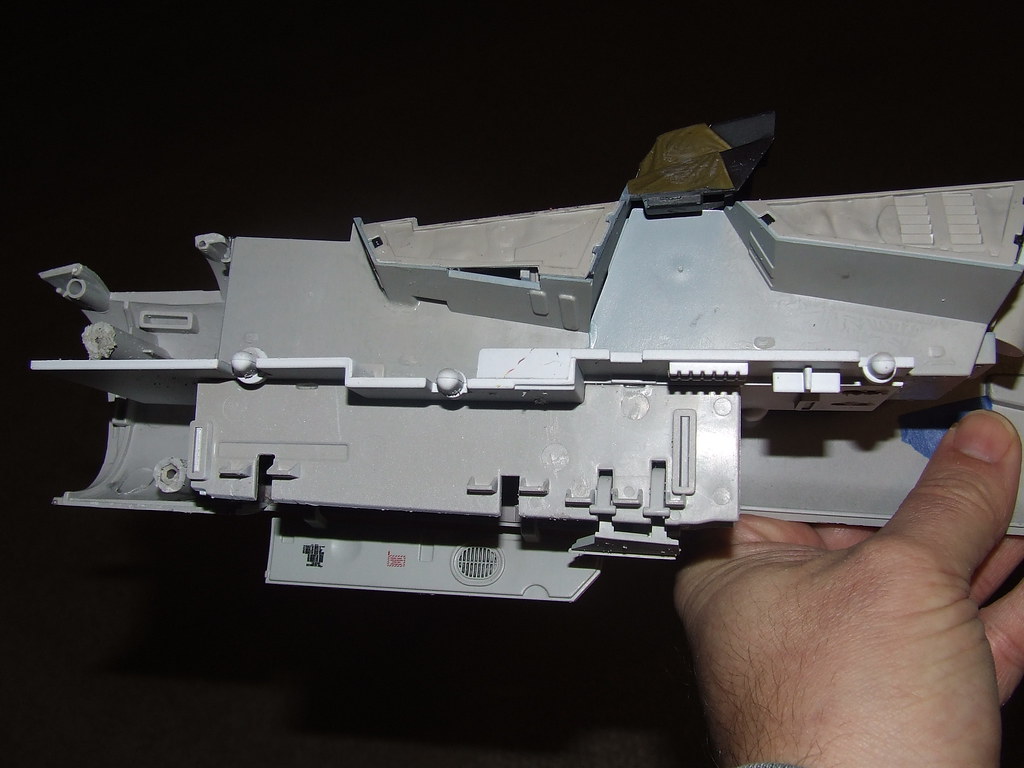
Mike and anyone else interested in taking apart the nose section:
Not that hard and really straight forward. I will post steps tonight.
I used a Dremel with a grinding bit, a razor saw and lots of care. Everything came apart really easy once I understood how it was manufactured.
It was really exciting to see the engineering that went into this!
[/img]http://farm5.static.flickr.com/4011/428 ... ac67_b.jpg[/img]
-
deankleines
- Corporal
- Posts: 84
- Joined: Mon Dec 21, 2009 6:22 pm
Re: Taking apart the nose section
[quote="deankleines"]Mike and anyone else interested in taking apart the nose section:
Not that hard and really straight forward. I will post steps tonight.
I used a Dremel with a grinding bit, a razor saw and lots of care. Everything came apart really easy once I understood how it was manufactured.
It was really exciting to see the engineering that went into this!
http://farm5.static.flickr.com/4011/428 ... ac67_b.jpg
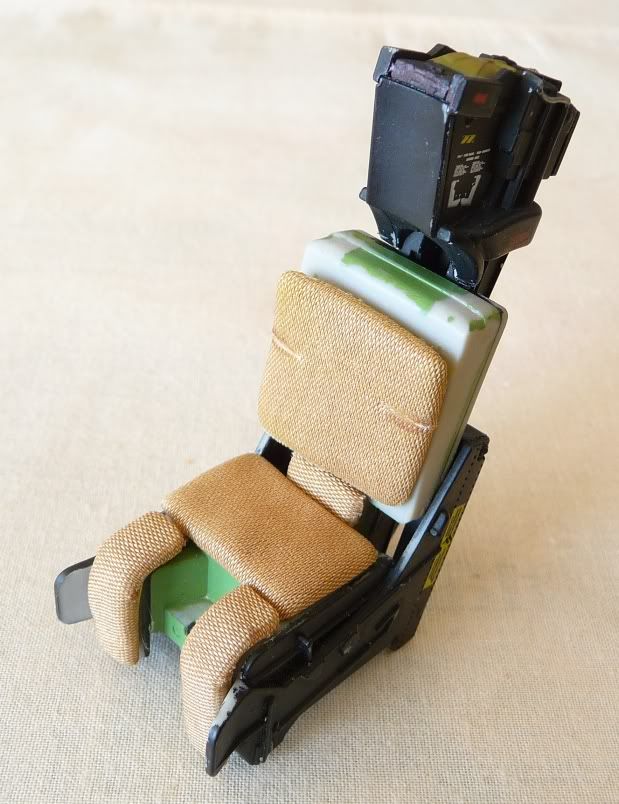
Ejection Seat Progress
Dean,
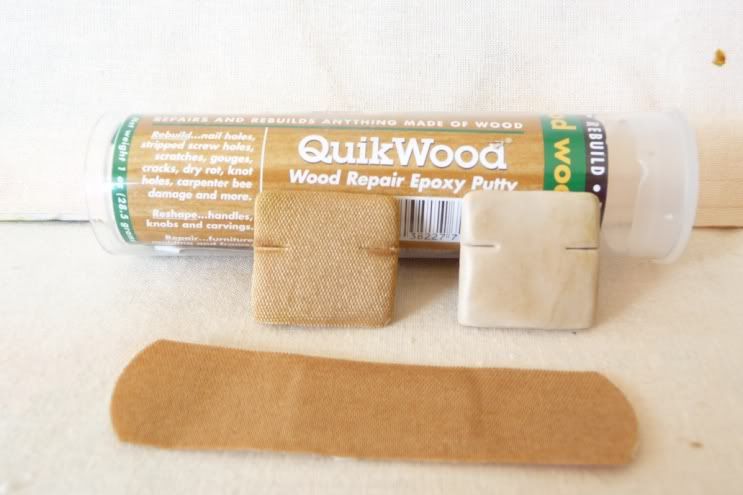
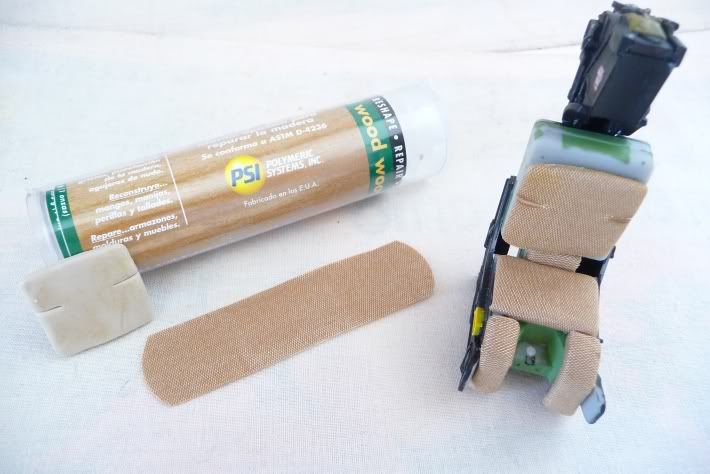
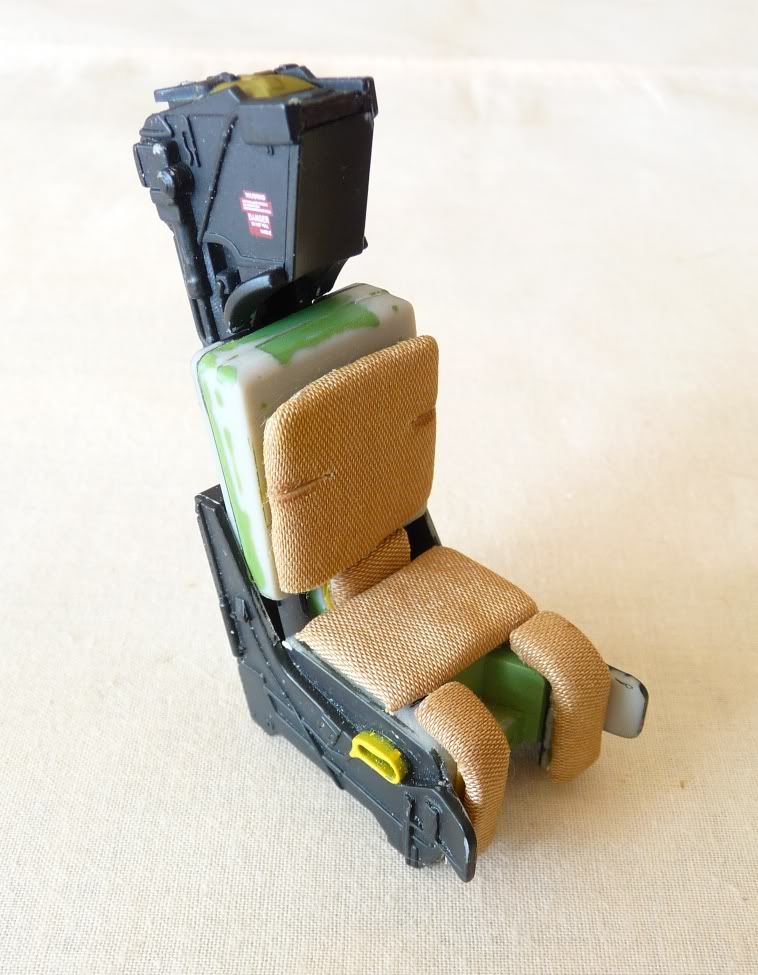
Your pictures inspired me to try something new. Check it out. Spent last two days working on the ejection seat. The original pleated cushions were replaced with a more fabric version. (See earlier pics) I have seen quite a variety in colors ranging from tan to olive to a dark green. Taking a tip from chuck540z3 I formed the individual cushions with 2 Part Epoxy Putty. Stuff is great. Once you kneed it together you have about 15 minutes to shape, cut and finish it. After that it begins to harden. Next day you can sand it! Chuck used some sort of medical tape to imprint a fabric pattern. I tried this with mixed results then I thought... "why not just cover the hardened cushions with the band-aid material. So I gave it a shot
and this was the outcome.
Mike
<a href="http://s160.photobucket.com/albums/t197 ... =Seat1.jpg" target="_blank"><img src="http://i160.photobucket.com/albums/t197 ... /Seat1.jpg" border="0" alt="Photobucket"></a>
<a href="http://s160.photobucket.com/albums/t197 ... eat2-1.jpg" target="_blank"><img src="http://i160.photobucket.com/albums/t197 ... eat2-1.jpg" border="0" alt="Photobucket"></a>
<a href="http://s160.photobucket.com/albums/t197 ... eat3-1.jpg" target="_blank"><img src="http://i160.photobucket.com/albums/t197 ... eat3-1.jpg" border="0" alt="Photobucket"></a>
<a href="http://s160.photobucket.com/albums/t197 ... =Seat6.jpg" target="_blank"><img src="http://i160.photobucket.com/albums/t197 ... /Seat6.jpg" border="0" alt="Photobucket"></a>