Getting into the drivers seat...
-
mack perry
- Corporal

- Posts: 33
- Joined: Mon Jul 10, 2006 7:10 pm
- Location: fla
-
MiG29K
- Officer - 1st Lieutenant

- Posts: 496
- Joined: Sun Mar 05, 2006 1:36 pm
- Location: Shoreline Washington
- Contact:
G'Day Spud!
Hey Spud and Mack - G'day as well to both of you...
Alright...where shall I start? I'll reply point per point. Thanks first off and now to the questions -
Color. I Used Testor's Brand #1237 Spray Enamel to paint the Antennaes and other peripheral parts. Mind you the parts were Polystyrene and not the Vinyl/PVC like surface of the fuselage. I did however made a ad-hoc mix of paint to match the darker gray of the fuselage. I took the standard gray Testors paint pen and I mixed it with black and white until I got a near visual match. Basically I pulled it out of a hat and I did not record any exact percentages.
Light Gray. The light gray was a bottled Testor's Model Master Paint. Name is Light Ghost Gray and the number faded off the bottle but I believe it is number 1728!
Tamiya / Gunze Paints I asked several months back about the best kind of paint to adhere to Vinyl / PVC material and I was told Acrylics and I have never used Acrylics before in modeling. When I finally reach this road, I'll give my report.
Roundels and Removal thereof: As per your statement, I as well used ultra fine grade sanding film to removed aspects of printed graphics such as the Pilots Name and in the editing of the Aircraft number. When all is said and done Spud, the surface is smooth and is hardly noticeable (short of the fact the area is barely shinier)
Airbrushing: I haven't yet used an airbrush on my plane as I broke mine due to my stupidity and laziness in NOT properly cleaning it. I would estimate that airbrushing will do well in covering large surfaces, of course with appropriate color.
Solvent: I used Testors Paint thinner and some Q-tips and papertowels to remove all the paint from the nosecone. Some guy from Aircraft Resource Center suggested that I try it and I made the attempt and it worked. The nose is made of a strange rubbery material unlike the rest of the plane. I don't think thinner will work on any other part. I think wet sanding or using ultra fine sanding sheets is the best option.
If anyone else has any ideas for both Spud and I, go ahead, fire away.
Lastly: MACK PERRY. Thanks to you as well and ...what did you mean about talking about numbers? Are you curious as to what it cost overall to make all the changes to the plane? The whole project if you will, I will liken to a big Avalanche. Why? you ask? I never really planned on going beyond antennas and landing gear. One thing led to the other and it basically snowballed beyond what I ever imagined, thus I bought the plastic materials on an "as need" basis and it would take a bit to estimate the cost. Ask me anything else you may be curious about if you like Mack!
Take Care and Peace...
R
??????? ?????. ?????? ? ??????!
Washington State > Kansas
Washington State > Kansas
-
mack perry
- Corporal
- Posts: 33
- Joined: Mon Jul 10, 2006 7:10 pm
- Location: fla

G'day MiG29K
Sorry for the my delay in responding
Thank you hoever for your prompt and thorough reply.
As far as the paint goes, I’m going to try and get an acrylic match this weekend using the access ladder as a match sample, I'll post my search results here once I find something. I'll will also try to ID a good lower grey colour as well.
When using my airbrush I nearly always use acrylics due to their ease of thinning and cleaning, all I can suggest is give them a go.
Solvents: well you can strike spirit (know as mentholated spirits here) off the list as this had no effect at all.
I hear that applying a bi-carb of soda paste/solution can be used to remove paint but I would be concerned that this may result in bleaching the plastic, so I am leaning towards the fine grit and touch up method at the moment.
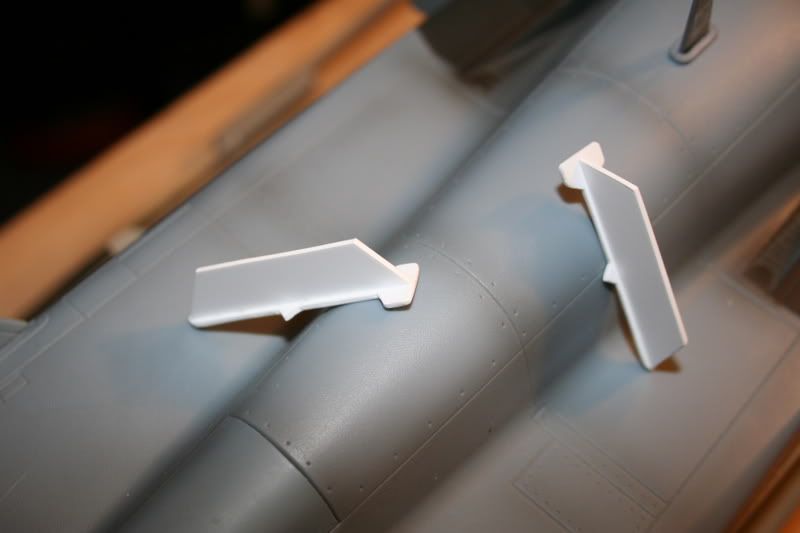
As an interim baby step on the road to customisation, I decided to tackle the lex fences and found that they came away quite easily, although the glue residue left behind required some gentle blade scraping and light sanding to remove.

I'm not completely happy with the results so far, I still need to add some weathering to stop them from looking so stuck on. For this I intend to dry-brushing some grey pastels into the crevices and then seal it in place with some sprayed on mat coat.
Secondly I have reversed the control column to it correct position.
I am still deciding how best to approach the gear doors, have a few ideas that I hope will be a little less involved than yours but need to do a bit more planning first. I also want to make sure that I have some touch-up paint on hand before I begin.
Lastly I am also considering changing the Hi-Vis markings to Lo-Vis but this also requires a lot of planning not to mention some serious artwork.
I know these changes seem quite minor when compared to your mods, I’ll keep you posted on any breakthroughs.
Sorry for the my delay in responding
Thank you hoever for your prompt and thorough reply.
As far as the paint goes, I’m going to try and get an acrylic match this weekend using the access ladder as a match sample, I'll post my search results here once I find something. I'll will also try to ID a good lower grey colour as well.
When using my airbrush I nearly always use acrylics due to their ease of thinning and cleaning, all I can suggest is give them a go.
Solvents: well you can strike spirit (know as mentholated spirits here) off the list as this had no effect at all.
I hear that applying a bi-carb of soda paste/solution can be used to remove paint but I would be concerned that this may result in bleaching the plastic, so I am leaning towards the fine grit and touch up method at the moment.
As an interim baby step on the road to customisation, I decided to tackle the lex fences and found that they came away quite easily, although the glue residue left behind required some gentle blade scraping and light sanding to remove.
I'm not completely happy with the results so far, I still need to add some weathering to stop them from looking so stuck on. For this I intend to dry-brushing some grey pastels into the crevices and then seal it in place with some sprayed on mat coat.
Secondly I have reversed the control column to it correct position.
I am still deciding how best to approach the gear doors, have a few ideas that I hope will be a little less involved than yours but need to do a bit more planning first. I also want to make sure that I have some touch-up paint on hand before I begin.
Lastly I am also considering changing the Hi-Vis markings to Lo-Vis but this also requires a lot of planning not to mention some serious artwork.
I know these changes seem quite minor when compared to your mods, I’ll keep you posted on any breakthroughs.
SPUD
Something's up with photobucket?????

Something's up with photobucket?????
-
MiG29K
- Officer - 1st Lieutenant
- Posts: 496
- Joined: Sun Mar 05, 2006 1:36 pm
- Location: Shoreline Washington
- Contact:
Curious...
Spud Meister...
Are you planning on removing the Carrier Landing bar on your Hornet to match that of operational AUS Hornets?? Just wondering. I know that there are very minor minor differences between US and AUS birds. I also noticed you are going to add the "Bird Slicers" 5 blade IFF antennas. I'm thinking of doing that to mine now although I was initially not going to do it. Hope the links I sent you are of help! I'm going to check out the site you recommended as well.
Peaccceout! R
??????? ?????. ?????? ? ??????!
Washington State > Kansas
Washington State > Kansas
G'day MiG29K
If by Carrier Landing bar you are referring to the bar on the front gear, well it would appear that some aircraft have this removed entirely while others retain a shortened version so at present I intent to leave this part in situ until I look at some more reference shots.
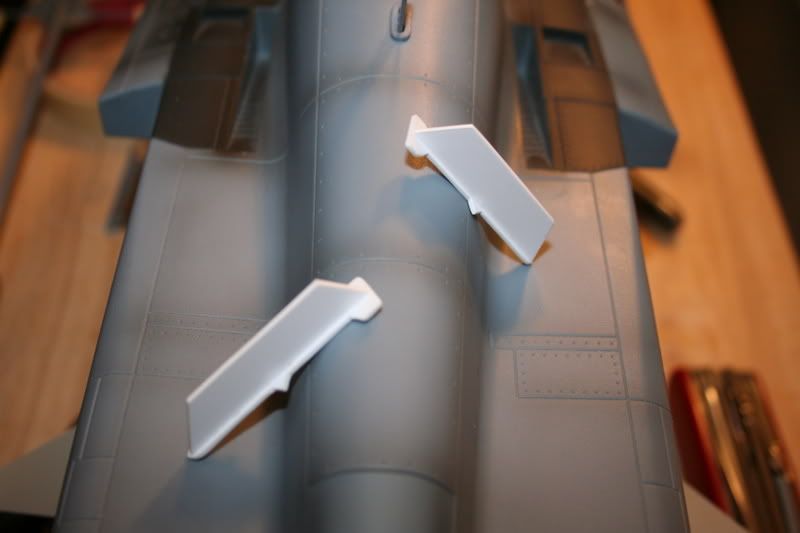
Here's how the fence comes up once a little grime has been added, however take into account that the use of a flash for the photo below makes the outcome look quite crude, where as the effect is far more subtle and thus acceptable to the naked eye.

I've still not got to the links yet as I have had this BBI Abrams to distract me, did anybody else notice that the commanders hatch is on back to front or maybe more accurately upside-down, well at least it used to be , I've also had to open up the FLIR/Rangefinder doors like others have also done, will post something once I the lenses are in place......well you know I had to find something to exaust my creative energies on while I'm waiting to get the F/A-18 paint issue sorted
  .
.
If by Carrier Landing bar you are referring to the bar on the front gear, well it would appear that some aircraft have this removed entirely while others retain a shortened version so at present I intent to leave this part in situ until I look at some more reference shots.
Here's how the fence comes up once a little grime has been added, however take into account that the use of a flash for the photo below makes the outcome look quite crude, where as the effect is far more subtle and thus acceptable to the naked eye.
I've still not got to the links yet as I have had this BBI Abrams to distract me, did anybody else notice that the commanders hatch is on back to front or maybe more accurately upside-down, well at least it used to be
SPUD
Something's up with photobucket?????
Something's up with photobucket?????

-
MiG29K
- Officer - 1st Lieutenant
- Posts: 496
- Joined: Sun Mar 05, 2006 1:36 pm
- Location: Shoreline Washington
- Contact:
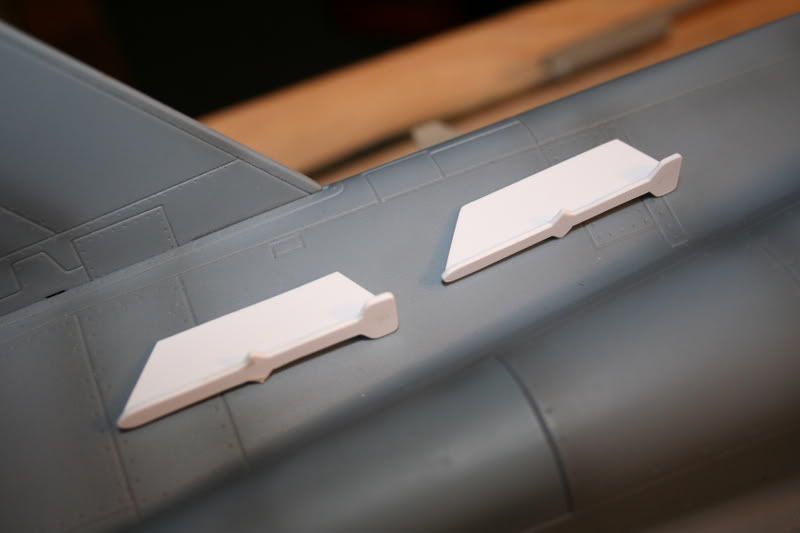
LEX FENCE
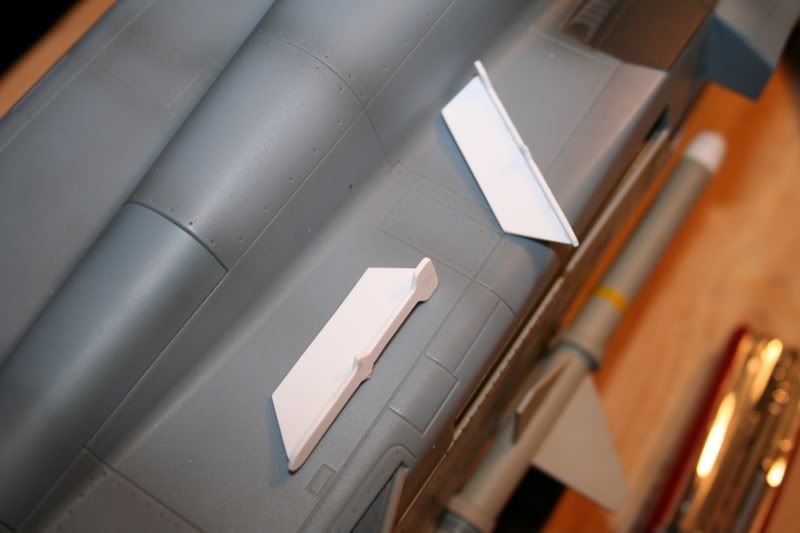
The fences on mine and many others were installed backwards. I have been trying to get them pulled out but I think these ones were glued securely. If they break no biggie, I'll just build new ones and glue them the right way! Also, the end of the tailhook is backwards, you'll have to slice off the "hook" end and reverse it. The Control stick in the cockpit is backwards as well. Remove it and then at the bottom, reshape the "D" peg into an oval. That way it will fit back in the "D" shaped slot on the floor. You might want to custom make and install a throttle onto the left panel. I worked one out complete with all the control buttons and switches, painted it flat black and installed it onto a two-lane track that glued right over the "graphic." There were a few other strange inconsistencies on the plane but I can' think of them off the top of my head.
??????? ?????. ?????? ? ??????!
Washington State > Kansas
Washington State > Kansas
-
MiG29K
- Officer - 1st Lieutenant
- Posts: 496
- Joined: Sun Mar 05, 2006 1:36 pm
- Location: Shoreline Washington
- Contact:
and here goes
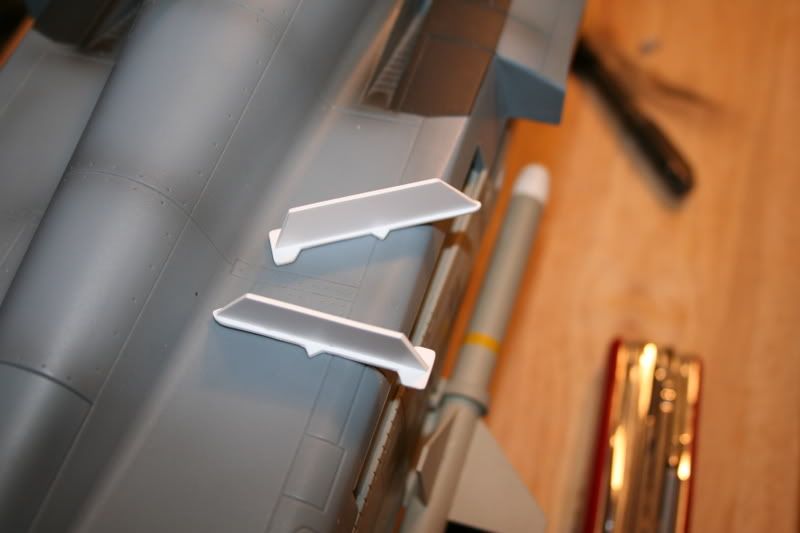
Spudkopf -A few weeks ago I tried pulling out the fences and reversing them only to damage one of them. It's to be expected since mine were pretty securely superglued and the rubber-like material made them prone to damage. I sketched one up in plastic now and corrected the positioning as with yours: (by the way, give me the latest on what's new)Spudkopf wrote:G'day MiG29K
Sorry for the my delay in responding
Thank you hoever for your prompt and thorough reply.
As far as the paint goes, I’m going to try and get an acrylic match this weekend using the access ladder as a match sample, I'll post my search results here once I find something. I'll will also try to ID a good lower grey colour as well.
When using my airbrush I nearly always use acrylics due to their ease of thinning and cleaning, all I can suggest is give them a go.
Solvents: well you can strike spirit (know as mentholated spirits here) off the list as this had no effect at all.
I hear that applying a bi-carb of soda paste/solution can be used to remove paint but I would be concerned that this may result in bleaching the plastic, so I am leaning towards the fine grit and touch up method at the moment.
As an interim baby step on the road to customisation, I decided to tackle the lex fences and found that they came away quite easily, although the glue residue left behind required some gentle blade scraping and light sanding to remove.
I'm not completely happy with the results so far, I still need to add some weathering to stop them from looking so stuck on. For this I intend to dry-brushing some grey pastels into the crevices and then seal it in place with some sprayed on mat coat.
Secondly I have reversed the control column to it correct position.
I am still deciding how best to approach the gear doors, have a few ideas that I hope will be a little less involved than yours but need to do a bit more planning first. I also want to make sure that I have some touch-up paint on hand before I begin.
Lastly I am also considering changing the Hi-Vis markings to Lo-Vis but this also requires a lot of planning not to mention some serious artwork.
I know these changes seem quite minor when compared to your mods, I’ll keep you posted on any breakthroughs.
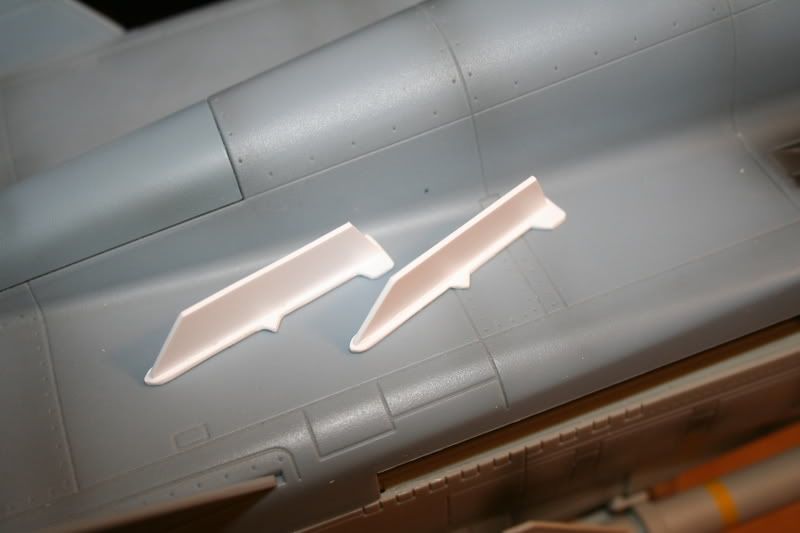
Now i get that nice solid "THUNK" noise every time I hit them!
Last edited by MiG29K on Sat Oct 07, 2006 7:58 am, edited 2 times in total.
??????? ?????. ?????? ? ??????!
Washington State > Kansas
Washington State > Kansas
G'day MiG29K
As usual your work looks excellent. Can’t wait to see the completed installation.
As for me life keeps getting in the way and as such my hobby time has been very limited, almost to the point being stagnant. As it is I have only been able to cruise by here every second day or so and almost missed your posting.
The Abrams is in limbo while I await the results of my CIP casting project. So the best I've been able to muster up is a quick and simple correction of the TOW launcher on one of two 21stCT forest M0125 I received recently. Surprisingly all the components are there to correct what looks like an assembly error, to me it even looks like someone got the assembly wrong on the first one and has repeated the error ever since. I’ll see if I can post up some images this weekend.
SPUD
Something's up with photobucket?????
Something's up with photobucket?????
-
HardenSteel
- Sergeant

- Posts: 230
- Joined: Mon Oct 04, 2004 6:47 pm
- Location: Victoria, BC
-
MiG29K
- Officer - 1st Lieutenant
- Posts: 496
- Joined: Sun Mar 05, 2006 1:36 pm
- Location: Shoreline Washington
- Contact:
She's going to Canada and I definitely want to move forward on that -Victoria would even be great since it's been a year. I didn't go up to B.C. as often as I usually do. If the F-16 get enough changes finished, it too will go up. Good to see you're still around. Crazy busy around here and I'm working on Female Fighter Jockey for the Hornet. I'll keep you posted!HardenSteel wrote:This jet absolutely rules! I still want to see it in person. Keep up the fantastic job!
HD
??????? ?????. ?????? ? ??????!
Washington State > Kansas
Washington State > Kansas