Love to tweak toys and models? Add features and small details? This forum is for you!
-
MiG29K
- Officer - 1st Lieutenant

- Posts: 496
- Joined: Sun Mar 05, 2006 1:36 pm
- Location: Shoreline Washington
-
Contact:
Post
by MiG29K » Wed Apr 19, 2006 9:11 pm
??????? ?????. ?????? ? ??????!
Washington State > Kansas
-
RED
- Officer - Major

- Posts: 939
- Joined: Sun Feb 05, 2006 3:09 pm
- Location: Atlanta, Georgia
Post
by RED » Wed Apr 19, 2006 10:45 pm
MIG29K---Sorry I don't have any answers for you ---but I just wanted to tell you I think your work on your F/A-18 IS OUTSTANDING!!! I really enjoy looking at all the new customs you have been doing!!!

Keep up the good work!!!---RED---
[size=150][/size]"Take your time.Stay away from the easy going.Never go the same way twice."---GySgt Charles C. Arndt on patrolling on Guadalcanal,1942[color=#BF0000][/color]
-
Folkwulfe
- Officer - Captain

- Posts: 719
- Joined: Fri Jun 10, 2005 1:23 pm
- Location: Arlington, Texas
Post
by Folkwulfe » Thu Apr 20, 2006 10:59 am
Hey dude...looking good so far to me. From the pics I have you're dead on. The actuator bar that connects the canopy frame to the mechanism I considered making a two-piece friction slider....not exactly accurate, but might simplify the raising and lowering of the canopy. I have removed the canopy and have started making paper templates for the inside canopy framing first. Looks like we started from opposite ends. Oh...and forget removing the nose cone.....I'll explain later.
US Army MP Corps combat veteran Operation Desert Shield/Desert Storm
-
MiG29K
- Officer - 1st Lieutenant
- Posts: 496
- Joined: Sun Mar 05, 2006 1:36 pm
- Location: Shoreline Washington
-
Contact:
Post
by MiG29K » Thu Apr 20, 2006 11:02 am
errrr...ummm...HOW did your manage to remove the canopy? or did you hack your plane apart????? hehe... I swear my Hornet at this point is basically a Girl with mad Tattoos and Body Piercings at this point! Do tell!
??????? ?????. ?????? ? ??????!
Washington State > Kansas
-
MiG29K
- Officer - 1st Lieutenant
- Posts: 496
- Joined: Sun Mar 05, 2006 1:36 pm
- Location: Shoreline Washington
-
Contact:
Post
by MiG29K » Thu Apr 20, 2006 11:04 am
Thanks RED!
??????? ?????. ?????? ? ??????!
Washington State > Kansas
-
Folkwulfe
- Officer - Captain
- Posts: 719
- Joined: Fri Jun 10, 2005 1:23 pm
- Location: Arlington, Texas
Post
by Folkwulfe » Thu Apr 20, 2006 11:52 am
First...to remove the canopy. Put something flat and wide, but not too thick (say 1/4 inch?) along the lower aft end of both canopy rails (nearest the hinges, but not on the aft bulkhead). Then close the canopy and push down on the forward edge of the canopy at the windscreen and hold it down with you thumb. That should pull up slightly on the hinges themselves. Use a thin blade and slide it between the outer edge of the hinge cutout and push slightly towards the centerline of the aircraft from either side. That hinge should then pop free...repeat on the opposite side and the canopy comes off easy.
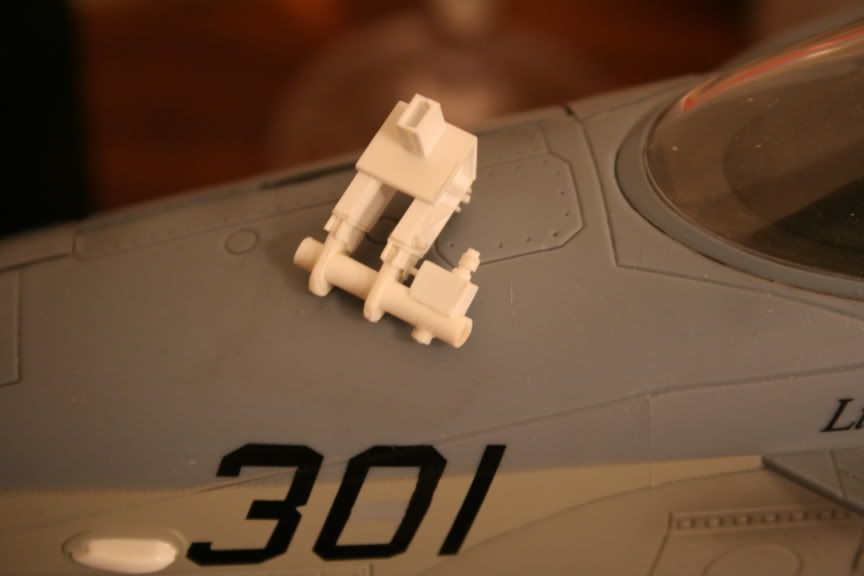
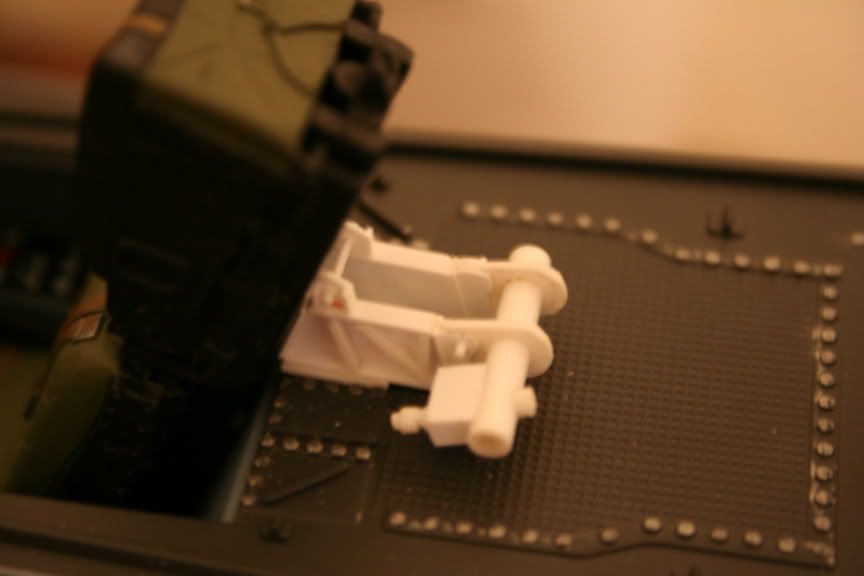
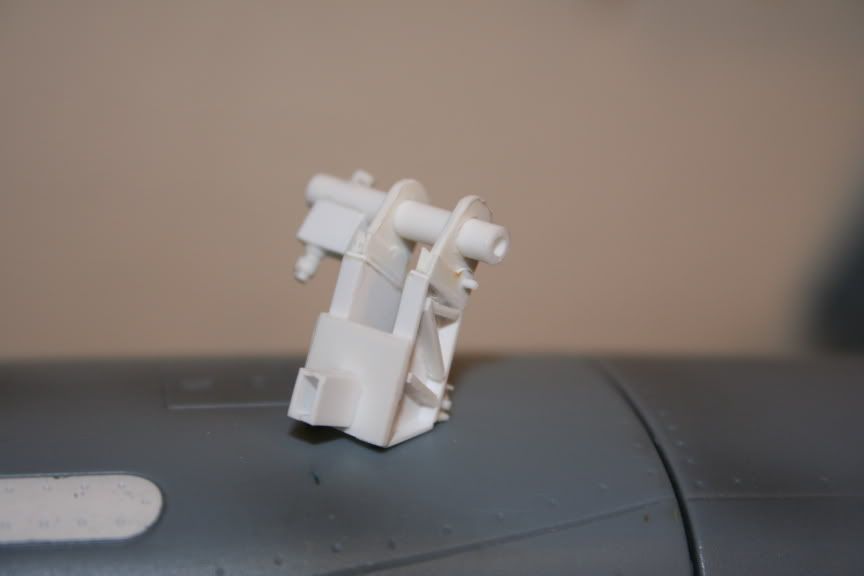
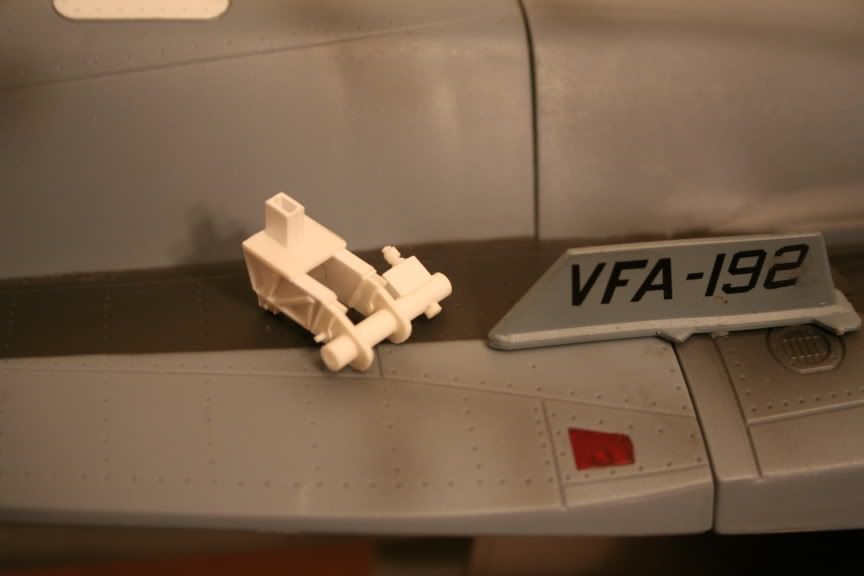
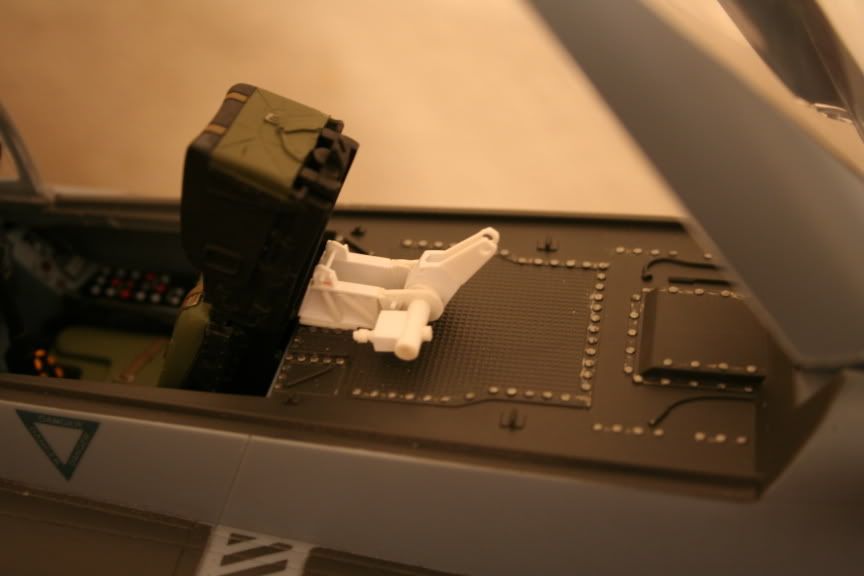
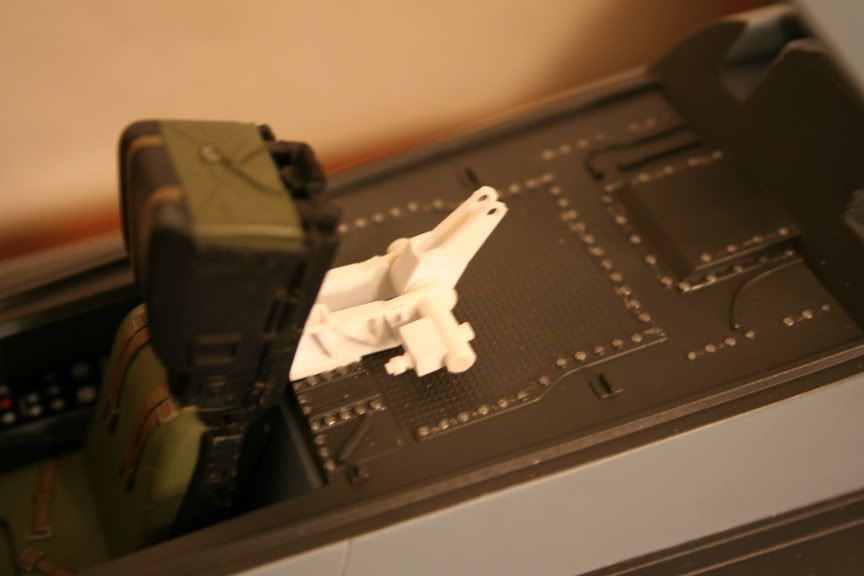
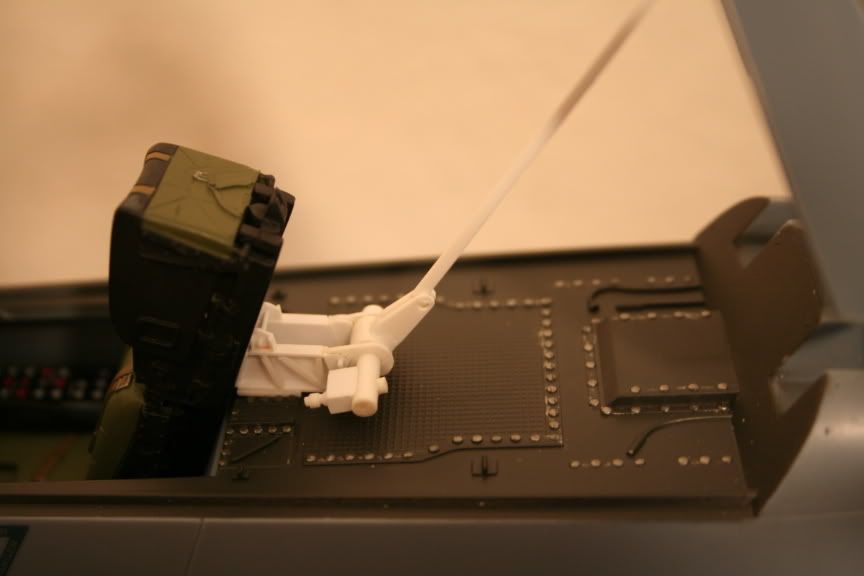
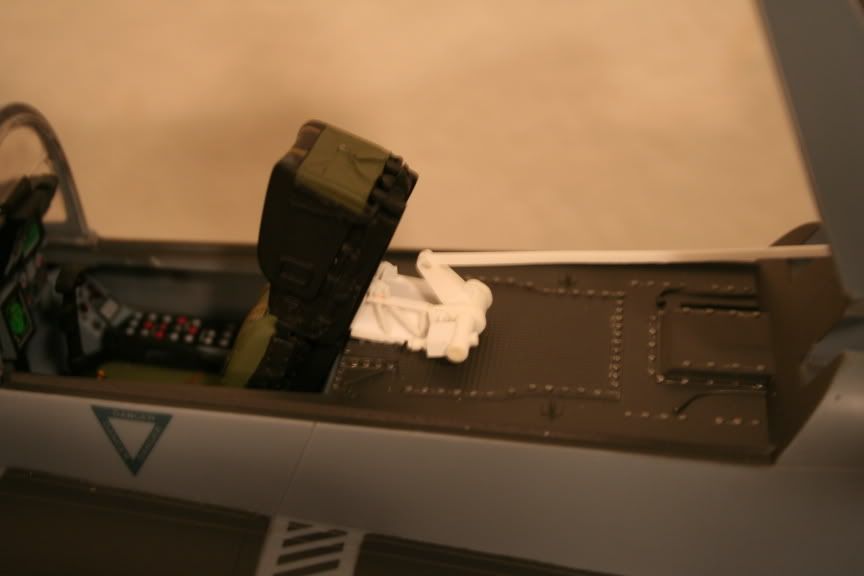
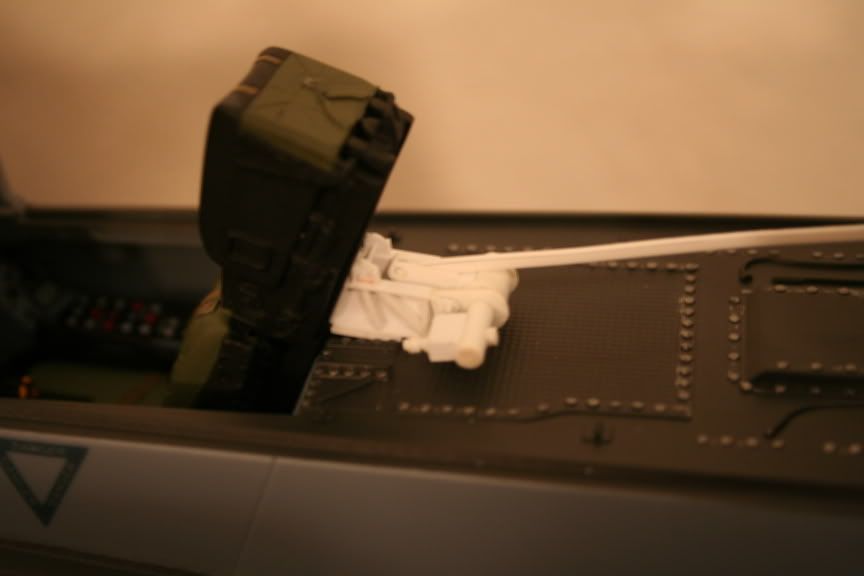
Now for second and funny. The devise we are interested in is NOT the canopy actuator (I feel so stupid). This devise mounted immediately behind the ejection seat is (drum roll please) the actuator that LOCKS/UNLOCKS the canopy to the cockpit frame! The canopy is raised and lowered by a pistol and levers buried in the fuse just behind the aft bulkhead of the cockpit. What THIS devise does is simple. As the canopy lowers, the arm from the frame to this mechanism pushes and rotates the arm (you've already made that part) towards the seatback. An electric motor (small box attached to the shaft) assists in rotating it forward (and aft). As the canopy lowers to the cockpit frame, four "cleats" sink into female openings along the cockpit sides. That bar from the canopy frame to this devise.....pulls the whole canopy frame forward a couple of inches as the rotating arm seats itself in the recess between the two mounts. That seals the canopy edge and engages the cleats that keep the canopy closed....TADA! It works backwards to open (arm rotates backwards, pushes bar attached to frame, slide canopy back, engages piston to raise the frame). Is that clear as mud or what?
US Army MP Corps combat veteran Operation Desert Shield/Desert Storm
-
MiG29K
- Officer - 1st Lieutenant
- Posts: 496
- Joined: Sun Mar 05, 2006 1:36 pm
- Location: Shoreline Washington
-
Contact:
Post
by MiG29K » Thu Apr 20, 2006 12:18 pm
*imititating a Beavis laugh*..HUH HUH HUH...HUH HUH HUH... J/K
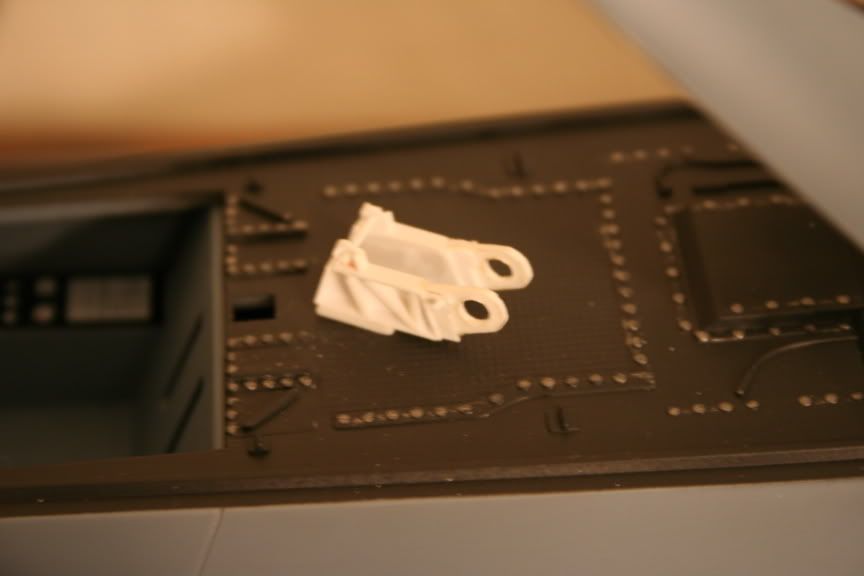
Funny - I was going to send you a sketch on my "theory" of how it could work. Sooo the arm that I built... (the one sticking out 45 degees) moves forward....toward the back of the seat... like this????????????? (check this four pic sequence below)
Sequence ONE
Sequence TWO

Sequence THREE
Sequence FOUR
Also, I made the arm smaller this morning because it was a bit off...
So is that what you meant?
Thanks!!
Last edited by
MiG29K on Thu Apr 20, 2006 12:30 pm, edited 1 time in total.
??????? ?????. ?????? ? ??????!
Washington State > Kansas
-
steelbonnet
- Officer - Colonel

- Posts: 1292
- Joined: Fri Apr 01, 2005 5:49 am
- Location: Great Britain
-
Contact:
Post
by steelbonnet » Thu Apr 20, 2006 12:20 pm
Awwww man Mate this is Just the icing on the cake adding the parts now BBI SHOULD have put in
Outstanding work as always & Such Fine craftsmanship.
ja
Steel Bonnet
-
wolf8564
- Sergeant

- Posts: 155
- Joined: Thu Oct 28, 2004 7:29 am
- Location: Atlanta,Ga.
Post
by wolf8564 » Thu Apr 20, 2006 12:23 pm
Nice conundrum!
-
wolf8564
- Sergeant
- Posts: 155
- Joined: Thu Oct 28, 2004 7:29 am
- Location: Atlanta,Ga.
Post
by wolf8564 » Thu Apr 20, 2006 12:24 pm
Now to detail the Ejection seat
-
Folkwulfe
- Officer - Captain
- Posts: 719
- Joined: Fri Jun 10, 2005 1:23 pm
- Location: Arlington, Texas
Post
by Folkwulfe » Thu Apr 20, 2006 1:28 pm
Balls dude! It's dead on.....Did you get the short read on removing the canopy?
US Army MP Corps combat veteran Operation Desert Shield/Desert Storm
-
Folkwulfe
- Officer - Captain
- Posts: 719
- Joined: Fri Jun 10, 2005 1:23 pm
- Location: Arlington, Texas
Post
by Folkwulfe » Thu Apr 20, 2006 2:03 pm
Bookmarked for printing later. Thanks dude....I can always use more reference material. Oh....and the last person that fooled with Texas was Pancho Via....and he's dead. During Desert Shield/Storm....my hummer had a 3X5 Texas flag on the antenna that was much easier to see at distances than an American flag. Never took a single friendly round and the few idiots from the Iraqi army that did shoot at us? They met Allah some time ago. Hopefully, their God put them in heaven next to the Hari-Krishna's....talk about virgins!!!!
US Army MP Corps combat veteran Operation Desert Shield/Desert Storm
-
Folkwulfe
- Officer - Captain
- Posts: 719
- Joined: Fri Jun 10, 2005 1:23 pm
- Location: Arlington, Texas
Post
by Folkwulfe » Thu Apr 20, 2006 2:45 pm
Here's the bad news. The rubbery nose piece is just a thick rubber shell covering a plastic nose piece underneath. I'm going to saw the entire nose off at the break where the radar cone seperates. Most likely, I'll have to thin the edges and cover with a "frame" around the entire circumfrance and fabricate a replacement. The original is WAY too thick between the rubber shell and the plastic underlamen. That's gonna be real fun getting the shape right. Once I get the nose off, I'll have a much better idea on the radar tray and opening the gunbay for the M61. Any M61's out there you know of in 1/18th scale to use as a basis?
US Army MP Corps combat veteran Operation Desert Shield/Desert Storm
-
MiG29K
- Officer - 1st Lieutenant
- Posts: 496
- Joined: Sun Mar 05, 2006 1:36 pm
- Location: Shoreline Washington
-
Contact:
Post
by MiG29K » Sun Apr 23, 2006 11:01 pm
Folkwulfe...
If you need some other references....hit up the pics:
http://s73.photobucket.com/albums/i208/ ... 0Actuator/
Joint Problem solving might be in order...
I think one of the pics also has dimensions and stuff on it. I can walk you thru some of the problems I encountered too. Reg. Model Cement is good but for some parts I highly recommend super glue!!!!
Hit me up later
Rob
??????? ?????. ?????? ? ??????!
Washington State > Kansas
-
Folkwulfe
- Officer - Captain
- Posts: 719
- Joined: Fri Jun 10, 2005 1:23 pm
- Location: Arlington, Texas
Post
by Folkwulfe » Mon Apr 24, 2006 2:36 pm
I am so far behind right now it's pityfull. I finally got the nosecone off...It's ugly! I had to razor saw the thing off. The good news is the radar bay looks pretty good. The bad news is the entire nosecone is un-usable. I'm going to try vacu-forming the two halves of the cone and brace them internally some. Spray it beige-tan and hope it turns out well enough to pass for raw fiberglass inside. I'll have to work on that one. The radar tray should fit nicely....and the canopy framing is coming along too. Couldn't bring myself photograph anything right now...it all looks so bad....Soon though, very soon.
US Army MP Corps combat veteran Operation Desert Shield/Desert Storm
-
Folkwulfe
- Officer - Captain
- Posts: 719
- Joined: Fri Jun 10, 2005 1:23 pm
- Location: Arlington, Texas
Post
by Folkwulfe » Mon Apr 24, 2006 2:58 pm
Dude...the canopy actuator looks perfect! Awesome job...and "YES" I would be interested in the measurements and fit problems you encountered. I have fabricated the decking and most of the siderails from the aft canopy along both sides up to the forward bow. I have to drill the "lightening holes" yet...they're next...then get them painted and mounted. I'll them move to the actuators themselves. The forward bow on the canopy is fairly thick, so I'll probably mount the rearview mirrors and grab rails directly to it instead of adding the inside edge of the forward bow. Just as a side note...I Dremeled out the half moon piece on the forward canopy above the instrument panel. Doesn't hurt a thing...just be careful around the edges where they come close to the panel combing. I nicked mine a couple of small places, but the paint covered them effectively. As soon as I can I'll take pictures, but don't plan on them until later this week. What's next? The radar package and the replacement nosecone (boy is that one gonna be fun!).
US Army MP Corps combat veteran Operation Desert Shield/Desert Storm