
as everyone's 1/18 airplane collection gets bigger, space becomes more of a premium. Something i'm thinking of doing is displaying some of my 1/18 planes with only one wing installed, the other in storage. Either hang them tight to a wall, more or less in profile or put them on a shelf, again, displayed in profile, with the missing wing side facing the wall.
I've already experimented with this a bit and it's something i may start doing more of, especially on planes i've had on display for a while...sort of like putting them in partial storage. Maybe rotate which planes i do this with over time. They essentially take up about half the space when dispayed this way. It would be a very good way to display large planes, like four engine bombers, for the long term.
Any comments or other space saving ideas?
space saving idea for hanging planes
space saving idea for hanging planes
i never met an airplane i didn't like...
-
FieroDude
- Officer - Brigadier General

- Posts: 1669
- Joined: Tue Sep 26, 2006 8:09 pm
- Location: Sister Lakes, MI
The only thing that has come to mind several times but that I have yet to try constructing is something almost like a mobile. Having 9 foot ceilings with heavy plaster on lathe construction, this should work--I would be more hesitant on drywall. The big challenge I foresee is balance points and/or rigging counterweights. Somehow, I don't think a Stuka will balance well with a Bf-109. But this should allow closer overlap and still look halfway decent.
Verraten und verkauft,
zu lange vertröstet zu lange belogen
Verraten und verkauft,
Durch den Dreck und über den Tisch gezogen.
H.R.K 1993
zu lange vertröstet zu lange belogen
Verraten und verkauft,
Durch den Dreck und über den Tisch gezogen.
H.R.K 1993
-
tmanthegreat
- Officer - Brigadier General
- Posts: 11240
- Joined: Tue Oct 05, 2004 7:38 pm
- Location: Central California
-
grunt1

- Officer - Brigadier General
- Posts: 2979
- Joined: Tue Jul 25, 2006 8:41 pm
- Location: Indiana
- Contact:
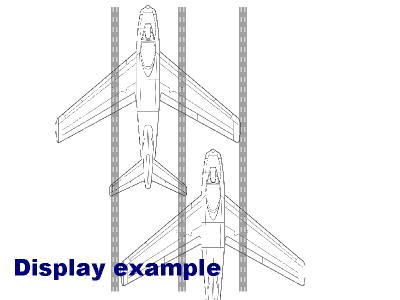
Aferg, that's a great idea.. I have a nice wall and the best option I'd come up with was hanging them vertically which was nice to show the colors, etc.. but looked pretty silly..
Removing the wing would allow me to use the same space but the aircraft would appear to be in flight.
Now I just need clear plastic hooks of some kind that wouldn't be too obtrusive.
Removing the wing would allow me to use the same space but the aircraft would appear to be in flight.
Now I just need clear plastic hooks of some kind that wouldn't be too obtrusive.
-----------------------------------------------------------
-------- Need a list of everything 1:18? --------
---------- http://www.sshqdb.com --------------
---- Built by the community, for the community ----
-----------------------------------------------------------
My Store: http://www.battlegroundmodels.com
-------- Need a list of everything 1:18? --------
---------- http://www.sshqdb.com --------------
---- Built by the community, for the community ----
-----------------------------------------------------------
My Store: http://www.battlegroundmodels.com
if you want to go one better on the idea you can hang them in front of a mirror (so that they are tight against it) and the reflection creates the perception of the missing wing, to an extent anyway. Also, hanging against a sky blue backround looks good too. There is sky wall paper available...i put some up years ago on one wall in my den and it makes an astonishing difference when you hang planes in front of it. I rotate my collection in front of that wall..
i never met an airplane i didn't like...
-
jaywhy8202
- Corporal

- Posts: 51
- Joined: Sun Apr 30, 2006 10:14 pm
- Location: SoCal
- Contact:
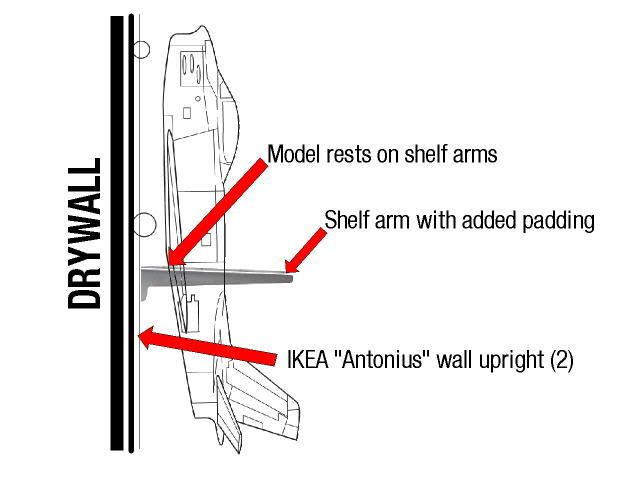
Was wandering around my local IKEA for some replacement home office furniture when an idea hit me...
Why not store them AGAINST my wall using an adjustable wall shelving system?
I wanted to keep this project on the cheap. So, I bought three 70-7/8" ANTONIUS slotted wall uprights ($4 each) and 3 pairs of 6-3/4" ANTONIUS bracket arms ($1.50 a pair).


Since I have drywall in my house, I'll mount the upright tracks with toggle bolts in the back. As far as the spacing goes between uprights, I'll take wheelbase measurements of my birds to determine the width that will accommodate them best.
I'll experiment with the arm padding -- I'll do a pair with adhesive-backed foam weather stripping, another with cut segments of cable guard tubing and a pair with split silicone tubing.
Again, I was going for the cheap...

Just an alternative idea from having to make mobiles and hanging strings -- and a chance to maximize wall display space.
Why not store them AGAINST my wall using an adjustable wall shelving system?
I wanted to keep this project on the cheap. So, I bought three 70-7/8" ANTONIUS slotted wall uprights ($4 each) and 3 pairs of 6-3/4" ANTONIUS bracket arms ($1.50 a pair).
Since I have drywall in my house, I'll mount the upright tracks with toggle bolts in the back. As far as the spacing goes between uprights, I'll take wheelbase measurements of my birds to determine the width that will accommodate them best.
I'll experiment with the arm padding -- I'll do a pair with adhesive-backed foam weather stripping, another with cut segments of cable guard tubing and a pair with split silicone tubing.
Again, I was going for the cheap...
Just an alternative idea from having to make mobiles and hanging strings -- and a chance to maximize wall display space.
[baf]Jon[/baf]
JO1, USN (ret.)
San Diego
JO1, USN (ret.)
San Diego
I have been using screw in L-hooks to store/display my planes around the top of my study. Here's a few pics to illustrate. I've got 20 planes up using this method.
<a href="http://img223.imageshack.us/my.php?imag ... 181aa4.jpg" target="_blank"><img src="http://img223.imageshack.us/img223/7522 ... aa4.th.jpg" border="0" alt="Free Image Hosting at www.ImageShack.us" /></a>
<a href="http://img478.imageshack.us/my.php?imag ... 182yc1.jpg" target="_blank"><img src="http://img478.imageshack.us/img478/8848 ... yc1.th.jpg" border="0" alt="Free Image Hosting at www.ImageShack.us" /></a>
<a href="http://img478.imageshack.us/my.php?imag ... 183ts9.jpg" target="_blank"><img src="http://img478.imageshack.us/img478/1725 ... ts9.th.jpg" border="0" alt="Free Image Hosting at www.ImageShack.us" /></a>
<a href="http://img95.imageshack.us/my.php?image ... 184qk0.jpg" target="_blank"><img src="http://img95.imageshack.us/img95/8905/x ... qk0.th.jpg" border="0" alt="Free Image Hosting at www.ImageShack.us" /></a>
-
Rogue
- Officer - 1st Lieutenant

- Posts: 510
- Joined: Tue Oct 05, 2004 8:16 am
- Location: 1, US, TX, D/FW, Propwash 16Xray
- Contact:
Re: space saving idea for hanging planes
One problem with that is several planes have a 1 piece wing. So unless you cut the wing in half, it wouldn't work. Or are you just displaying the fuse?aferguson wrote: Something i'm thinking of doing is displaying some of my 1/18 planes with only one wing installed, the other in storage.
-
vulgarvulture
- Officer - Major

- Posts: 880
- Joined: Tue Oct 05, 2004 3:05 pm
Vulgarvulture,
It's funny you mention the pushpins, I've only ever had one plane that fell, it was my 1/72 B-36 Peacemaker. Anybody remember that monster kit? I had it up with pushpins and screw in hooks and no matter what I did, it fell. After the 3rd time of trying to find all of the little pieces and fix it, I gave up. I guess it just didn't want to fly.
As for the L-hook idea, I can't take credit for it. It was my girlfriend's idea.
-
FieroDude
- Officer - Brigadier General
- Posts: 1669
- Joined: Tue Sep 26, 2006 8:09 pm
- Location: Sister Lakes, MI
You just have to work out a compromise. You start by stripping the walls bare, then put planes in one "stack", and decorative plates, photos, and other such items in another. Then it's "one for you, one for me. One for you, one for me." Then you figure how to reconfigure the garage to hold your collection, a cot, and if you're lucky, a dorm fridge and a 13" TV.
Verraten und verkauft,
zu lange vertröstet zu lange belogen
Verraten und verkauft,
Durch den Dreck und über den Tisch gezogen.
H.R.K 1993
zu lange vertröstet zu lange belogen
Verraten und verkauft,
Durch den Dreck und über den Tisch gezogen.
H.R.K 1993
-
STUKA
- Officer - Brigadier General
- Posts: 2800
- Joined: Thu Jan 12, 2006 10:33 am
- Location: Ft Campbell
Yeah - I've moved most of the armor to the garage on shelves -
got a few planes in my son's room and the rest in boxes.
I will be taking my nam huey out - that thing was not made to stay in the box?
btw - once put together - does it come apart easy for when i move.
got a few planes in my son's room and the rest in boxes.
I will be taking my nam huey out - that thing was not made to stay in the box?
btw - once put together - does it come apart easy for when i move.
Ich liebe den Geruch von Sturzkampfflugzeug morgens.
-
tmanthegreat
- Officer - Brigadier General
- Posts: 11240
- Joined: Tue Oct 05, 2004 7:38 pm
- Location: Central California
The XD UH-1 Huey does come apart easily. I have the S1 "Hogshead II" version, and currently have it disassembled and stored in my closet where storage space is at a premium. The tail boom seperates from the main body of the helicopter, and the rotor assembly comes off as well. You can further remove the rotor blades from the balance assembly as well as the horizontal stabilizers on the tail-boom. You can also remove the rocket pods. The XD AH-1 Supercobra and the BBI Blackhawk helicopters also disassemble in much the same mannerSTUKA wrote:btw - once put together - does it come apart easy for when i move.
"If you fail to plan, you plan to fail."
-
jaywhy8202
- Corporal
- Posts: 51
- Joined: Sun Apr 30, 2006 10:14 pm
- Location: SoCal
- Contact:
Compromise? Whuzzat?? 
That's why in our house -- our kids are all grown and have families of their own -- my wife has her hobby room, and I've got my home office.
My planes go up on the "I LOVE ME" wall, alongside all my military and civilian award certificates and plaques I've seem to have amassed over the years...
That's why in our house -- our kids are all grown and have families of their own -- my wife has her hobby room, and I've got my home office.
My planes go up on the "I LOVE ME" wall, alongside all my military and civilian award certificates and plaques I've seem to have amassed over the years...
[baf]Jon[/baf]
JO1, USN (ret.)
San Diego
JO1, USN (ret.)
San Diego
-
luftpanzer
- Officer - Brigadier General
- Posts: 1528
- Joined: Tue Feb 15, 2005 5:55 pm
- Location: Randolph New Jersey
- Contact:


Here is another possible option. Ran a 1 inch dowel thru the rear of the F-86, thru the exhaust section and up to the cockpit. The dowel is held in place inside the fuselage by the exhaust section. Used a grinding hell to grind down about a 5" section of the dowel inside the fuselage so it fits snug inside the exhaust. Covered the dowel in crumpled aluminium foil to simulate exhaust. May paint it later. Put a small 2x4 block on top of the oval display panel then drilled a 1" hole to mount the dowel. The panel is mounted to a stud behind the drywall.
[img][img]http://img503.imageshack.us/img503/446/s3010003dn5.jpg[/img][/img]
[img][img]http://img503.imageshack.us/img503/446/s3010003dn5.jpg[/img][/img]
-
CW4USARMY
- Officer - Brigadier General
- Posts: 1859
- Joined: Tue Oct 05, 2004 4:32 pm
- Location: Huntsville, AL
Very cool idea! Could get quite a few on a wall that way!yappy wrote:Here is another possible option. Ran a 1 inch dowel thru the rear of the F-86, thru the exhaust section and up to the cockpit. The dowel is held in place inside the fuselage by the exhaust section. Used a grinding hell to grind down about a 5" section of the dowel inside the fuselage so it fits snug inside the exhaust. Covered the dowel in crumpled aluminium foil to simulate exhaust. May paint it later. Put a small 2x4 block on top of the oval display panel then drilled a 1" hole to mount the dowel. The panel is mounted to a stud behind the drywall.
[img][img]http://img503.imageshack.us/img503/446/s3010003dn5.jpg[/img][/img]
-
pickelhaube
- Officer - Brigadier General
- Posts: 9703
- Joined: Mon Jan 22, 2007 5:52 am
- Location: New Orleans

Apologize should have mentioned you will need to remove the screws, open the fuselage, remove the exhaust nozzle split the the exhaust chamber to seat the dowel the reassemble. Doesn't take to long. The easiest way for me to remove a screw cover with minimal damage is with a dreamel. I bought a small dremel drill bit set from a local Cummings Tool Co. It was cheap and has all the bits you need for 1/18 and any other scale you work on. I drill a small hole in the cover then use a double pointed scribe to pop out the cover using the hole I just drilled for leverage.
[img][img]http://img169.imageshack.us/img169/737/s3010004sa8.jpg[/img][/img]
[img][img]http://img169.imageshack.us/img169/737/s3010004sa8.jpg[/img][/img]