Large Scale Boeing P-26 Peashooter Model & Restoration
Posted: Thu Apr 17, 2014 10:21 pm
Greetings:
I recenty acquired a model I thought I would share.
I purchased this vintage model of a P-26 about two months ago. The model was in good shape and is a large scale. It is mainly made of wood and has a 28" wingspan. Though it was labeled a handmade and one of a kind piece, I think it might be a buildup of an old balsa wood kit. An old kit by Sterling also had a 28 inch wingspan but the wings in that kit were stick and tissue construction, the wings of this plane are wooden.
The P-26 was the Army Air Corps first monoplane fighter and the first of metal construction. The forward thinking of these design concepts contrasted greatly with the open cockpit and bracing wires of the biplane era. Though small and lightly armed, the aircraft served as an important step in the evolution of fighter aircraft design. Though the aircraft served for a short period time in the Army Air Corps, the P-26 is fairly well known due to its unique shape and many of the flamboyant paint schemes units that operated them employed on the aircraft during their service.
The model had some issues when I purchased it. I repaired and solved some of the issues. Here are some photos of my newly acquired piece and some corresponding details.

This is how the model looked when I originally purchased it. The model was in overall good condition but had some minor problems. One of the biggest problems encountered was it had loads of dust on it from being hanging on display for a long period of time. This was easy to address.
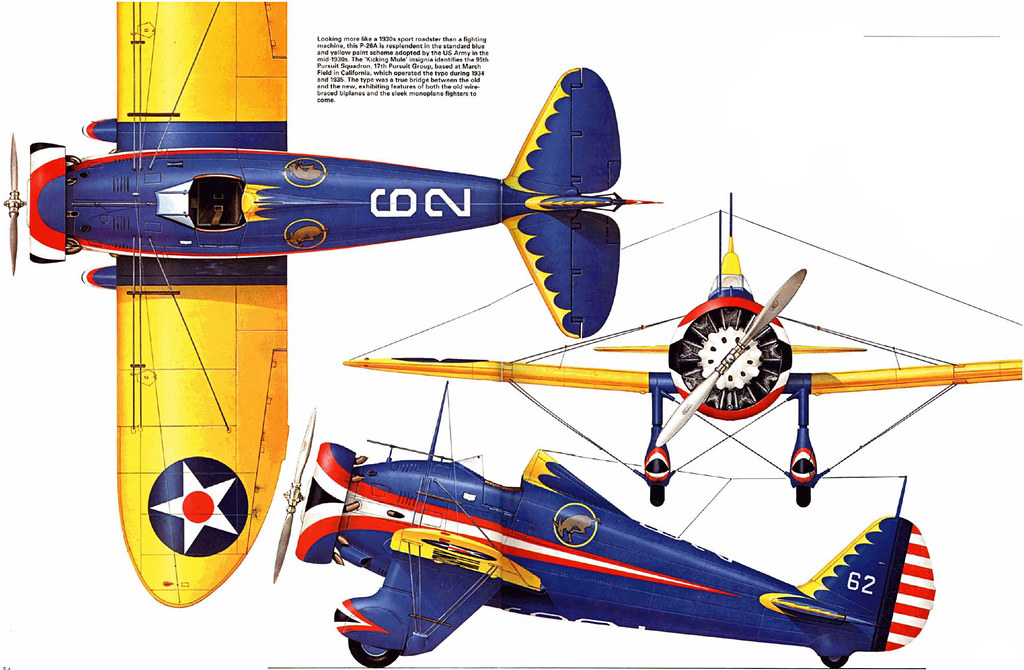
After doing some research on the markings, I found the color scheme was off an airplane from the 95th Pursuit Squadron, 17th Pursuit Group. They were based at March Field in California during 1934-35, during that time they operated the P-26. The unit was famous for its "Kicking Mule" insignia behind the cockpit of the aircraft. On my model, this was absent and an incorrect and too small decal was in its place. This was one of my first items to fix. I also found out my model represents and early P-26...later aircraft did not have the streamlined tailwheel piece and had a higher rear cockpit piece to protect the pilot in a rollover on landing. The P-26, with its narrow landing gear, was notorious for this.

This is one of the pictures of the model following my repair and restoration work. Creating the "Kicking Mule" logo was not easy. No scale decals in the size exist. I found the insignia in a book and took a photo of it with my camera to get maximum detail. I then enlarged the insignia to the size I wanted and printed it on computer sticker paper I found at hobby lobby. To protect the decal I coated it with clear coat. I also applied the proper white tail numbers and numbers on the rear fuselage. Military fonts are hard to find in this scale and white waterslide decals hard to make, so I compromised and used white numbers you can find at Staples for signs, bulletin boards and other projects. They are vinyl, stick well to everything and come in large sizes. I added new numbers to the tail and rear fuselage, then sealed them to the model with clear coat. Many P-26's were marked in this fashion in their respective units during their operational careers.

As noted in the profile drawing, the P-26's had a large radio aerial in front of the cockpit and on the tail. I made these parts (I had to move the front one a bit from where it should actually be to get it to stay on the model properly) then added thread for the radio wires themselves. I found a blue to match the finish (the finish is original...the original photo was a badly taken photo from someone else that does not reflect the true color of the plane...my photos do) to paint the radio aerials and do some other touchup work. I did some other paint touchup work around the model with colors to match. The pilot is an R/C Eflite 1/9 scale pilot for their Stearman model...I just kind of wedge him in the cockpit. He's a bit big...but I haven't found anything more suitable in size yet. The radial engine details and bracing wire were original to the model so I left them alone.

Part of the pitot tube had gone missing, so I fashioned a new metal part and added it to what remained of the pitot tube. My last order of business was to repaint the step areas as they had faded and become loose due to dried out glue. Finally, I was able to hide some epoxy residue on the windshield by coating the windshield with future floor polish.

This large model is fairly light and easily sits on a pizzaguy stand on its own balance with none of the sticky grips on the stand. It is a neat model and the minor things I did to it greatly enhance its accuracy in terms of the markings. The original builder spent a lot of time building this plane and making it look good. It is a unique piece and I'm glad to own it.
I recenty acquired a model I thought I would share.
I purchased this vintage model of a P-26 about two months ago. The model was in good shape and is a large scale. It is mainly made of wood and has a 28" wingspan. Though it was labeled a handmade and one of a kind piece, I think it might be a buildup of an old balsa wood kit. An old kit by Sterling also had a 28 inch wingspan but the wings in that kit were stick and tissue construction, the wings of this plane are wooden.
The P-26 was the Army Air Corps first monoplane fighter and the first of metal construction. The forward thinking of these design concepts contrasted greatly with the open cockpit and bracing wires of the biplane era. Though small and lightly armed, the aircraft served as an important step in the evolution of fighter aircraft design. Though the aircraft served for a short period time in the Army Air Corps, the P-26 is fairly well known due to its unique shape and many of the flamboyant paint schemes units that operated them employed on the aircraft during their service.
The model had some issues when I purchased it. I repaired and solved some of the issues. Here are some photos of my newly acquired piece and some corresponding details.
This is how the model looked when I originally purchased it. The model was in overall good condition but had some minor problems. One of the biggest problems encountered was it had loads of dust on it from being hanging on display for a long period of time. This was easy to address.
After doing some research on the markings, I found the color scheme was off an airplane from the 95th Pursuit Squadron, 17th Pursuit Group. They were based at March Field in California during 1934-35, during that time they operated the P-26. The unit was famous for its "Kicking Mule" insignia behind the cockpit of the aircraft. On my model, this was absent and an incorrect and too small decal was in its place. This was one of my first items to fix. I also found out my model represents and early P-26...later aircraft did not have the streamlined tailwheel piece and had a higher rear cockpit piece to protect the pilot in a rollover on landing. The P-26, with its narrow landing gear, was notorious for this.
This is one of the pictures of the model following my repair and restoration work. Creating the "Kicking Mule" logo was not easy. No scale decals in the size exist. I found the insignia in a book and took a photo of it with my camera to get maximum detail. I then enlarged the insignia to the size I wanted and printed it on computer sticker paper I found at hobby lobby. To protect the decal I coated it with clear coat. I also applied the proper white tail numbers and numbers on the rear fuselage. Military fonts are hard to find in this scale and white waterslide decals hard to make, so I compromised and used white numbers you can find at Staples for signs, bulletin boards and other projects. They are vinyl, stick well to everything and come in large sizes. I added new numbers to the tail and rear fuselage, then sealed them to the model with clear coat. Many P-26's were marked in this fashion in their respective units during their operational careers.
As noted in the profile drawing, the P-26's had a large radio aerial in front of the cockpit and on the tail. I made these parts (I had to move the front one a bit from where it should actually be to get it to stay on the model properly) then added thread for the radio wires themselves. I found a blue to match the finish (the finish is original...the original photo was a badly taken photo from someone else that does not reflect the true color of the plane...my photos do) to paint the radio aerials and do some other touchup work. I did some other paint touchup work around the model with colors to match. The pilot is an R/C Eflite 1/9 scale pilot for their Stearman model...I just kind of wedge him in the cockpit. He's a bit big...but I haven't found anything more suitable in size yet. The radial engine details and bracing wire were original to the model so I left them alone.
Part of the pitot tube had gone missing, so I fashioned a new metal part and added it to what remained of the pitot tube. My last order of business was to repaint the step areas as they had faded and become loose due to dried out glue. Finally, I was able to hide some epoxy residue on the windshield by coating the windshield with future floor polish.
This large model is fairly light and easily sits on a pizzaguy stand on its own balance with none of the sticky grips on the stand. It is a neat model and the minor things I did to it greatly enhance its accuracy in terms of the markings. The original builder spent a lot of time building this plane and making it look good. It is a unique piece and I'm glad to own it.
