1/18 Sdkfz 222 Build

-
pickelhaube
- Officer - Brigadier General

- Posts: 9706
- Joined: Mon Jan 22, 2007 5:52 am
- Location: New Orleans
I guess I could if there is enough interest.Panzer_M wrote:Can you make a 1/18 Pz II L with your godlike skill at scratch_building PH?
This is Amazing work..just amazing.
But the way the last armor poll went the masses want a M-3 Stuart.
So that will be the next ground up build.
Kirk Douglas : Mine hit the ground first
John Wayne : Mine was taller

John Wayne : Mine was taller
-
pickelhaube
- Officer - Brigadier General
- Posts: 9706
- Joined: Mon Jan 22, 2007 5:52 am
- Location: New Orleans
Production is under way.
I STILL do not have all of the molds made. I ordered 2 gals of RTVand that was not enough.
Hopefully more will be into today to finish up.
The molds have been challinging to say the least. I tried some new mold making ideas . All ended dismally. So I reworked them back to the way I have been making the.
This is all good but it just meens TIME LOST.
The top half of the body is coming out nicely but the master was heavily damaged pulling out of the master mold.
I still need to make the molds for the bottom body and the turret.That will be done as soon as I get the RTV.
Hopefully with fingers crossed the fisrt run will go out on Friday.
I am going to another modeler meeting tonight . I am still trying to get a painter so I can offer a turn key product.
I have not began yet but the built ready to paint offering seems to be a success. This has peaked a lot of interest.
Thanks .
Kirk Douglas : Mine hit the ground first
John Wayne : Mine was taller
John Wayne : Mine was taller

-
pickelhaube
- Officer - Brigadier General
- Posts: 9706
- Joined: Mon Jan 22, 2007 5:52 am
- Location: New Orleans
-
Jericoeagle1
- Officer - Major

- Posts: 978
- Joined: Mon Oct 04, 2004 3:15 pm
- Location: Yelm, Washington
-
pickelhaube
- Officer - Brigadier General
- Posts: 9706
- Joined: Mon Jan 22, 2007 5:52 am
- Location: New Orleans
Well Guys,
There is something to be said about making a full blown project rather than a mod.
I have used 4 GALLONS OF RTV to build this thing
All I have left to do is make the seat platform and all the molds will be made.
I have cast almost all of the other parts and almost ready to start and sort them out.
The bodies ,turret , turret frame came out nicely . There is probaly close to 100 pices in this kit. I HAD TO MAKE ALMOST EVERY SINGLE ONE
To you guys who have ordered one and in some cases 2 I am sure you will enjoy the 222.
I think by Thursday they will be ready to ship.
I still need to make the directions and this takes a little time as well.
I am sorry but I do not think that they will go out and be in your hands by Christmas. This kind of bums me out but I just could not make the dead line. Hopefully it will be worth the wait when you guys get them in your hands.
Thanks for all of the support,
Matthew
Kirk Douglas : Mine hit the ground first
John Wayne : Mine was taller
John Wayne : Mine was taller
-
bananapirate
- Sergeant

- Posts: 219
- Joined: Tue Jun 30, 2009 1:38 pm
- Location: WI
-
pickelhaube
- Officer - Brigadier General
- Posts: 9706
- Joined: Mon Jan 22, 2007 5:52 am
- Location: New Orleans
Man you are right . By the time I am done I will have made over 1,000 pieces and parts for this project .normandy wrote:Pickel, this was (is ) a huge project on your part and there are always problems that plague development and production.......
We've seen it with 21st and many of the other 1:18th manufacturers. When the 222 is ready... it'll ready. Can't rush a good thing.
That is a whole lot of parts.
Anyway release the doves all the molds are MADE !!!!!! The last hold out was the seating trapees . I was not sure how I was going to make it. I can probably make some pics of how I worked it out. But I was in a hurry to make the molds so they are floating in RTV now.
This project is making me think a little about that Stuart tank.The Stuart is a small tank but it has quite a few parts as well.
I droped the price on the 222 from $300 down to $250. I am not sure that was a good idea considering what it took from start to finish it.
I hate and I shudder to think what if I would have dropped the price down to $100 and tried to make 30-40 of these. I think that I would have shot myself with a XD panzerfoust in the head.
Kirk Douglas : Mine hit the ground first
John Wayne : Mine was taller
John Wayne : Mine was taller
-
pickelhaube
- Officer - Brigadier General
- Posts: 9706
- Joined: Mon Jan 22, 2007 5:52 am
- Location: New Orleans
I just sent out PM's to everybody who got one or two of the 222.
If you did not recieve a PM from me please PM me ASAP so I do not miss you.
Almost all of the pieces have been made. Now it is time to put the kits together and make up the directions.
Again PM me if you have not recieved a request PM for your address.
Thanks,
Matthew
If you did not recieve a PM from me please PM me ASAP so I do not miss you.
Almost all of the pieces have been made. Now it is time to put the kits together and make up the directions.
Again PM me if you have not recieved a request PM for your address.
Thanks,
Matthew
Kirk Douglas : Mine hit the ground first
John Wayne : Mine was taller
John Wayne : Mine was taller
-
pickelhaube
- Officer - Brigadier General
- Posts: 9706
- Joined: Mon Jan 22, 2007 5:52 am
- Location: New Orleans
The first run is done.
All the unbuilt kits will go out tomorrow.
The built kits should go out Monday.
Thanks for the order guys.
After I get done with the built 222's I have a whole list of commisions that I need to get on .
Custom heaven is on the way.
All the unbuilt kits will go out tomorrow.
The built kits should go out Monday.
Thanks for the order guys.
After I get done with the built 222's I have a whole list of commisions that I need to get on .
Custom heaven is on the way.
Kirk Douglas : Mine hit the ground first
John Wayne : Mine was taller
John Wayne : Mine was taller
Any chance you can snap a pic of an entire kit? I'm not sure why, but I'm curious what it would look like...
MV
MV
"When I went into Kuwait I had 39 tanks, after six weeks of air bombardment, I had 32 left. After 20 minutes in action against the M1's, I had none." Iraqi BN Cdr, 1991
[img]http://img.photobucket.com/albums/v253/CanteenX/Blowing-Smoke-sig.jpg[/img]
[img]http://img.photobucket.com/albums/v253/CanteenX/Blowing-Smoke-sig.jpg[/img]
-
pickelhaube
- Officer - Brigadier General
- Posts: 9706
- Joined: Mon Jan 22, 2007 5:52 am
- Location: New Orleans
-
pickelhaube
- Officer - Brigadier General
- Posts: 9706
- Joined: Mon Jan 22, 2007 5:52 am
- Location: New Orleans
Rather than take pics of the parts. Which I will do I have been in the assembly mode.I think that this is a quick build. They seem to be going together with not too much dificulty.
This is how I started building th model kits. Maybe this can help you guys through it.
So far.
1. Look over the directions they are for the Tamiya kit but that as I staed before is what I made this kit from.
2. Wash every thing with mild soap and water. The casting release has oils in it. The CA / Superglue will not stick.
3..Glue the main body. Make sure you fill the seems 100% sand and soot some primer on them. Because once you start putting parts on. This will be crazy hard to do. But when you go to start glue parts on the PAINT NEEDS TO BE SCRAPED AWAY TO GIET A GOOD BOND.
4. Glue on the rails on the bottom. They should fit nice and snug.
5. Glue on the suspention blocks.
6. Glue on the muffler stubs on the body.
7. Dry fit the exaust pipe muffler and tail pipe. DO NOT GLUE THEM HET.
8. Fit the fenders over the mufflers. They should glue tight up against the glue strip guides. It looks like the right side ( spare tire side ) exaust could have been made a little longer . YIKES !! I faught the first one but glued a little extention on the others and this made it a lot easier to fit.
Maybe do not cut the pour stub off close this should help a little . The left side works fine.
9. Glue on tool boxes.
10. Glue on Lisc. plates.
11. Glue small round hatch cover.
12. Glue on rear engine bonnet.
That is as far as I got.
I will post mre steps as I proceed.
I hope this helps. Getting the main body together and filled I think will be the hardest thing to do on this build. Take your time dry fit and things should be easy.
PM me and I will be happy to give my phone if you get stuck.
This is the first ground up project that I have ever done so I am happy to help out as much as I can.
I really like what Fritz has done. He has the first fully built and painted 1/18 scale Sdkfz 222 on the planet !!!!!!!
Heck I don't even have one
Kirk Douglas : Mine hit the ground first
John Wayne : Mine was taller
John Wayne : Mine was taller
-
Fritzkrieg
- Officer - Captain

- Posts: 835
- Joined: Sun Mar 09, 2008 3:49 pm
-
pickelhaube
- Officer - Brigadier General
- Posts: 9706
- Joined: Mon Jan 22, 2007 5:52 am
- Location: New Orleans
They do seem to catch in one area. You may have to notch about a 1/4 inch or so in one spot. When you put the turret in with the seats it catches on one side.Fritzkrieg wrote:Yeah, I had a hell of a time trying to fill the seems, after, I'd put the fenders on.
PH, I'm not sure if it was jst a fluke with my kit, but I had to grind down the support ribbing a little to get the turret to turn 360, without the seats catching.
The master did not do this. Go figure.
Anyay , I never did give any photos of the seat assembly. After I made it I moulded it right away to try and get started making them.
Here are some pics of the production parts.
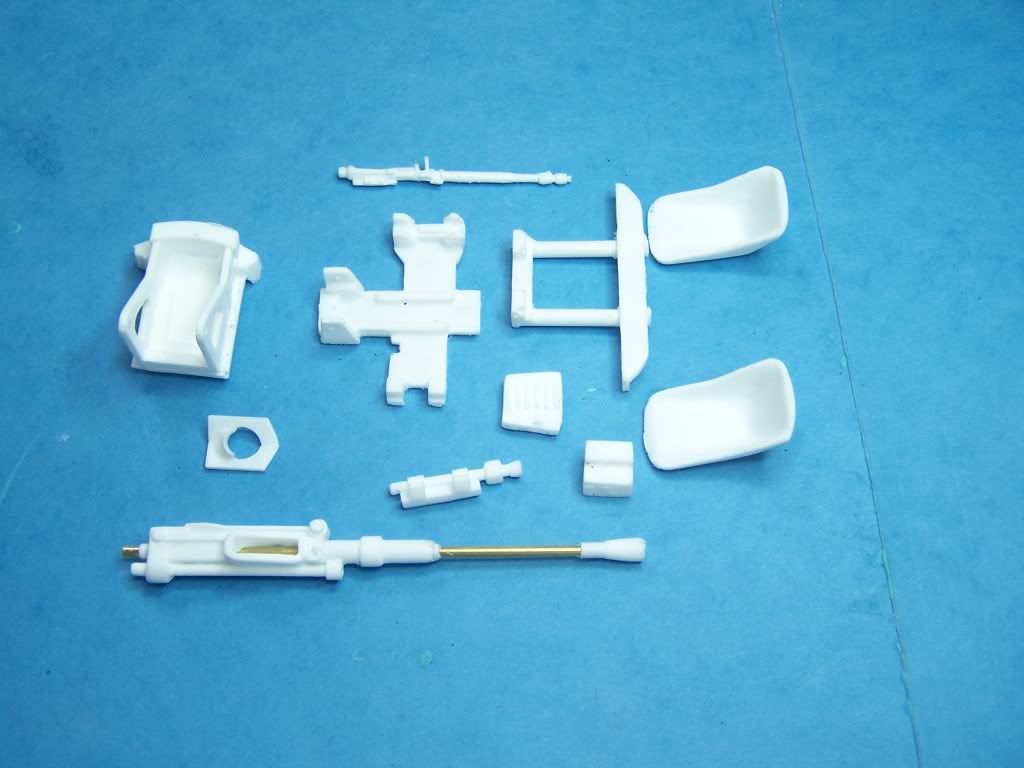
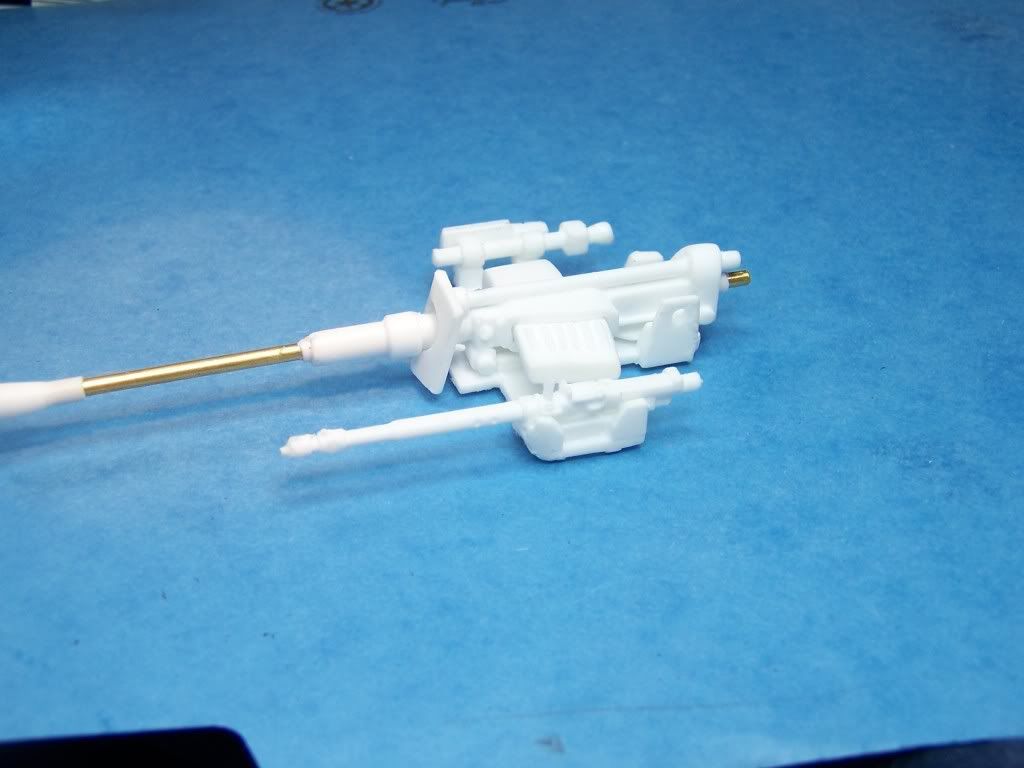
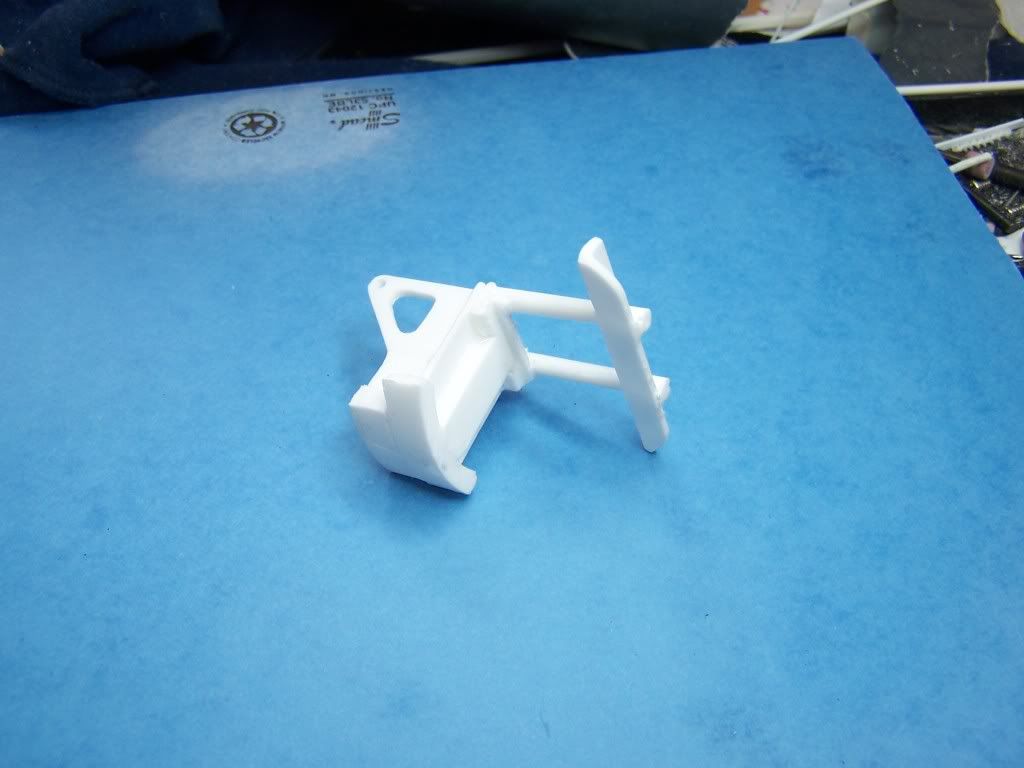
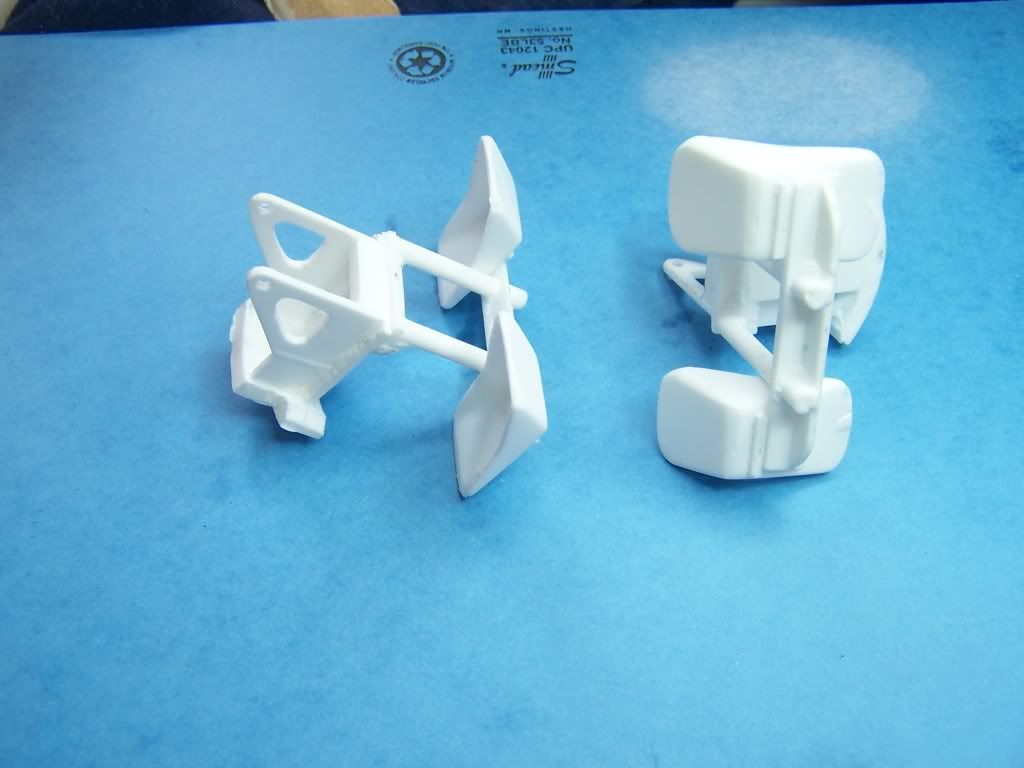
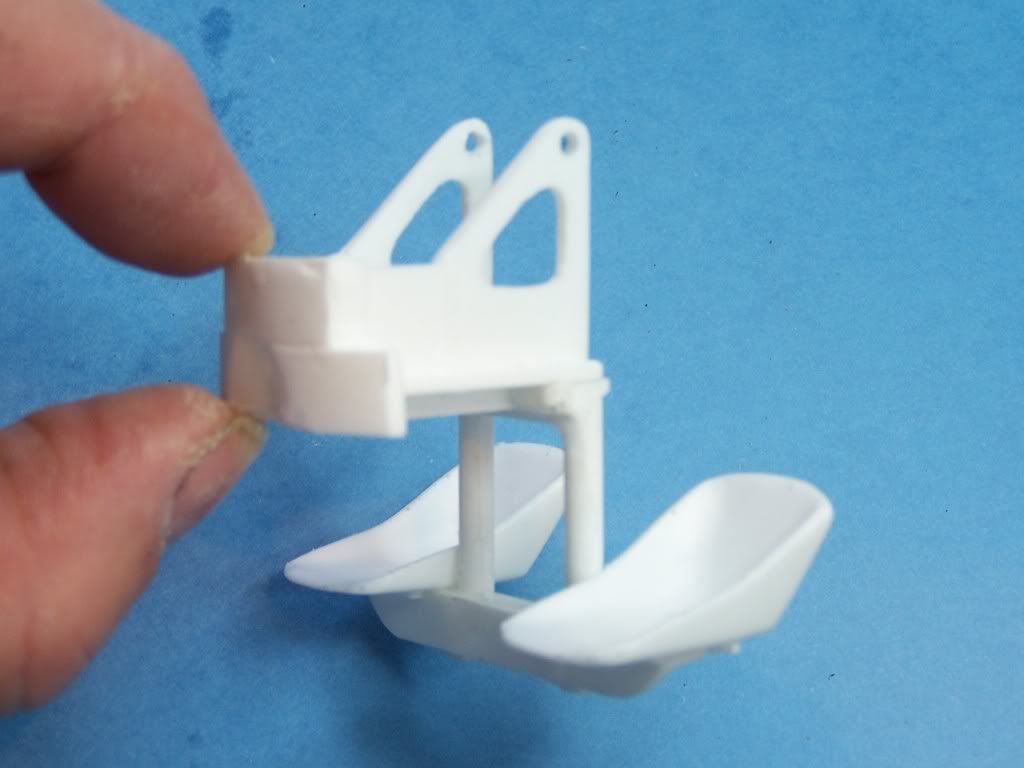
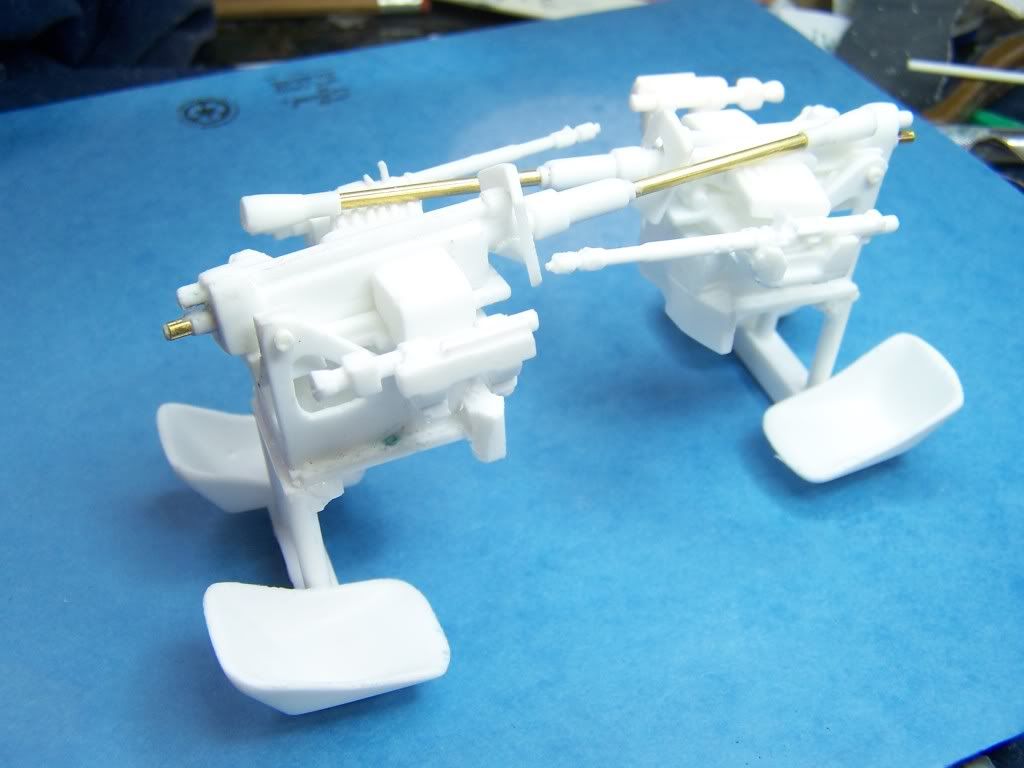
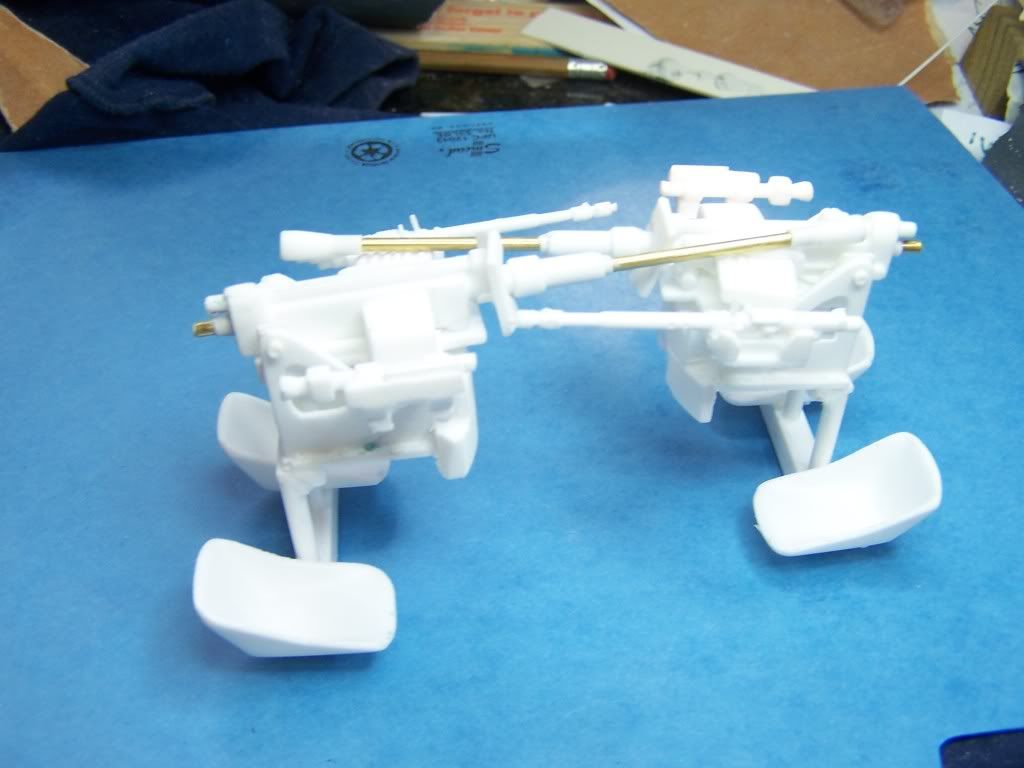
The bumper looking part fits into the 2 stubs located in the turret ring.
Kirk Douglas : Mine hit the ground first
John Wayne : Mine was taller
John Wayne : Mine was taller
-
normandy
- Officer - Brigadier General
- Posts: 6028
- Joined: Mon Oct 04, 2004 6:30 pm
- Location: Atlantic Coast
Pickel, thanks for the pics of the seat and gun assembly. Had hard time trying to figure it out, with pics it all makes sense now.
For any of you who haven't ordered this kit I'd recommend it, it's not a difficult build. I've got two and a half hours into it, just needs a little sanding and then paint.
Thanks Pickel...........Great Kit!!!
Normandy
For any of you who haven't ordered this kit I'd recommend it, it's not a difficult build. I've got two and a half hours into it, just needs a little sanding and then paint.
Thanks Pickel...........Great Kit!!!
Normandy
-
pickelhaube
- Officer - Brigadier General
- Posts: 9706
- Joined: Mon Jan 22, 2007 5:52 am
- Location: New Orleans
Thanks normandy and Panther.normandy wrote:Pickel, thanks for the pics of the seat and gun assembly. Had hard time trying to figure it out, with pics it all makes sense now.
For any of you who haven't ordered this kit I'd recommend it, it's not a difficult build. I've got two and a half hours into it, just needs a little sanding and then paint.
Thanks Pickel...........Great Kit!!!
Normandy
The kit does have a lot of parts but I built a lot of locating stubs and location pips so eveything should fit as it should.
The tricky parts I am finding out are the hulls and the exaust. The hulls just taking a little more niping and tucking and should fit fine after that.
Most of the hull seam is hidden from sight do to the bumbpers rear engine bonnet and frnders. But you must finish them ( sanging filling ) before you put these parts on.
As far as the exaust is concered appairently there is a little design problem. The exaust pipe that joins the top stub ( the part that glues to the rear hull ) connecting to the muffler is about 1/8th of an inch too short.The right side. You can use a piece of q tip shaft round tooth pic or any other rod of the same diameter and this should make things work a little better.
When I was making the built built up orders . I was able to get them to work but it was kind of a pain. Them I glued the 1/18inch extention and it just fell into place. It is the top end that you need to work on . Not the end that goes into the muffler.
Maybe some day I will build one for myself. Maybe someday I will build all of my customs for myself. I just don't have the time. Plus building for myself does not put bread on the table.
Kirk Douglas : Mine hit the ground first
John Wayne : Mine was taller
John Wayne : Mine was taller
-
grunt1

- Officer - Brigadier General
- Posts: 2979
- Joined: Tue Jul 25, 2006 8:41 pm
- Location: Indiana
- Contact:
Just finished mine last night, big fun..  The directions were a good start, but having the pics here and a 21C 222 sitting on my desk helped out a lot with the "doh, that's where that goes!" moments.
I'm going to make the side doors operational and take another run at hinges or something on the turret screen, then she should be ready for paint.
Thanks pic! good stuff
I'm going to make the side doors operational and take another run at hinges or something on the turret screen, then she should be ready for paint.
Thanks pic! good stuff
-
tmanthegreat
- Officer - Brigadier General
- Posts: 11240
- Joined: Tue Oct 05, 2004 7:38 pm
- Location: Central California
I'm in the process of finishing mine up as well and I'm pleased with the way it is coming out Just a lot of little odds and ends now, then the fine detailing. I expect it should be ready by the end of the week at the latest.
The most difficult part was getting the hull pieces together. They had a lot of runoff that needed to be sanded, etc., but with a little pressure, quick-drying CA glue, and puttying & sanding, they've gone together beautifully and its hard to tell they were once two pieces
The other thing to watch out for - as forewarned by Pickel - is the oils on the plastics. You will really want to thoroughly wash the pieces before painting them, but even then, spots may not dry perfectly. I the two biggest ones on mine (one of which was right on the hood) by sanding off the paint, thinly spreading putty over the spot, sanding it, then repainting.
The fit of everything else was quite good and I only had what I would consider minor difficulty fitting the muffler pieces. The directions were helpful - as was my old 21c 32x SDK 222
"If you fail to plan, you plan to fail."