3D Printing -- Pretty Close to Ready

Your Main Forum For Discussing 1:18 Scale Military Figures and Vehicles.
gburch
Officer - Captain
Officer - Captain
Posts: 678
Joined: Fri Mar 27, 2009 3:45 am
Location: Houston, Texas
Contact:

Re: 3D Printing -- Pretty Close to Ready

Post by gburch » Sun May 01, 2011 6:48 am

Paint Day:

The full Rev 0.5 body stack, with gloss white lacquer on everything but the warhead, which went straight to gloss black. Two fins, the all-white and the all-black fins sit in the foreground, while lots of nose section prototypes are in the background:

Image

All that remains is for the main body to be masked for its black.

Here's a shot of one of the many "paint stands" I've fabricated to hold parts for painting:

Image

Meanwhile, I've gone back to the bottom body section to work on further improvements. Because it has the most detail of any of the printed body parts and contains more plastic than any other part, it takes a LONG time to print. So I've created some test elements that contain only part of the outer contour of this segment, so that I don't have to print the whole thing to keep refining the vent fairings that are the main printed-in surface detailing, and are presenting fairly major challenges to get right. This allows a much faster prototyping turnaround time and doesn't eat so much plastic:

Image

I should be posting pics of the first full Rev 0.5 paintjob in a few hours.

pickelhaube
Officer - Brigadier General
Posts: 9685
Joined: Mon Jan 22, 2007 5:52 am
Location: New Orleans

Re: 3D Printing -- Pretty Close to Ready

Post by pickelhaube » Sun May 01, 2011 6:59 am

Could you print the details separate ?

That way you can keep the fins clean. That way it would be easier to sand and just make the parts like applique.

When I am casting, the more details I put into a piece means one thing. Something will not come out. So the whole piece is tossed into the trash. So if you make the piece in parts. One little piece if off , does not ruin the whole thing.

Plus smaller parts could be easier to make.
Kirk Douglas : Mine hit the ground first
John Wayne : Mine was taller


Image

gburch
Officer - Captain
Officer - Captain
Posts: 678
Joined: Fri Mar 27, 2009 3:45 am
Location: Houston, Texas
Contact:

Re: 3D Printing -- Pretty Close to Ready

Post by gburch » Sun May 01, 2011 7:19 am

pickelhaube wrote:Could you print the details separate ?

That way you can keep the fins clean. That way it would be easier to sand and just make the parts like applique.

When I am casting, the more details I put into a piece means one thing. Something will not come out. So the whole piece is tossed into the trash. So if you make the piece in parts. One little piece if off , does not ruin the whole thing.

Plus smaller parts could be easier to make.
Great question, and one I've been struggling with throughout this process. Making smaller details as separate parts was my original intention, but that quickly came up against the reality that the printing process has its own logic that's definitely different from how I've done scratch building in the past.

The basic problem is that, the smaller the part, the less accurate the print, because you're dealing with the deposition of molten plastic. For very small parts, a line of plastic doesn't have time to cool and "set" enough before it gets hit with more plastic, causing it to be pushed around a little by the new plastic that's being laid down. In a few layers, this turns into a mess. This is why the very tip of the warhead/nosecone doesn't ever (and I'm afraid won't ever) come out just right and will require extra puttying and hand shaping.

So the bottom line is that I have two choices: Either include the small detail in the print of a larger part (so the plastic in that detail has time to set before it gets built on), or address details with traditional methods like scratch building or, if I were to find the right collaborator (:) ), molded parts. This is definitely how I'm going to have to address the guide vanes just below the nozzle, BTW.

Bar
Sergeant
Sergeant
Posts: 107
Joined: Sat Oct 21, 2006 2:27 am
Location: Scotland. Where else?
Contact:

Re: 3D Printing -- Pretty Close to Ready

Post by Bar » Sun May 01, 2011 9:20 am

gburch wrote:
pickelhaube wrote:So the bottom line is that I have two choices: Either include the small detail in the print of a larger part (so the plastic in that detail has time to set before it gets built on), or address details with traditional methods like scratch building or, if I were to find the right collaborator (:) ), molded parts. This is definitely how I'm going to have to address the guide vanes just below the nozzle, BTW.

I'd say traditional scratching will be the way to go for really small and/or intricate parts.
It's the best way. Either that or farming out the printing of tiny high detail parts to a larger outfit like PCS.
E-mail(And MSN Messenger): vipermark7@googlemail.com

pickelhaube
Officer - Brigadier General
Posts: 9685
Joined: Mon Jan 22, 2007 5:52 am
Location: New Orleans

Re: 3D Printing -- Pretty Close to Ready

Post by pickelhaube » Sun May 01, 2011 9:48 am

The basic problem is that, the smaller the part, the less accurate the print, because you're dealing with the deposition of molten plastic. For very small parts, a line of plastic doesn't have time to cool and "set" enough before it gets hit with more plastic, causing it to be pushed around a little by the new plastic that's being laid down. In a few layers, this turns into a mess. This is why the very tip of the warhead/nosecone doesn't ever (and I'm afraid won't ever) come out just right and will require extra puttying and hand shaping.


Maybe you could get a tiny fan. Tape a funnel to it. Tape a tube to that and blow air on the heat tip's work area. That way the cool air could hit the critical area and cool the plastic just a bit to make the troubled area stack ?
Kirk Douglas : Mine hit the ground first
John Wayne : Mine was taller


Image

gburch
Officer - Captain
Officer - Captain
Posts: 678
Joined: Fri Mar 27, 2009 3:45 am
Location: Houston, Texas
Contact:

Re: 3D Printing -- Pretty Close to Ready

Post by gburch » Sun May 01, 2011 12:58 pm

Done! (... right ...):

Image
Image

I'm thinking of this as "Rev 0.5.1" -- since I've already got a number of improvements either already printed or close to the print stage. But I'm very happy with the outcome of the work I've done since the first version incorporated into the bird in this pic. This includes:

-- a completely new fin-body design
-- improved fin contour
-- rudder actuator fairing
-- vent details on body
-- new body fin-section/tank-section joint
-- detachable warhead
-- improved surface finishing technique

I'd say there's about 20 hours of assembly and finishing in this bird, not counting experiments and false starts.
pickelhaube wrote:Maybe you could get a tiny fan. Tape a funnel to it. Tape a tube to that and blow air on the heat tip's work area. That way the cool air could hit the critical area and cool the plastic just a bit to make the troubled area stack ?
I'm not sure there's enough time between layers for this to work, but I have to say it's pretty darned smart! I'll try it.

gburch
Officer - Captain
Officer - Captain
Posts: 678
Joined: Fri Mar 27, 2009 3:45 am
Location: Houston, Texas
Contact:

Re: 3D Printing -- Pretty Close to Ready

Post by gburch » Fri May 06, 2011 8:20 am

Back to the drawing board ...

I'm now returning to every major component of the model for potential improvement.

First up is the fins:
Image
This is a new "cut" of the fin parts that includes a registration tab to ensure proper fit. Shown here are some very rough pieces in place only for test fitting.

Next is the control compartment of the body -- the area between the tank section and warhead:
Image
Image
This is purely experimental, an area chosen for being relatively small-volume where I can work on ideas for panel treatment and even the possibility of opening hatches.

Also on the agenda is changing the location of the cuts between major segments of the body to correlate more closely to the actual construction of the real rocket.

"Progress" is slowing down now, as I tackle hard problems that I set aside in earlier phases, and as I work on getting from 90% to 100% -- which I suspect will involve more than 10% overall effort and time.

Bar
Sergeant
Sergeant
Posts: 107
Joined: Sat Oct 21, 2006 2:27 am
Location: Scotland. Where else?
Contact:

Re: 3D Printing -- Pretty Close to Ready

Post by Bar » Fri May 06, 2011 12:18 pm

Beautiful.
I want one!
:D
E-mail(And MSN Messenger): vipermark7@googlemail.com

gburch
Officer - Captain
Officer - Captain
Posts: 678
Joined: Fri Mar 27, 2009 3:45 am
Location: Houston, Texas
Contact:

Re: 3D Printing -- Pretty Close to Ready

Post by gburch » Sun May 08, 2011 8:08 am

Hatches:

Image
This shows the top section of the tank section, with the control section and warhead above. Pieces are mainly rough-fit together.

As I suspected would be the case, the effort to continue refining and improving the design is very slow going, with LOTS of design, print, test-fit, design cycles to get to a tentative set of new parts. This is due, I think, to the fact that the kinds of refinements I'm doing now involve the interaction of multiple parts, so changing one thing results in needing to change others, with design and print time cascading upward between cycles.

... at this rate I'm weeks and weeks, and LOTS of plastic, away from a "next Rev" rocket ...

pickelhaube
Officer - Brigadier General
Posts: 9685
Joined: Mon Jan 22, 2007 5:52 am
Location: New Orleans

Re: 3D Printing -- Pretty Close to Ready

Post by pickelhaube » Sun May 08, 2011 8:57 am

The 2 prototypes side by side look awesome :D
Kirk Douglas : Mine hit the ground first
John Wayne : Mine was taller


Image

gburch
Officer - Captain
Officer - Captain
Posts: 678
Joined: Fri Mar 27, 2009 3:45 am
Location: Houston, Texas
Contact:

Re: 3D Printing -- Pretty Close to Ready

Post by gburch » Fri May 13, 2011 2:50 pm

Work in the rocket factory:
Image
On the left are eight slightly different fins, each with a variation on how the whole assembly is cut in the computer into parts. So far, I haven't found a "magic bullet" that substantially improves on the first variation I made after the Rev 0.5.1 bird was done. The fins may always be a kludge, given the state of the printing technology I'm working with. They do come out nice in the end, but require a lot of work to get to an acceptable level of finish.

On the right is the new control section and warhead. I have more hope that the next version will be a substantial improvement on the last one, with hatches that closely approximate those on the real A4. I have some ideas about how hinges would be made ... but that lies in the dim mists of the far future ...

gburch
Officer - Captain
Officer - Captain
Posts: 678
Joined: Fri Mar 27, 2009 3:45 am
Location: Houston, Texas
Contact:

Re: 3D Printing -- Pretty Close to Ready

Post by gburch » Sat May 14, 2011 2:56 pm

More panels:

Image

I've been putting off addressing the access panel detail in the engine section. I knew they couldn't be addressed the way I did the control section, because they're smaller and there's more of them. I was afraid this would be a big problem, because this kind of surface detail was causing problems back when I first started, causing delamination when the print head made the kick from the simple curve of the body surface to sharp angles. But the refinements I've made in the printer's controls since then appear to handle these panel details just fine.

... sometimes things work out ...

pickelhaube
Officer - Brigadier General
Posts: 9685
Joined: Mon Jan 22, 2007 5:52 am
Location: New Orleans

Re: 3D Printing -- Pretty Close to Ready

Post by pickelhaube » Sat May 14, 2011 3:36 pm

You know this could work for something else that will not require a smooth finish.

Something like a Sherman turret.

This would be perfect for my future Jumbo Sherman turret project .

The linear texture would be easy as pie to cover up with the texturing that I need to apply

You are going in the wrong direction.

Armor projects is were it's at for this machine.

Two turn tables and a microphone.

http://www.youtube.com/watch?v=EPfmNxKLDG4
Kirk Douglas : Mine hit the ground first
John Wayne : Mine was taller


Image

gburch
Officer - Captain
Officer - Captain
Posts: 678
Joined: Fri Mar 27, 2009 3:45 am
Location: Houston, Texas
Contact:

Re: 3D Printing -- Pretty Close to Ready

Post by gburch » Sat May 14, 2011 4:34 pm

pickelhaube wrote:You know this could work for something else that will not require a smooth finish.

Something like a Sherman turret.

This would be perfect for my future Jumbo Sherman turret project .

The linear texture would be easy as pie to cover up with the texturing that I need to apply

You are going in the wrong direction.

Armor projects is were it's at for this machine.
I've thought A LITTLE about armor and ground vehicles but my main personal interest these days is aircraft and spacecraft.

If someone could find a public-domain, hi-res 3D model of a Sherman, I might take a stab at it. I can't see doing the modeiling myself like I'm doing on the A4. But at the rate I'm making progress on the A4 ... it would be weeks and weeks and weeks before I could even look at it.

And I DO have in my mind that my "next project" would be a 1/18 X-15. Again, the way things are going that looks like a project for 2012 ...

Jay
Officer - Lt. Colonel
Posts: 1218
Joined: Sun Jun 25, 2006 6:19 pm
Location: Auckland, New Zealand

Re: 3D Printing -- Pretty Close to Ready

Post by Jay » Sat May 14, 2011 4:46 pm

I could possibly draw up a jumbo turret if you were interested. I'd need to hunt down some reference pictures/profiles but if you wanted to have a go we could definitely start talking about such a project...that means you to Matthew!
"you get in a steep dive in this thing and you've got almost no maneuvarabilty at all. You couldn't hit the broad side of a barn with the broad side of another barn"

gburch
Officer - Captain
Officer - Captain
Posts: 678
Joined: Fri Mar 27, 2009 3:45 am
Location: Houston, Texas
Contact:

Re: 3D Printing -- Pretty Close to Ready

Post by gburch » Fri May 20, 2011 4:39 pm

sloooow "progress" ...

Image
Image
Image

I've spent all my mancave time this last week continuing experiments on the engine section. These pics show an approach I've spent hours and hours on ... breaking the area with panel detail into four quadrants to try to get the details more precise. Unless I come up with some way to address a number of problems with this design, I'll probably ditch it and go back to trying to perfect printing that section as a single piece.

The fins shown in the last pic are some of the experimental ones, in mid-filling-and-sanding stage. Also not great ...

I may take a break for a few weeks. I'm still as obsessed as ever with this project, but I'm starting to get just a wee bit frustrated, as well ...

gburch
Officer - Captain
Officer - Captain
Posts: 678
Joined: Fri Mar 27, 2009 3:45 am
Location: Houston, Texas
Contact:

Re: 3D Printing -- Pretty Close to Ready

Post by gburch » Sun May 22, 2011 2:20 pm

weekend work:

Image

The only new thing to come out of a weekend of experiments is a first stab at the joint between the engine and tank sections. This was often left uncovered in operational use of the V-2. It's a detail that looks like it will come out pretty well.

This pic shows an engine section with no hatch detail, as I've stalled on work with that for now.

gburch
Officer - Captain
Officer - Captain
Posts: 678
Joined: Fri Mar 27, 2009 3:45 am
Location: Houston, Texas
Contact:

Re: 3D Printing -- Pretty Close to Ready

Post by gburch » Mon May 23, 2011 4:57 am

With so many parts of the rocket now subject to experimental improvements, I had to spend some time getting the "rocket factory" organized, which seemed like a good time for a family portrait:

Image

Bar
Sergeant
Sergeant
Posts: 107
Joined: Sat Oct 21, 2006 2:27 am
Location: Scotland. Where else?
Contact:

Re: 3D Printing -- Pretty Close to Ready

Post by Bar » Mon May 23, 2011 5:11 am

Dammit man, when are you going to sell me one?
:D
E-mail(And MSN Messenger): vipermark7@googlemail.com

gburch
Officer - Captain
Officer - Captain
Posts: 678
Joined: Fri Mar 27, 2009 3:45 am
Location: Houston, Texas
Contact:

Re: 3D Printing -- Pretty Close to Ready

Post by gburch » Mon May 23, 2011 5:44 am

Bar wrote:Dammit man, when are you going to sell me one?
:D
When I solve a bunch of hard problems and figure out how much I'm going to charge. If you're a good boy, Maybe Santa will have one for you this year :lol:

Bar
Sergeant
Sergeant
Posts: 107
Joined: Sat Oct 21, 2006 2:27 am
Location: Scotland. Where else?
Contact:

Re: 3D Printing -- Pretty Close to Ready

Post by Bar » Mon May 23, 2011 5:57 am

gburch wrote:
Bar wrote:Dammit man, when are you going to sell me one?
:D
When I solve a bunch of hard problems and figure out how much I'm going to charge. If you're a good boy, Maybe Santa will have one for you this year :lol:

Fair enough. I am standing ready then.
:D
E-mail(And MSN Messenger): vipermark7@googlemail.com

gburch
Officer - Captain
Officer - Captain
Posts: 678
Joined: Fri Mar 27, 2009 3:45 am
Location: Houston, Texas
Contact:

Re: 3D Printing -- Pretty Close to Ready

Post by gburch » Sun May 29, 2011 4:53 am

Image
Work on the "Rev 0.5+" parts continues very slowly. Besides having to attend to work-work and life-life, pushing all the various improvement initiatives simultaneously makes progress toward a next version a painstaking process.

The pic above shows the state of things last night. A set of basic Rev 0.5+ body parts has been through a few coats of primer and fins are ready for their first coats. The engine section on this bird is bare of panel details and will be the foundation for trying a method of "applique" panel detailing: I'm going to cut panels from a sheet of very thin styrene and glue them in place after the engine section has been fully filler-primed, and before the first coat of lacquer primer. A second engine section with printed-in panel details is on a separate development, printing and finishing track. The control section shown here is also an experiment, with fixed, printed-in panel detail. It looks only OK so far, but I need to pursue every possible option during this stage of development.

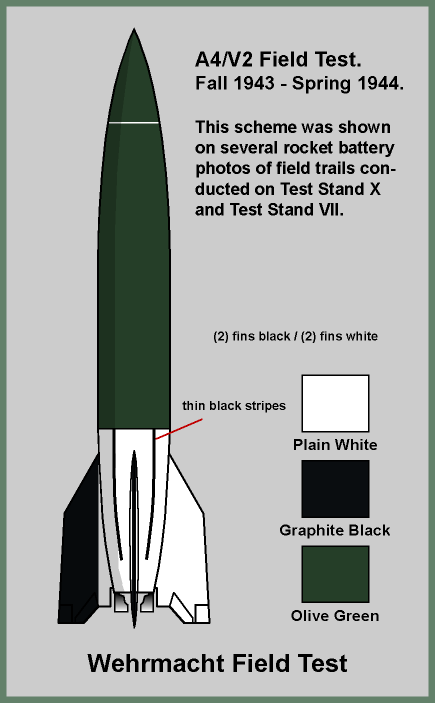
The color scheme for this and all further pre-Rev.1.0 work witll be this:

Image
Image

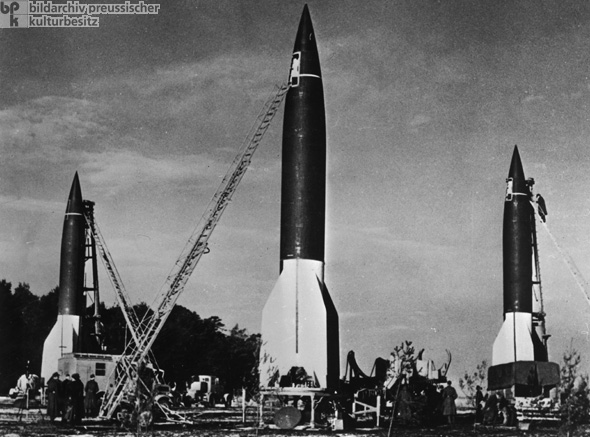
This is appropriate for a couple of reasons. First, it's easier and simpler and and will make switching out development parts easier while maintaining some kind of scale appearance, second, it was the scheme common on the late development and pre-deployment birds. Given my poor painting skills, when (?!?) I get to a "production bird I'm sure I'll skip the short-lived "blotch" camouflage scheme used only for a very short period on the first operational rockets, and go straight to the splinter scheme that most deployed V-2s wore (until the very end, when they didn't bother with camo and painted them all olive).

With any luck, I'll get through at least some final painting on a Rev.0.5.1 set of parts by the end of the long weekend and will post pics then.

pickelhaube
Officer - Brigadier General
Posts: 9685
Joined: Mon Jan 22, 2007 5:52 am
Location: New Orleans

Re: 3D Printing -- Pretty Close to Ready

Post by pickelhaube » Sun May 29, 2011 7:50 am

Lots of work :shock:

Is the project still fun ?

After a while the fun has a tendency to leave these projects . :?
Kirk Douglas : Mine hit the ground first
John Wayne : Mine was taller


Image

gburch
Officer - Captain
Officer - Captain
Posts: 678
Joined: Fri Mar 27, 2009 3:45 am
Location: Houston, Texas
Contact:

Re: 3D Printing -- Pretty Close to Ready

Post by gburch » Sun May 29, 2011 10:11 am

pickelhaube wrote:Lots of work :shock:

Is the project still fun ?
Good question. At first, just being able to produce ANYTHING was fun, then being able to get something that kinda, sorta looked like I'd imagined it was really satisfying. Now ...
pickelhaube wrote:After a while the fun has a tendency to leave these projects . :?
BINGO. But there's the fear that if you set it aside, you'll just remember how "unfun" it had become before you stopped, and also of forgetting all the little details you're holding in your head as you continue to work, making it very hard to start up again ... So I keep pressing on, hoping I'm not "wasting" my time (as if making toy rockets was a good use of my time ...).

Beeavision
Officer - 2nd Lieutenant
Posts: 420
Joined: Fri Oct 02, 2009 12:52 am
Location: Orlando, FL

Re: 3D Printing -- Pretty Close to Ready

Post by Beeavision » Sun May 29, 2011 10:13 am

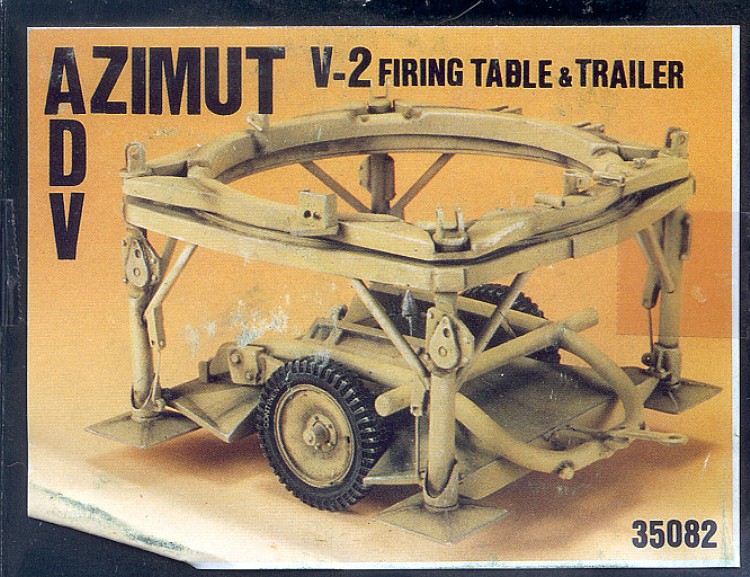
Now all you need is the launch platform.

Image

http://www.v2rocket.com/start/scale/fr/ ... latte.html

Post Reply