JSI F-14 REPAINT SERVICE AT SKYWORKS TOYS

-
thatf14guy
- Officer - 1st Lieutenant

- Posts: 521
- Joined: Thu Nov 19, 2009 5:58 am
-
supersonicfifi

- Officer - Colonel

- Posts: 1276
- Joined: Wed Jun 01, 2005 2:47 pm
- Location: FRANCE
SAD
Thanks my friends ! your support is great !
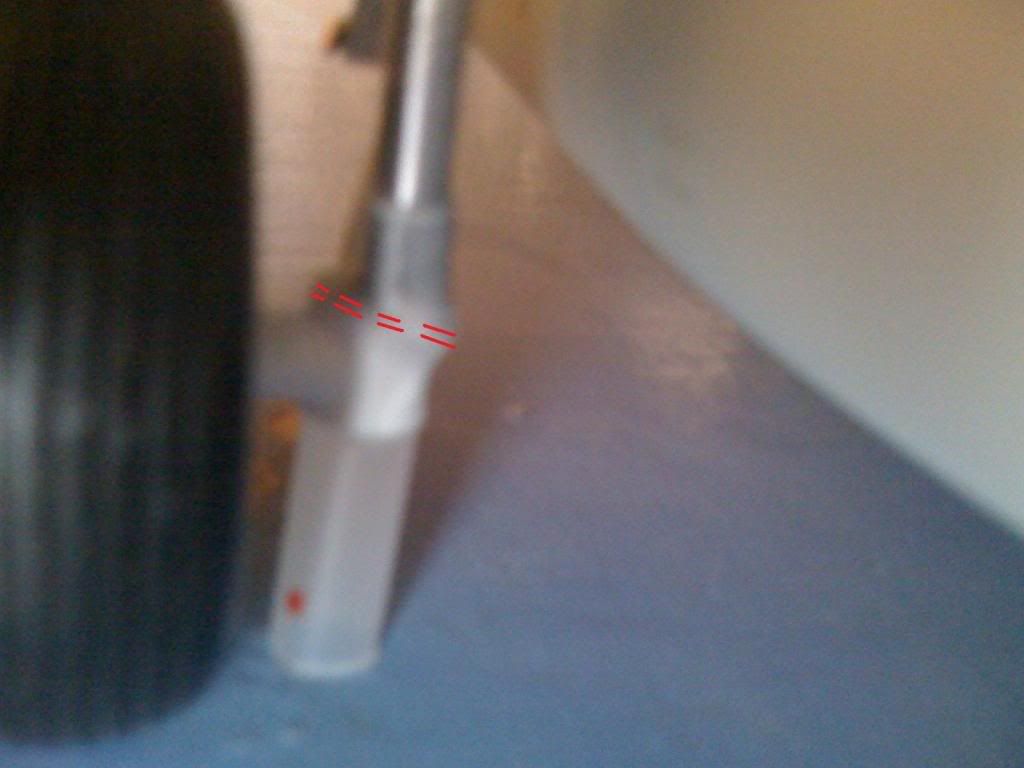
Here is the broken part and my modest repair
The failure line is in red ! I think the plastic part should be made of metal and welded to the skyworks struts !
The SKYWORKS landing gear looks absolutly amazing but the transportation went ballistic !!!!!
So i glued the plastic part back ( but the weight is too much !)
So i glued a small plastic tube (translucid) to help stand erect !!!!
1/18 mirage 2000 & RAFALE should i say more ?
-
supersonicfifi
- Officer - Colonel
- Posts: 1276
- Joined: Wed Jun 01, 2005 2:47 pm
- Location: FRANCE
this is a temporary solution !
Jack from SKYWORKS was so disgusted with the story that he offered me to repair it for me ! It's very nice of him, i will send him back soon!
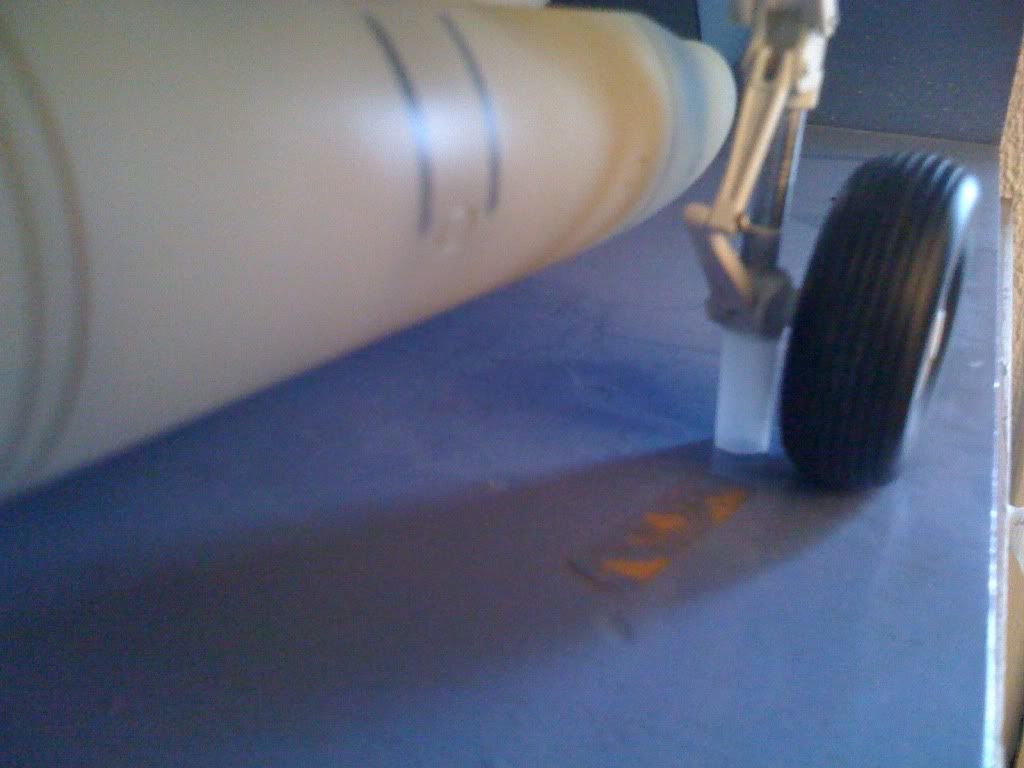
The thing is that this part ( the white plastic L shaped form holding the wheel ) must support a HUGE weight.
I can see that SKYWORKS solution help for the straightness of the lower part of the strut but this small part hold the wheel and a lot of weight.
I wonder who could cast it for us because with jack solution it could be the perfect Landing gear in our scale.
I am going to carefully remove the lower part + wheel and look for a locksmith if he can do something.
Does anybody knows how to remove the wheel ? it look so good with jack improvment that i dont want to mess evrything !!!!
Philippe
Jack from SKYWORKS was so disgusted with the story that he offered me to repair it for me ! It's very nice of him, i will send him back soon!
The thing is that this part ( the white plastic L shaped form holding the wheel ) must support a HUGE weight.
I can see that SKYWORKS solution help for the straightness of the lower part of the strut but this small part hold the wheel and a lot of weight.
I wonder who could cast it for us because with jack solution it could be the perfect Landing gear in our scale.
I am going to carefully remove the lower part + wheel and look for a locksmith if he can do something.
Does anybody knows how to remove the wheel ? it look so good with jack improvment that i dont want to mess evrything !!!!
Philippe
1/18 mirage 2000 & RAFALE should i say more ?
-
Black_Dragon_One
- Officer - Brigadier General

- Posts: 2032
- Joined: Sat Dec 11, 2004 1:23 pm
- Location: California
supersonicfifi wrote:this is a temporary solution !
Jack from SKYWORKS was so disgusted with the story that he offered me to repair it for me ! It's very nice of him, i will send him back soon!
The thing is that this part ( the white plastic L shaped form holding the wheel ) must support a HUGE weight.
I can see that SKYWORKS solution help for the straightness of the lower part of the strut but this small part hold the wheel and a lot of weight.
I wonder who could cast it for us because with jack solution it could be the perfect Landing gear in our scale.
I am going to carefully remove the lower part + wheel and look for a locksmith if he can do something.
Does anybody knows how to remove the wheel ? it look so good with jack improvment that i dont want to mess evrything !!!!
Philippe
it look like the landing gear it self it held on by a linch pen... so remove the linch pen and the landing gear should come free..
whats up doc....
-
SkyWorksToys
- Sergeant

- Posts: 142
- Joined: Wed Nov 04, 2009 4:12 pm
Just send that whole gear assembly back to me ,will get it fix or send new no point of messing things more than necessary,how to remove gear
1 bend gear door enough for hinge facing front of airplane to disengage
2 this way you exposed big silver metal pin remove it by pulling, I put them in there they should slide out easy .small package wont cost a lot back to US
1 bend gear door enough for hinge facing front of airplane to disengage
2 this way you exposed big silver metal pin remove it by pulling, I put them in there they should slide out easy .small package wont cost a lot back to US
-
pcoughran
- Officer - 1st Lieutenant
- Posts: 596
- Joined: Mon Jun 30, 2008 10:58 am
- Location: 1, USA, MO, St. Louis
Jack,
Any update on your scratch gear? I put a carbon fiber rod in mine that was missing the metal rod and it still broke in the same place as Rafale's right where the wheel attaches to the strut. Actually both gear broke in that same spot after repairing the breaks in the middle part of the strut.
Are your newer gear going to address that weakness? I'm afraid if you just make the strut larger and it still attaches to the same wheel joint it will break there as well just like Rafale's and my two that I put rods into.
I was hoping the newer gear you were talking about would fix the wheel connection area to the strut at well as the struts themselves.
I'm still interested so let me know.
Phil
"Where's dat waskily wabbit?"
____________________________________________
Good Trades: Ostketten, Pickelhaube, Cornbreadfred, Sledgehammer, Pizzaguy, caesarbc3,jwcarpenter
____________________________________________
Good Trades: Ostketten, Pickelhaube, Cornbreadfred, Sledgehammer, Pizzaguy, caesarbc3,jwcarpenter
-
SkyWorksToys
- Sergeant
- Posts: 142
- Joined: Wed Nov 04, 2009 4:12 pm
Phil
Part of what Im doing right now is conducting "extensive strength test" of new gear I set it on a deck and im waiting,so far there is no breaks or bends but I dont think there will be any problems new gear strut is almost twice diameter ,question is if I make it of the metal for appearance and extra strength it will be expensive and I already have people loving me for SkyWorks prices.This forum is not to great to find out where market is and if it will be worth to make ,so far there is only about 20 people seriously interested .I would like to have it myself highly detailed metal version so I guess I dont have choice.
As far as JSI gear breaking where axle attaches to strut did you drill all the way just before end of the bottom strut?I would like to see picture of the problem area because I was thinking to use wheel and hub axle from JSI with modification
-
pickelhaube
- Officer - Brigadier General
- Posts: 9706
- Joined: Mon Jan 22, 2007 5:52 am
- Location: New Orleans
Jack are you casting the axel or just repairing the strut ?
This is a little more work but if you drill a hole toward the bottom were the axel L's to the sturt and insert a smaller metal rod or tube . Super glue them together and cast that union with the axel and strut this should be strong enough to hold a plane twice the weight.
Does any of that make since ?
Or better yet maybe bend a piece of piano wire at a sharpe L and insert it into the strut tube and cast the axel hub over that.
Kirk Douglas : Mine hit the ground first
John Wayne : Mine was taller

John Wayne : Mine was taller
-
SkyWorksToys
- Sergeant
- Posts: 142
- Joined: Wed Nov 04, 2009 4:12 pm
-
pcoughran
- Officer - 1st Lieutenant
- Posts: 596
- Joined: Mon Jun 30, 2008 10:58 am
- Location: 1, USA, MO, St. Louis
Mine has been "put away" now for a few weeks so don't quite remember the "state" the gear are in for sure as I repaired them more than once before giving up. I know all the pieces are tucked away in the wheel wells. I'm almost afraid to get it down off its acrylic stand as I'm afraid every time I mess with it something else will break (gear doors or something).SkyWorksToys wrote:It does make sense,that is exactly what I was thinking in a worst case scenario, that is why I want to see picture, so far what I experience they break at strut where metal rod ends
After inserting a rod into the original gear that broke mid-strut, it broke again this time right above the "L" where the wheel actually meets the strut. It so happens that is where the rod ends in its channel as well. I didn't drill when I installed new rod as mine was missing a rod so inserted correct diameter rod into existing hollow strut. But like I said the hollow channel ends a bit above the "L" where the wheel meets the strut. When it broke the second time (both gear struts) the little angled pieces that hold the strut assembly onto the strut portion with the spring also broke (tiny little pieces broke right where the pins connect them. Tried glueing them but they are so small where the pin goes in they just keep breaking up.
If I get the courage and time to bring it down over the next day or so, I'll try to take a couple pics if I can.
Phil
"Where's dat waskily wabbit?"
____________________________________________
Good Trades: Ostketten, Pickelhaube, Cornbreadfred, Sledgehammer, Pizzaguy, caesarbc3,jwcarpenter
____________________________________________
Good Trades: Ostketten, Pickelhaube, Cornbreadfred, Sledgehammer, Pizzaguy, caesarbc3,jwcarpenter
-
SkyWorksToys
- Sergeant
- Posts: 142
- Joined: Wed Nov 04, 2009 4:12 pm

-
Black_Dragon_One
- Officer - Brigadier General
- Posts: 2032
- Joined: Sat Dec 11, 2004 1:23 pm
- Location: California
-
thatf14guy
- Officer - 1st Lieutenant
- Posts: 521
- Joined: Thu Nov 19, 2009 5:58 am
-
SkyWorksToys
- Sergeant
- Posts: 142
- Joined: Wed Nov 04, 2009 4:12 pm
F14 Gear progress
Update on a gear for all of you who email us about gear progress.This is final version we did couple revisions ,gear is mostly metal except white pieces which are plastic and tie up ring which will be made of little ticker than pictured bras ,gear will be available for sale this month, it wont be expensive


-
iflabs
- Officer - 2nd Lieutenant

- Posts: 292
- Joined: Thu May 31, 2007 12:28 am
- Location: Minne-sota-apolis
Re: F14 Gear progress
SkyWorksToys wrote:Update on a gear for all of you who email us about gear progress.This is final version we did couple revisions ,gear is mostly metal except white pieces which are plastic and tie up ring which will be made of little ticker than pictured bras ,gear will be available for sale this month, it wont be expensive
-
SkyWorksToys
- Sergeant
- Posts: 142
- Joined: Wed Nov 04, 2009 4:12 pm
I would mention first you have to remove the landing gear door as no way to remove the pin without taking the door off. There are 2 tabs that fit into holes on each side and you will have to bend a piece on 1 side and than remove the door. Than no problem to remove the metal pin and install the landing gear assy.
-
SkyWorksToys
- Sergeant
- Posts: 142
- Joined: Wed Nov 04, 2009 4:12 pm
I did mention that on previous pageSkyWorksToys wrote: ,how to remove gear
1 bend gear door enough for hinge facing front of airplane to disengage
2 this way you exposed big silver metal pin remove it by pulling, I put them in there they should slide out easy .small package wont cost a lot back to US