V-1 Transport / Launch Dolly REBOOTED Price Drop !!!!
-
pickelhaube
- Officer - Brigadier General

- Posts: 9649
- Joined: Mon Jan 22, 2007 5:52 am
- Location: New Orleans
-
pickelhaube
- Officer - Brigadier General
- Posts: 9649
- Joined: Mon Jan 22, 2007 5:52 am
- Location: New Orleans
Progress report.
I am halfway through the RTV mold making. I am still scratching my head on how I am going to pour the molds on the main carrage and those long guide arms. I think the best way to make them is in two pieces. Being so long and thin the resin will probably fill not in the cavities. I am not sure if I will make the push handels in the back plasic or brass. If I make them in brass and if they get bumped hard the metal may snap the guide arm that it is attached to. For that reason I am thinking of using styreen rods for the push handels. I thought that this would be an easy project. Probably that is why Pegasis did not make them in the first place.
I am about through with the M-113 kit pouring and will get back on this 100% tomorrow. Hopefully all of the molds will be ready and actual pouring of the resin may start Fri or Sat.
Thanks for the orders .
Kirk Douglas : Mine hit the ground first
John Wayne : Mine was taller

John Wayne : Mine was taller
-
pickelhaube
- Officer - Brigadier General
- Posts: 9649
- Joined: Mon Jan 22, 2007 5:52 am
- Location: New Orleans
Progress report.
I am halfway through the RTV mold making. I am still scratching my head on how I am going to pour the molds on the main carrage and those long guide arms. I think the best way to make them is in two pieces. Being so long and thin the resin will probably fill not in the cavities. I am not sure if I will make the push handels in the back plasic or brass. If I make them in brass and if they get bumped hard the metal may snap the guide arm that it is attached to. For that reason I am thinking of using styreen rods for the push handels. I thought that this would be an easy project. Probably that is why Pegasis did not make them in the first place.
I am about through with the M-113 kit pouring and will get back on this 100% tomorrow. Hopefully all of the molds will be ready and actual pouring of the resin may start Fri or Sat.
Thanks for the orders .
I am halfway through the RTV mold making. I am still scratching my head on how I am going to pour the molds on the main carrage and those long guide arms. I think the best way to make them is in two pieces. Being so long and thin the resin will probably fill not in the cavities. I am not sure if I will make the push handels in the back plasic or brass. If I make them in brass and if they get bumped hard the metal may snap the guide arm that it is attached to. For that reason I am thinking of using styreen rods for the push handels. I thought that this would be an easy project. Probably that is why Pegasis did not make them in the first place.
I am about through with the M-113 kit pouring and will get back on this 100% tomorrow. Hopefully all of the molds will be ready and actual pouring of the resin may start Fri or Sat.
Thanks for the orders .
Kirk Douglas : Mine hit the ground first
John Wayne : Mine was taller
John Wayne : Mine was taller
-
pickelhaube
- Officer - Brigadier General
- Posts: 9649
- Joined: Mon Jan 22, 2007 5:52 am
- Location: New Orleans
Well production has started.
Here is the mess that is envolved in pouring the resin. The blue things are the RTV molds. That is about $75 worth of RTV.
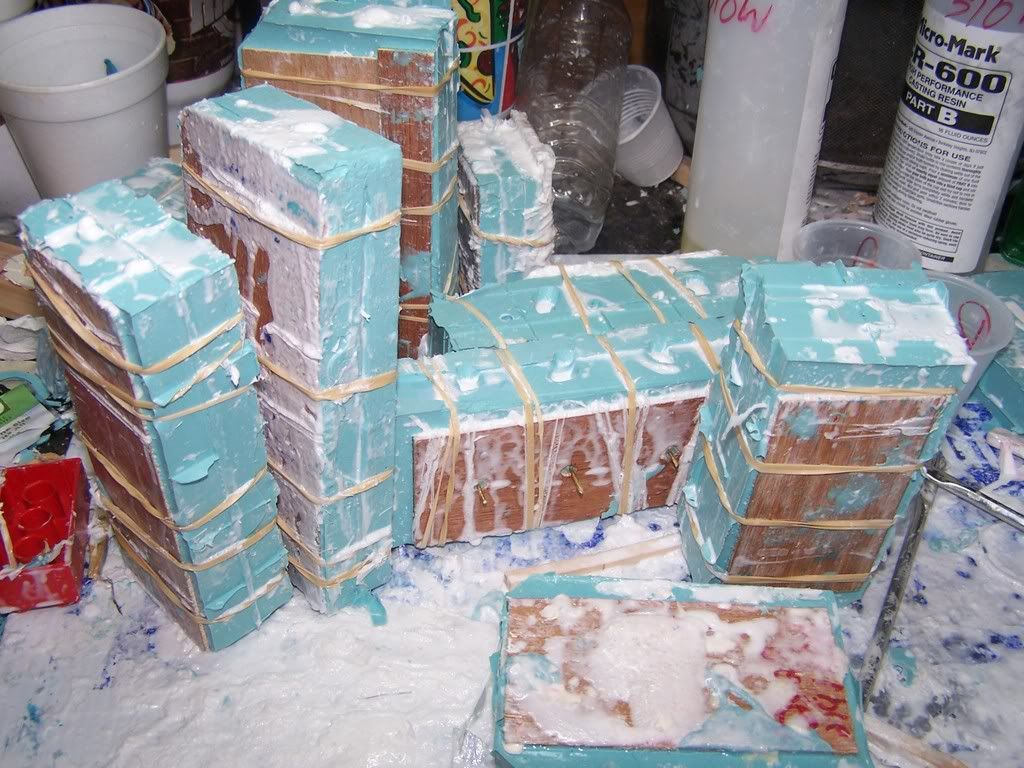
The main frames

I had to cut the guide arms into 2 pieces. There was no was to make them in one piece.

Here is the mess that is envolved in pouring the resin. The blue things are the RTV molds. That is about $75 worth of RTV.
The main frames
I had to cut the guide arms into 2 pieces. There was no was to make them in one piece.
Last edited by pickelhaube on Sun Jan 11, 2009 12:22 am, edited 1 time in total.
Kirk Douglas : Mine hit the ground first
John Wayne : Mine was taller
John Wayne : Mine was taller
-
thehun
- Officer - 2nd Lieutenant

- Posts: 364
- Joined: Sun Oct 02, 2005 10:21 pm
- Location: Heart of Dixie (Mississippi)
Mess
Pickel, 
Alot of people have no idea about how much work and how messy that stuff can be, It is a pain in the AZZ to work with and clean up, I can't even pay my kids to clean up my messes, I don't feel so bad after seeing yours
Hun
Alot of people have no idea about how much work and how messy that stuff can be, It is a pain in the AZZ to work with and clean up, I can't even pay my kids to clean up my messes, I don't feel so bad after seeing yours
Hun
-
Black_Dragon_One
- Officer - Brigadier General
- Posts: 2032
- Joined: Sat Dec 11, 2004 1:23 pm
- Location: California
-
pickelhaube
- Officer - Brigadier General
- Posts: 9649
- Joined: Mon Jan 22, 2007 5:52 am
- Location: New Orleans
I know. These had to be made because there are none out there. I was cosidering the price of the rocket and my thinking was who will pay more the dolly than the actual rocket?kevrut wrote:Alot of mess, time, and work into these things.
You're only charging how much?
Good job.
After I get the few orders out I will put these up on e-bay and see how it goes. At $35 I barely paid for the RTV and resin.
I always get ideas and sometimes I throw them out to you guys with all my polls and such . I love this kind of feed back from you guys. Some of my projects have been big hits . Some of them not so this dolly may be one of those. But the V-1 sitting on top of the dolly looks cool and for that reason I am glad I did it .
Kirk Douglas : Mine hit the ground first
John Wayne : Mine was taller
John Wayne : Mine was taller
-
pickelhaube
- Officer - Brigadier General
- Posts: 9649
- Joined: Mon Jan 22, 2007 5:52 am
- Location: New Orleans
Hey Normandy,
Thanks for the order and thanks to everybody who ordered one.
After your order is filled I may just retire this project unless I put it on e-bay.
Man I tell you for the price there was a LOT of work in such a simple project.
Everybodies order has been filled. I will go to the post office on Friday.
Maybe some day I will quit crying the blues on this project but for the price I charged YIKES there was a CRAZY amount of work.
So after Normandy's order the price will be at least $50 or I will just retire it.
Matthew
Kirk Douglas : Mine hit the ground first
John Wayne : Mine was taller
John Wayne : Mine was taller
-
normandy
- Officer - Brigadier General
- Posts: 6028
- Joined: Mon Oct 04, 2004 6:30 pm
- Location: Atlantic Coast
Pichelhaube, no need to thank me....Your work is top notch and should be priced accordingly. I know many of us are used to 21st's low prices...well two or three years ago but custom work is just that, custom. One person making what a few people want with no big Buck$ to back you.
Help support our customizers!
Oh and don't retire this project... get in touch with Pegasus and see if they have any interest. You can't stop now........
Help support our customizers!
Oh and don't retire this project... get in touch with Pegasus and see if they have any interest. You can't stop now........

-
pickelhaube
- Officer - Brigadier General
- Posts: 9649
- Joined: Mon Jan 22, 2007 5:52 am
- Location: New Orleans

-
pickelhaube
- Officer - Brigadier General
- Posts: 9649
- Joined: Mon Jan 22, 2007 5:52 am
- Location: New Orleans
Hey guys I did not make directions for the V-1 dolly. Click on this for directions.
privmsg.php?folder=outbox&mode=read&p=118260
Matthew
BTW ALL kits have been made and sent. All of you should have gotten theres by now if not next week.
King of Fools I have no idea when you will get yours. The last time just before Christmas it took 2 weeks to get to the UK 4 weeks to get to Belgiam. Going to Spain is anybodies guess. but it is on its way.
Kirk Douglas : Mine hit the ground first
John Wayne : Mine was taller
John Wayne : Mine was taller
-
normandy
- Officer - Brigadier General
- Posts: 6028
- Joined: Mon Oct 04, 2004 6:30 pm
- Location: Atlantic Coast
Guys, Got my kit Friday, this transport dolly is very cool. Once you see it you'll understand the time and effort that went into this kit. From the mock-up to the molds to the casting.......Nice Job Pickelhaube!
Pickel, I got a problem When I click on your link I get the last PM I sent out.
No biggie I'll just refer to the pic in this post.
Thanks for the kit,
Normandy.
Pickel, I got a problem
No biggie I'll just refer to the pic in this post.
Thanks for the kit,
Normandy.
-
pickelhaube
- Officer - Brigadier General
- Posts: 9649
- Joined: Mon Jan 22, 2007 5:52 am
- Location: New Orleans
Hmmmm.... When I click on it I get the PM I sent to JOC.normandy wrote:Guys, Got my kit Friday, this transport dolly is very cool. Once you see it you'll understand the time and effort that went into this kit. From the mock-up to the molds to the casting.......Nice Job Pickelhaube!
Pickel, I got a problem
No biggie I'll just refer to the pic in this post.
Thanks for the kit,
Normandy.
JOC is there anyway you can try to post the PM directions I sent you ?
Kirk Douglas : Mine hit the ground first
John Wayne : Mine was taller
John Wayne : Mine was taller
Hope this works as I am not a computer geek:
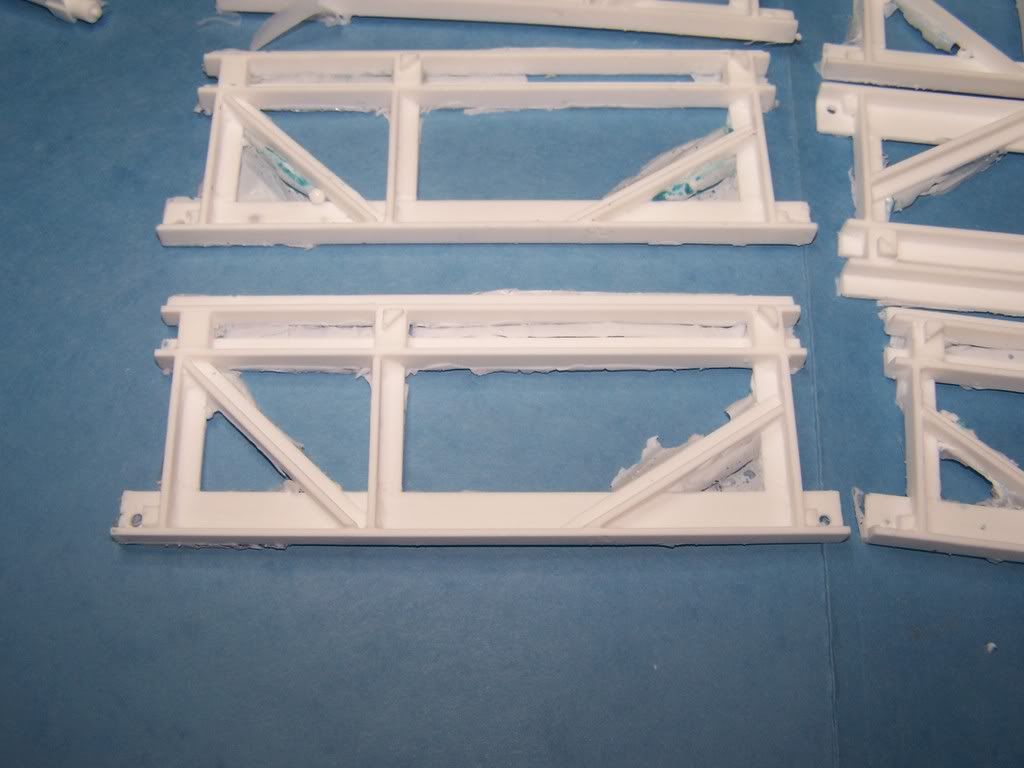
The cross members are the gray plastic angle irons here are some directions. You must use CA glue and WASH ALL THE PIECES WITH MILD SOAP AND WATER AND ALLOW TO DRY.
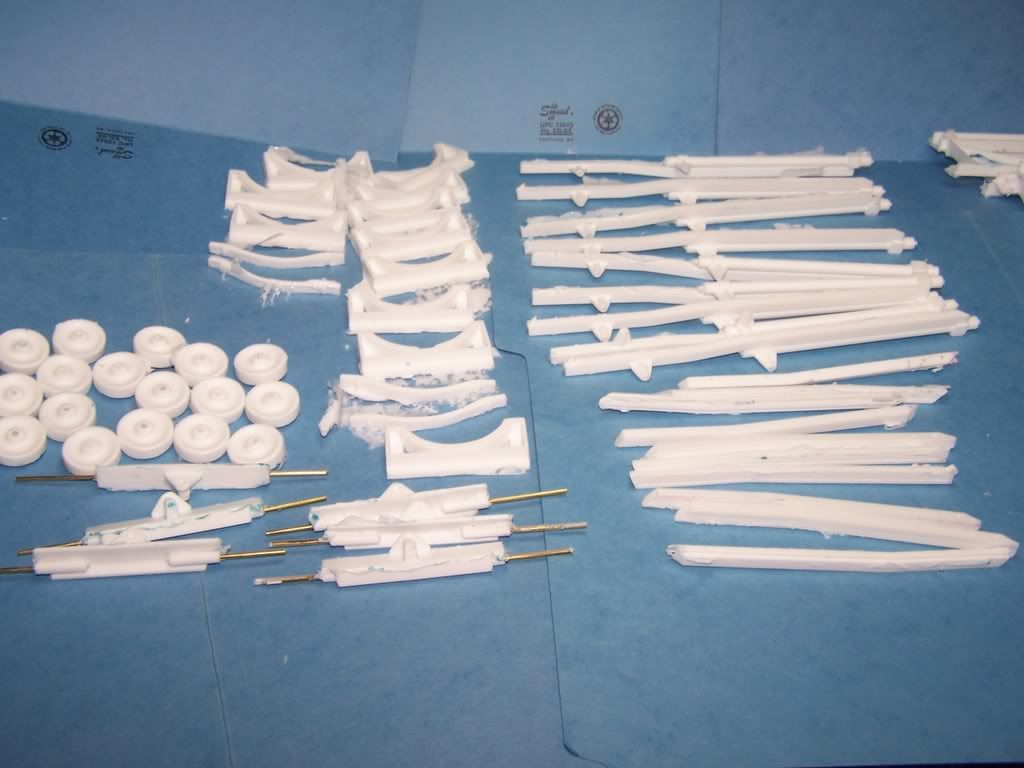
1. Glue the long arms together on a flat surface and allow to dry. You may want to put a little piece of plastic card on the splice joint to strengthen it. Make sure if you do this , that the card is on the inside.
2. Clean up the axel pieces and the main frames.
3. Glue the f for front axel piece to the frame bottoms make sure frame is square.Glue the back axel to the frame.
4. Glue the large rounded support to the inside of the frame on the little tabs.
5. Glue the smaller rounded support to the back side of the frame on there little tabs.
6. Glue the gray plastic angle irons up under the diagonal frame members going left to right.
7.Slide on the wheels mark the axels about 1/8 of an inch longer. Slide off wheels and cut axels with Dremel or wire cutting pliers will work.. Smooth with file .
8. Long support slide should be dry by now slide them down between the top angle rail and the rounded supports . They should fit in snugly. Test fit then glue.
9. Glue on the thin rounded support to the back of the rails. Use alignment tabs.
10. Apply the long brass push handels . You may not want to glue theses. They fit tight.
11. Glue the white handel tube to the long brass pull handel. Make sure it is square.
12. Glue small crank handels left side right side.
13. Slide wheels back on. When you paint the dolly the paint on the axels will hold the wheels on.
14. Paint.
JOC
The cross members are the gray plastic angle irons here are some directions. You must use CA glue and WASH ALL THE PIECES WITH MILD SOAP AND WATER AND ALLOW TO DRY.
1. Glue the long arms together on a flat surface and allow to dry. You may want to put a little piece of plastic card on the splice joint to strengthen it. Make sure if you do this , that the card is on the inside.
2. Clean up the axel pieces and the main frames.
3. Glue the f for front axel piece to the frame bottoms make sure frame is square.Glue the back axel to the frame.
4. Glue the large rounded support to the inside of the frame on the little tabs.
5. Glue the smaller rounded support to the back side of the frame on there little tabs.
6. Glue the gray plastic angle irons up under the diagonal frame members going left to right.
7.Slide on the wheels mark the axels about 1/8 of an inch longer. Slide off wheels and cut axels with Dremel or wire cutting pliers will work.. Smooth with file .
8. Long support slide should be dry by now slide them down between the top angle rail and the rounded supports . They should fit in snugly. Test fit then glue.
9. Glue on the thin rounded support to the back of the rails. Use alignment tabs.
10. Apply the long brass push handels . You may not want to glue theses. They fit tight.
11. Glue the white handel tube to the long brass pull handel. Make sure it is square.
12. Glue small crank handels left side right side.
13. Slide wheels back on. When you paint the dolly the paint on the axels will hold the wheels on.
14. Paint.
JOC
-
King O' Fools
- Officer - Captain

- Posts: 817
- Joined: Wed Jul 04, 2007 8:19 pm
Thanks for the update, PH. It arrived at my local post office yesterday. Now that was fast!pickelhaube wrote:Hey guys I did not make directions for the V-1 dolly. Click on this for directions.
privmsg.php?folder=outbox&mode=read&p=118260
Matthew
BTW ALL kits have been made and sent. All of you should have gotten theres by now if not next week.
King of Fools I have no idea when you will get yours. The last time just before Christmas it took 2 weeks to get to the UK 4 weeks to get to Belgiam. Going to Spain is anybodies guess. but it is on its way.
-
pickelhaube
- Officer - Brigadier General
- Posts: 9649
- Joined: Mon Jan 22, 2007 5:52 am
- Location: New Orleans
I forgot a step.
The small little aluminum wires are for the grab handels in the front of the rig. They go into the holes that are drilled there. You may have to cut them a little to get a better fit.
Thanks JOC for posting the directions.
King I can't believe you have them already !!!! Let me know how you like them and the M-113 kit.
Matthew
Kirk Douglas : Mine hit the ground first
John Wayne : Mine was taller
John Wayne : Mine was taller
-
pickelhaube
- Officer - Brigadier General
- Posts: 9649
- Joined: Mon Jan 22, 2007 5:52 am
- Location: New Orleans

Re: V-1 transport/launch dolly
Does anyone want to sell their V-1 transport dolly by any chance?
Let me know.
Let me know.

Re: V-1 transport/launch dolly
I am new to the forum but would love to have one of thes Dolly's for my v-1. Can you email me at
[email protected] or cell 817-239-7003 or do I need to try to contact you?
I am sure to order many more conversion/ custom pieces from you.
Thank you,
James
[email protected] or cell 817-239-7003 or do I need to try to contact you?
I am sure to order many more conversion/ custom pieces from you.
Thank you,
James
-
pickelhaube
- Officer - Brigadier General
- Posts: 9649
- Joined: Mon Jan 22, 2007 5:52 am
- Location: New Orleans
Re: V-1 transport/launch dolly
Hello ,welcome to the board unfortunately the v-1 dolly is retired at this time . The molds are shot and they are on the long list of things to be re-made .Puke wrote:I am new to the forum but would love to have one of thes Dolly's for my v-1. Can you email me at
[email protected] or cell 817-239-7003 or do I need to try to contact you?
I am sure to order many more conversion/ custom pieces from you.
Thank you,
James
Kirk Douglas : Mine hit the ground first
John Wayne : Mine was taller
John Wayne : Mine was taller
-
pickelhaube
- Officer - Brigadier General
- Posts: 9649
- Joined: Mon Jan 22, 2007 5:52 am
- Location: New Orleans
Re: V-1 transport/launch dolly
For you guys who have missed it .
I have had some interest in the V-1 dolly so I pulled out the molds and you pretty much guessed it the molds were all shot .
No biggie I had the RTV and needed to make a few molds for the Hind so I decided to remake all of the V-1s molds.
I have made some changes with the moldings and the parts are coming out great.
The first time I made the v-1 pouring was a challange and I have learned a thing or two since .
So I am offering the v-1 dolly at a reduced price of $45
And I usually charge twice the price of the kit to make a full build but considering the new ease of pouring I will be charging $30 fully build and paint the dolly.
So your choice of panzer gray or field grey $80 fully painted ADDITIONAL SHIPPING IS EXTRA .
$45 for the kit ( shipping extra )
$80 for a full build ( shipping extra )
Last edited by pickelhaube on Sat Jan 23, 2016 7:18 am, edited 1 time in total.
Kirk Douglas : Mine hit the ground first
John Wayne : Mine was taller
John Wayne : Mine was taller