Page 2 of 8
Posted: Sun Jan 25, 2009 6:01 pm
by pickelhaube
iflabs wrote:I may have missed it, but is the kit going to arrive prepainted?
Yes I was planing to do basic flat black but I tell you , the grey primer I use is a almost perfect match to the grey back ground on the
Pavehawk's paint job.

So you can get your choice. Black , grey or unpainted white .
Is that custom or what ?

Posted: Sun Jan 25, 2009 6:45 pm
by Sabrefan
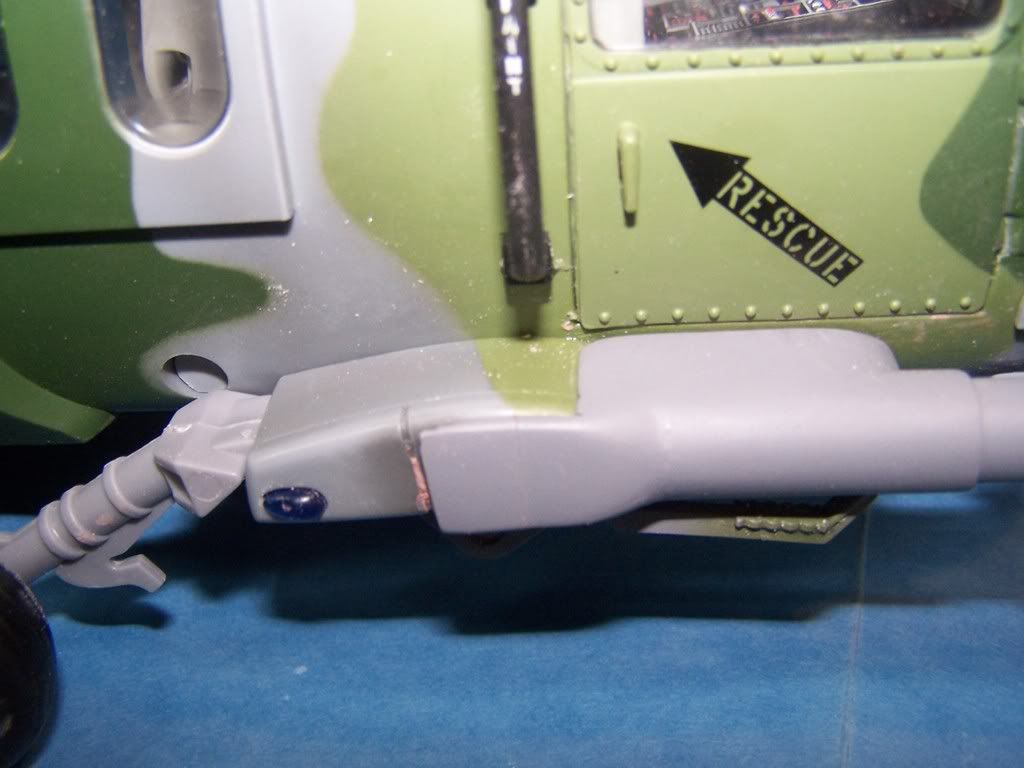
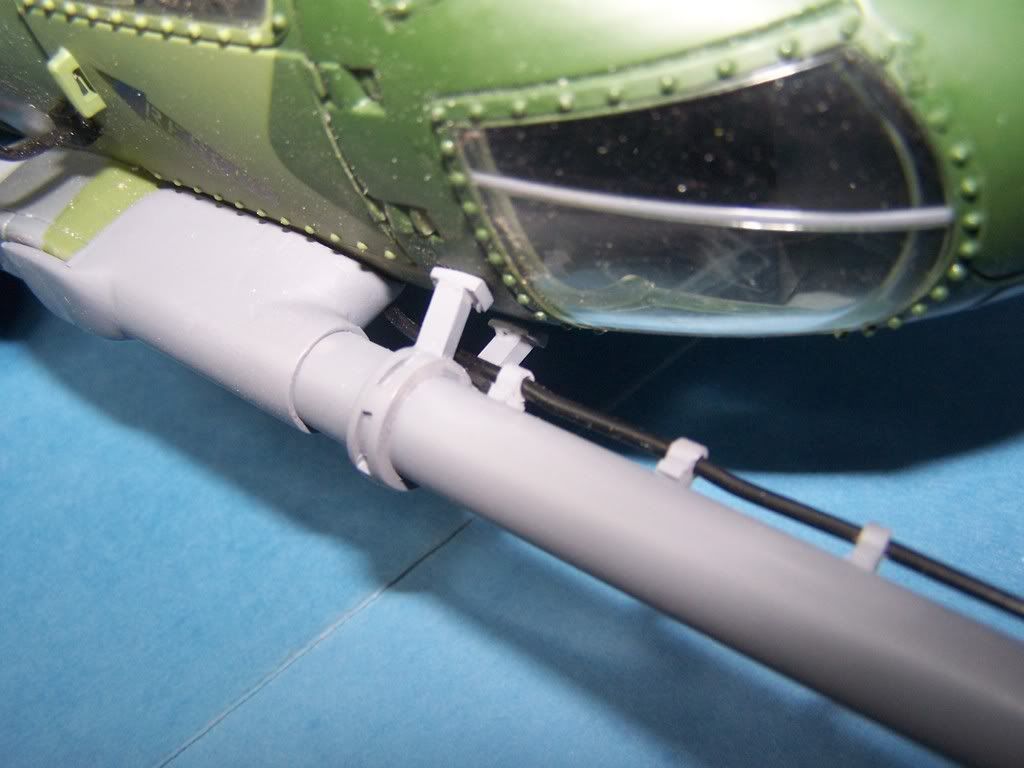
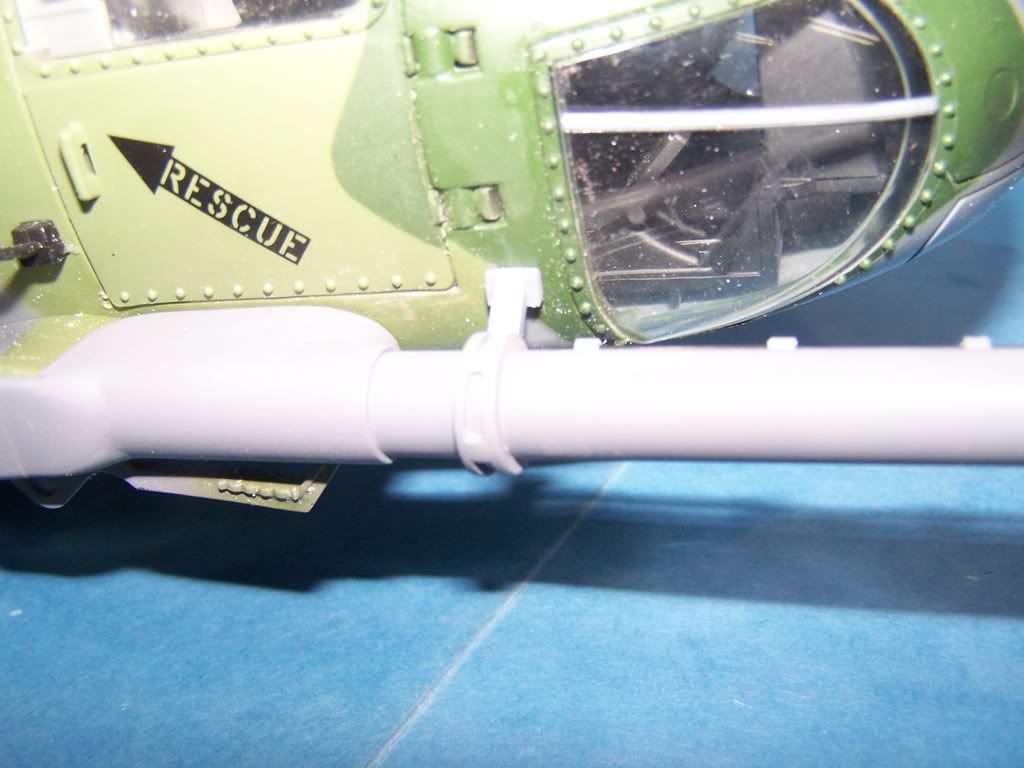
Matthew that
fuel probe looks great! From the time I first thought of getting a
Pavehawk model, I wondered if you would be willing to make the refueling
probe. You have nailed it my friend....
Posted: Sun Jan 25, 2009 7:06 pm
by popeye357
Man! Thats comming out great, I definitely want one:)
Posted: Sun Jan 25, 2009 7:58 pm
by Birddog
Posted: Mon Jan 26, 2009 11:51 am
by pcoughran
Looks great so far!
When you say you still have to do the mounting bracket do you mean the "horshoe looking" bracket that mounts the probe to the cab in front of the pilot's door? Do you know how you are going to do the attachment for that piece to the cab? It looks like a small piece to glue to the cab. Will it just be cosmetic and not actually be connected to the cab? Or will we have to drill small holes for some type of plug tip on the arms of the bracket?
It appears the probe wouldn't need any more support than you have in the picture above, but for more scale accuracy it would be nice to have the bracket.
Just curious.
pcoughran
Posted: Mon Jan 26, 2009 12:10 pm
by pickelhaube
pcoughran wrote:Looks great so far!
When you say you still have to do the mounting bracket do you mean the "horshoe looking" bracket that mounts the probe to the cab in front of the pilot's door? Do you know how you are going to do the attachment for that piece to the cab? It looks like a small piece to glue to the cab. Will it just be cosmetic and not actually be connected to the cab? Or will we have to drill small holes for some type of plug tip on the arms of the bracket?
It appears the probe wouldn't need any more support than you have in the picture above, but for more scale accuracy it would be nice to have the bracket.
Just curious.
pcoughran
I will make the front brace. I will try to tackel that today. As far as the main brace stub it is pretty tight. But you will eather have to glue it or put a tiny screw on the bottom of it. With the the length of the
probe you will have to do something to keep it on otherwise if you were to bump it it would fall off.
Posted: Mon Jan 26, 2009 4:59 pm
by pickelhaube
Posted: Mon Jan 26, 2009 5:14 pm
by Sabrefan
Matthew, that looks damn cool! I can't wait to add the prove to my Pavehawk.
Posted: Mon Jan 26, 2009 6:36 pm
by USCGSARdog
Hey Matt, that
fuel probe looks fantastic! These are really going to make the
Pavehawk look like a
Pavehawk. Really fine work.
I thought I would bounce one more idea off of you, as if you didn't have enough to do with the
Pavehawk project. How about a more realistic set of main gear wheels? As you can see, the bbi wheels are severely lacking in detail. The hubs don't have any depth and there are no lug nuts like on the real bird. They are probably my biggest gripe with the bbi Blackhawk.

-Rob
Posted: Mon Jan 26, 2009 7:26 pm
by pickelhaube
USCGSARdog wrote:Hey Matt, that
fuel probe looks fantastic! These are really going to make the
Pavehawk look like a
Pavehawk. Really fine work.
I thought I would bounce one more idea off of you, as if you didn't have enough to do with the
Pavehawk project. How about a more realistic set of main gear wheels? As you can see, the bbi wheels are severely lacking in detail. The hubs don't have any depth and there are no lug nuts like on the real bird. They are probably my biggest gripe with the bbi Blackhawk.
-Rob
Your killing me.
Got any close up pics ?
BTW Did you guys notice the gray primer ? It is a perfect match to the gray on the Pave.
Posted: Mon Jan 26, 2009 7:34 pm
by pcoughran
Yeah, the grey looks really good. Now just have to match those funny looking greens. Don't think those will be standard Air Force colors. They both look too light.
For those doing the DAP, the black is an easy solution.
Posted: Mon Jan 26, 2009 9:01 pm
by pickelhaube
pcoughran wrote:Yeah, the grey looks really good. Now just have to match those funny looking greens. Don't think those will be standard Air Force colors. They both look too light.
For those doing the DAP, the black is an easy solution.
Just 2 colors black and gray
Posted: Mon Jan 26, 2009 9:06 pm
by Birddog
Again......amazzzzing!!
Posted: Tue Jan 27, 2009 6:19 am
by pickelhaube
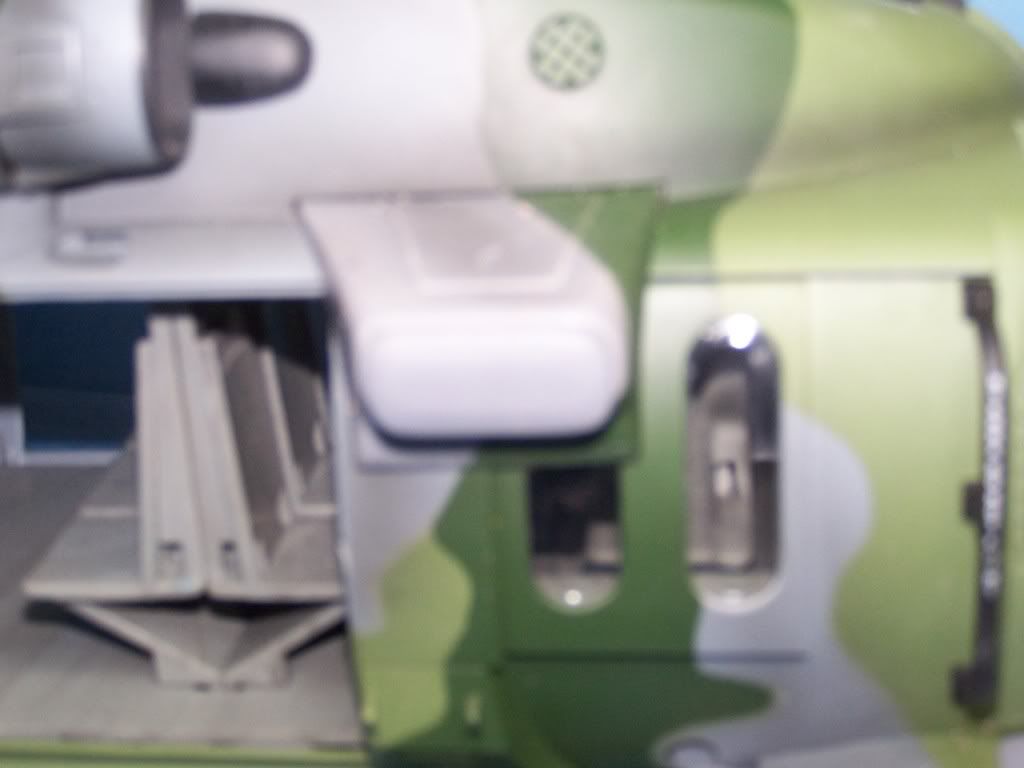
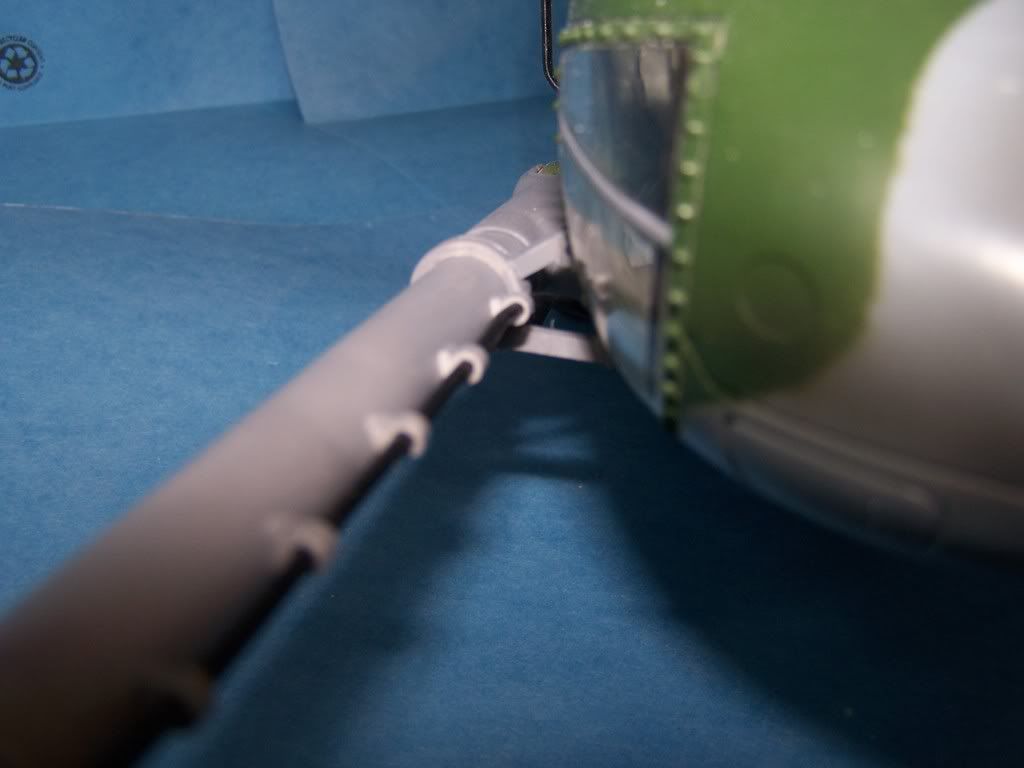
Well I have been looking at the boom attachment . The way I have it buggs me. Were I made it stop on top of the pod right under the window is were the gear pod starts to make its curve. The reason for this is the way I made the attchment pod slides in from the front stradeling the foot post.
I could wrap the whole pod and slide the attchment from the side to the fusalage . By doing this the top would look like a solid unit and would probably hold the
probe good enough so that you would not have to screw or glue it.
The down side is that it will be a bigger slot on the bottom to go around the step post. Also if I wrap it in order to make it a solid wrap I will ( or the Modeler) will have to cut off the navigation light.
So your opion is needed.
1. Don't worry about it and move on.
2. Wrap it and forget about the nav light.
3. Wrap it and stop short of the nav ligt.
I need your input.
[/img][/quote]
Posted: Tue Jan 27, 2009 7:23 am
by pcsguy88
I say it looks good as is. No way I'm hacking the nav light off.
Can someone with a pavehawk in their possesion please post the matching Tamiya acrylic or Model Master #'s to match the green colors?
Posted: Tue Jan 27, 2009 8:44 am
by KWR190
1. Don't worry about it and move on.
Posted: Tue Jan 27, 2009 9:19 am
by pcoughran
I think the full cover would look better overall, but don't want you to go through more trouble. Is the Nav light glued on and could easily be "popped" off with an exacto or would you actually have to "cut" it off? If you did the full cover I'd want to be able to put the Nav light back on on top of the full probe mount.
It looks pretty good as is though so if the consensus is to leave alone - drive on.
Posted: Tue Jan 27, 2009 9:27 am
by Sabrefan
Matthew I am not sure how hard it would be to remove the nav light without tearing it up. Sometimes they really glue these small parts on well.
Posted: Tue Jan 27, 2009 9:28 am
by Tambo
Full cover would look better, but I could make the shorter one work as well.
Posted: Tue Jan 27, 2009 11:16 am
by pcoughran
Isn't the external gun mount going to affect the Nav Light as well as isn't it attached to the wheel pylon as well?
I was rooting for the internal gun mount but if I remember correctly you were going to do the external first(only?).
Posted: Tue Jan 27, 2009 12:03 pm
by pickelhaube
pcoughran wrote:Isn't the external gun mount going to affect the Nav Light as well as isn't it attached to the wheel pylon as well?
I was rooting for the internal gun mount but if I remember correctly you were going to do the external first(only?).
Yes the nav light will have to be omited when using the external gun mount. I will be doing both gun mounts inside and out as well as both radomes the center and port side mounts .
I could make the
probe mount longer and stop it shy of the nav light but it will interfear with the gun mount. That is why I am kicking it to you guys. Nothing is ever easy. If I just covered the nav light that area would be were the gun mount will be.
Ping pong customizing sucks.
Posted: Tue Jan 27, 2009 12:25 pm
by pcsguy88
I'll trade the light for the gun. Can you make the gun mount attach to the probe mount? 2 birds 1 stone kind of thing? It's going to look incredible no matter how you do it, so do what you need to do to bring it to market at a reasonable cost. When it starts costing more than a bird on ebay, sales might rapidly decrease. Do you have any cost estimates yet?
Posted: Tue Jan 27, 2009 12:29 pm
by flyboy_fx
MAN THATS GREAT. almost tempts me to get one, but i prefer ww2, but there can be exceptions
Posted: Tue Jan 27, 2009 2:45 pm
by USCGSARdog
pickelhaube wrote:USCGSARdog wrote:Hey Matt, that
fuel probe looks fantastic! These are really going to make the
Pavehawk look like a
Pavehawk. Really fine work.
I thought I would bounce one more idea off of you, as if you didn't have enough to do with the
Pavehawk project. How about a more realistic set of main gear wheels? As you can see, the bbi wheels are severely lacking in detail. The hubs don't have any depth and there are no lug nuts like on the real bird. They are probably my biggest gripe with the bbi Blackhawk.
-Rob
Your killing me.
Got any close up pics ?
BTW Did you guys notice the gray primer ? It is a perfect match to the gray on the Pave.
Oh no Matt, I wouldn't want to kill you.....unless of course for some reason you decide to shelf this project.

Here is a pic of an MH-60J. The wheel is the same used on all H-60 variants, however I don't believe the Army and Air Force helos have the tie-down in the hub. Behind the tie-down is a large hex nut. The wheel looks pretty straight forward, with the biggest difference compared to the bbi wheel being its depth.
http://data3.primeportal.net/hangar/mic ... _of_62.jpg
-Rob
Posted: Tue Jan 27, 2009 6:16 pm
by Birddog
I think it will look good either way you choose to go with it. Lot of help I am for decision making......
Seriously though, I think that no matter what you do, it will look awesome. I'll make it work one way or the other.