Page 1 of 6
P-36A Curtiss step by step build is done !!!! 5-7-08
Posted: Sun Jul 08, 2007 5:58 pm
by pickelhaube
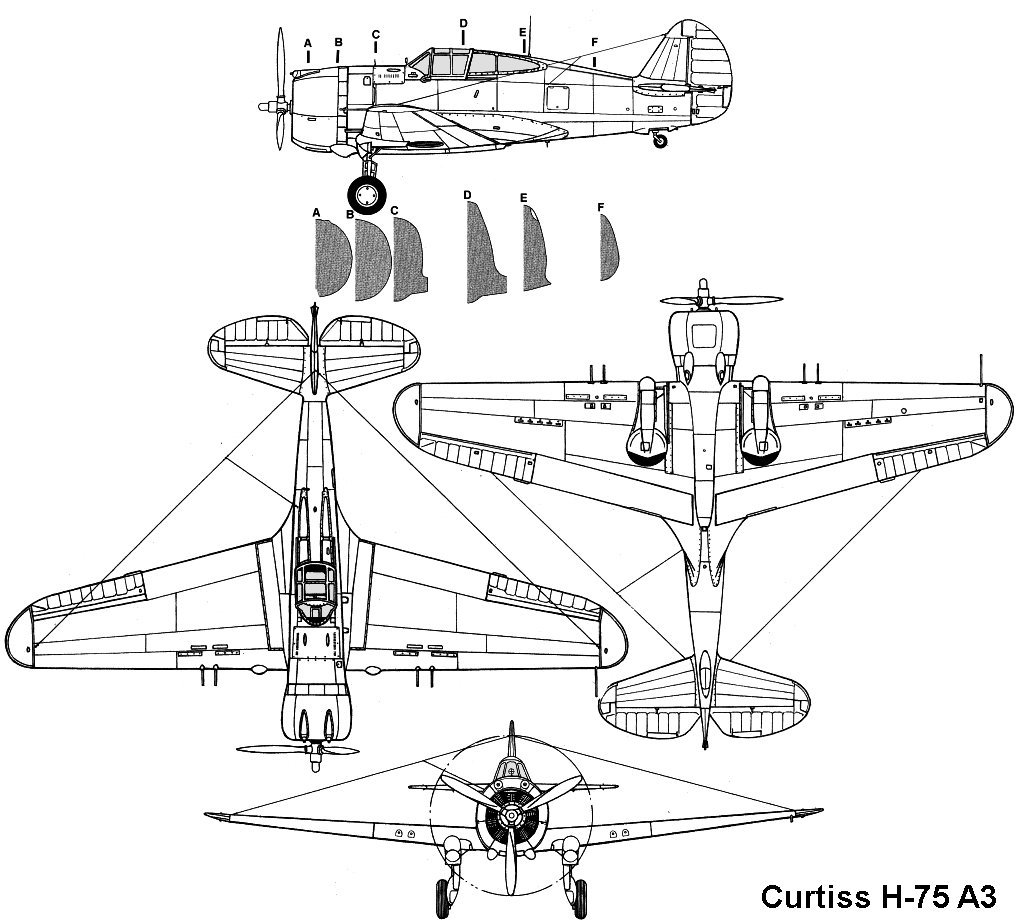
Hey guys. I just thought of a new conversion. Change a P-40 to a P-36 . It looks like a easy conversion. Cut the nose add a radial with cowling shorten the fuse and we will have a new plane. I am searching for scale plans and am having a hard time doing so. There is a Russian site that I pulled up but I am not sure of the accuracy. Squadron Signal does not have a book on the plane but there P-40 Walk around has a nice line profile of the P-36. Anybody have any sources for some good scale line drawings on the P-36/ P-75?
BTW the P-36 was credited with the first kill at Pearl Harbor. NOT the P-40 . This was the fisrt kill of America that was credited agaist the Japanese. The P-61 Blackwidow was credited for the last kill at the end of the war.
Posted: Mon Jul 09, 2007 7:38 am
by Aviatornut.com
Posted: Mon Jul 09, 2007 10:40 am
by Moth
Posted: Wed Jul 11, 2007 4:55 am
by pickelhaube
Hey Aviator Nut and Moth,
Thanks for the info. I just may start this project this weekend. After a quick stop at Kinkos to enlarge the scale drawings.
What do you all think of this bird? i know it is not on the top of everybodies MUST HAVE list but it is a major part of history. To draw first blood against a nation that caused millions to die . It is fun to come out the winner in a world wide war.

VIP
Posted: Thu Jul 12, 2007 8:43 am
by supersonicfifi
VERY IMPORTANT PLANE !
i am 100% with you this plane is very important because it "drew the first blood" in june 1940 above my country (France)
i always found this model so nice and the french pilots used this plane to down moree than 1000 german planes !
here is a nice picture of Flying legend's one : (in French colors !!!!!)
http://www.targeta.co.uk/pages/051_4944w.htm
i wish i had the talent & time to do it ! show me as much pictures as you can .... can't wait !
you could use this historic scheme !
i saw it fly at the FERTE ALLAIS meeting last year it was fantastic !
philippe

Posted: Thu Jul 12, 2007 7:35 pm
by pickelhaube
Hey Supersonicfifi,
There are a lot of color schemes for this plane. The French had some neat camos. I think the first one I do will be the Pearl Harbor silver 86. I think that is the number. If I do a French camo. I think that it would be the first French XD on the planet!!!
Posted: Sat Jul 14, 2007 5:07 pm
by pickelhaube
My trip to Kinkos was a success. I will superimpose the P-40 on the Mohawk plans and see what I am looking at for a custom.
Posted: Sun Jul 15, 2007 12:02 pm
by pickelhaube
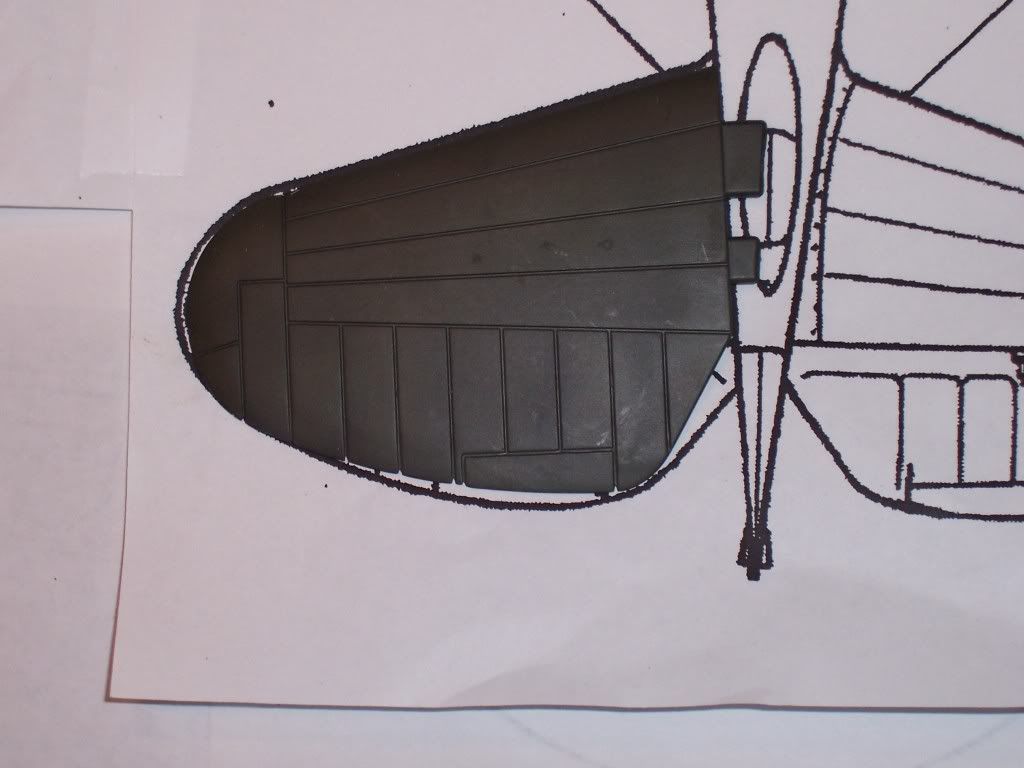
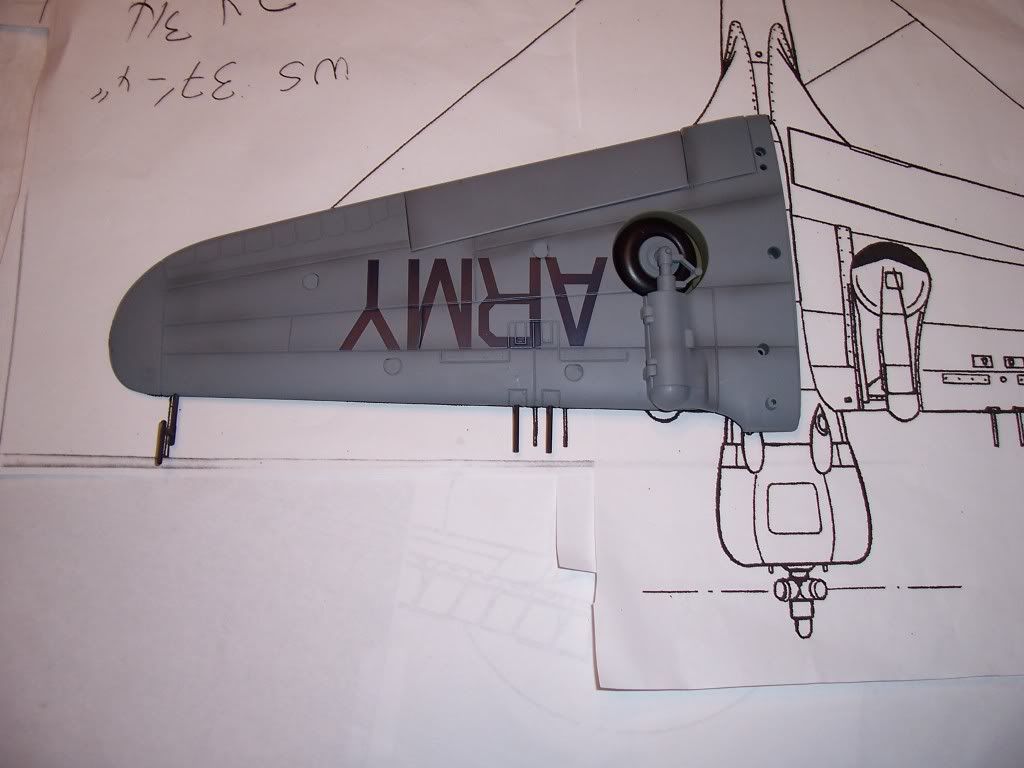
The customizing of the P-40 to the P-36 will be a small challange. The wing is almost perfect. The gun location is the biggest problem. They are about 3/8 of an inch off.
1. The landing gear is the same except the gear covers are attached to the gear not the wing.
2. The rudder is a little small this is easy to rectify.
3. The fuse from the trailing edge to the rudder needs to be split like a banana to make it a 1/4 thicker.
4. The stab is a little off but easy to fix.
5. The fairing under the main wing is to big and long . This needs to be thined out.
6. The tail wheel needs to be moved back and a bump needs to be made for the well doors.
7.The spinner will not be used. After taking it apart this will be a job in itself. The blades are not joined together. They are glued to the back of the spinner. A center hub needs to be made kind of like the P-47 or the F4F but with a 3 blade prop.
8. The engine cowling will me the major undertaking. The look is like a mutated P-47 radial engine. This is not that hard to do but will take some time.
I will start today taking apart a Pearl P-40 and will start on the modifications. If anybody is interested in this proetc I will do a step by step process on the project. If there is no interest on the project I will just try to post the finished plane after I am done. This will probably take about 4 weeks to do doing a little bit at a time. I do have a job. LET ME KNOW IF ANYBODY WILL BE INTERESTED SO I CAN GET SET UP FOR THE STEP BY STEP POST.
Matthew
Posted: Mon Jul 16, 2007 10:39 am
by aae83
I, for one, would be interested in seeing the step-by-step, ph.
This custom was one I'd been wondering about since before the topic was posted (earlier this spring), having seen the similarities between kits on the local hobby shop shelf. I'd decided to try something a little less challenging (a scratch build of a simpler shape, with the intent of possibly making a "kit" out of it) until I honed my skills.
I'd bought a couple of extra P-40s with one slated for this type of conversion. Another extra was for the third Pearl Harbor P-40 recently written up in Flight Journal (June?): a simple paint custom. It would be neat to have a PH P-36 to complete the set.
Would especially like to see your fabrication technique for the forward fuselage.
Thanks,
aae
me too !
Posted: Mon Jul 16, 2007 2:01 pm
by supersonicfifi
Great idea for the pearl harbor scheme but how are you going to make teh paint ? i am interested in a step by step picture report .... because i can t honestly think about a way of doing it myself !

Posted: Tue Jul 17, 2007 7:20 pm
by pickelhaube
OK Guys,
Let us do this. Things needed to begin project.
1. 1/18 scale P-40
2. Scale prints. Not really needed but it will help when we get to the cowling.
3. Razor back saw
3. X acto knife (small) with plenty of #11 blades. This could be the wrong number but the one that work well are the real pointy ones.
4. Panel scriber this helps
5. CA glue
6. Plastic glue
7.1/16 thich sheet or strip strene.
8. Gap filling matrix: Milliputty , Squadron putty green or white or the cheapist and I think this best working Bondo. Milliputy has been the most saught after for years but it is hard to find. My area anyway. Squadron putty works fine it is pricey though and takes a few hours to harden if not a day. Bondo sets in about 20 mins it is easy to work with cheap and it sticks very well to plastic. This is MY choice to work with.
9. Bondo
10. Flat screw driver (thin) and phillips medium to small
11. Tooth picks
Step one Dissassembly . No photos needed for this step.
a. Start with removing sliding glass . Now the front windshield. Pry EASY at the bottom points on top of the cockpit rails pop off.Pry off EASY the tear drop rear glass start with the front and then go to the center rib slowly pry off.EASY.
b. Pop off all of the screw caps they ar 8 of them. Not too easy use the flat screw driver. If you mess them up NO BIG DEAL. Also the surrounding area. Think BONDO.
c. Use phillips screw driver to back off screws.
d. Start with rear wheel well and pry apart fuse halves. They used a little glue on the rudder area so take care here but it should split nicely. The trouble area is around the front of the fuse. On top of the engine area right behind the top guns. The top piece is glued on well pry a little with the flat screw driver and put a tooth pick in the spread part. move the screw driver in front of the tooth pick about 1/4 inch and sink another tooth pick rpeat this until she gives way and seperates. EASY DOES IT !!
Anybody with me?
i will keep an eye on you !
Posted: Wed Jul 18, 2007 9:15 am
by supersonicfifi
i will keep an eye on your project

if you want more fun i can send you an P 40 that you will trasnform into a French P36 !!!!!!
i can't wait to see the pics ....
Philippe
Posted: Wed Jul 18, 2007 10:16 am
by MIGMADMAVIS
Thats gonna be sweet, but wouldnt be even cooler if you could make a p-40E with the bigger air scoop in the front of the plane. Im not sure how youd do it, but it would be sweet!!!
Posted: Wed Jul 18, 2007 10:22 am
by aae83
With you so far...
Posted: Wed Jul 18, 2007 10:26 am
by V2 MAN
Okay..... hangin in there

Posted: Wed Jul 18, 2007 3:44 pm
by pickelhaube
MIGMADMAVIS wrote:Thats gonna be sweet, but wouldnt be even cooler if you could make a p-40E with the bigger air scoop in the front of the plane. Im not sure how youd do it, but it would be sweet!!!
Mig Mad,
This custom job would be a walk in the park !!!!
Posted: Thu Jul 19, 2007 3:19 am
by pickelhaube
I got some tips from CoreyEagle on the camera set up to post the pics. Work just took a big step to being a living hell. This could slow down the process. Today will tell. I hope to implament his tips ASAP.
I failed to mention, have a few zip lock bags on hand to put all of the pieces parts in so they will not get lost.
Posted: Thu Jul 19, 2007 4:48 am
by pickelhaube
During this technical lull the tutalage can continue some what.
You guys need to make a choice do an stand off scale or true scale.
The empanage has a few issues.
1. If you hold the fuse up in the air and look at it check out the top of the fuse to the bottom. The P-36 is fatter top to bottom by a full 1/4 inch. That is about 6mm to you metric guys .And the rudder is the same top tip to bottom 1/4 taller than the P-40. Can you notice a 1/4 ? I think that I can . Can you?
2. There is a convinent panel line that can be cut and spread like a banana. Starting at the rudder and running back to the wing fairing line. DO NOT CUT THIS FIRST THE RUDDER FIN HAS GOT TO BE CUT OFF FIRST. JUST LOOK AT IT !!!!!!!!!!
3. Check out the rudder fin. The real P-36 controls were covered with fabric . Most planes in those days were. The P-51 Me-109 and I think the Spitfire as well. This was done to reduce wieght back there. The fin needs to be split as well. Do you guys know what a trim tab is ? There is one on the rudder . On the trailing edge of the rudder there is about a 7/8 inch vetical line (23 mm). Right on top of that trim tab line there is a horizontal line (stich line ?)you need to cut to make this thing 1/4 taller after you cut the rudder fin off of the main rudder.
There will be alot of sliceing and diceing that has got to be done. Again can you notice the tail area a 1/4 taller???


after tear down

comparing

[/img]
difference between P-40 tail and P-36

rear glass differences
STAB
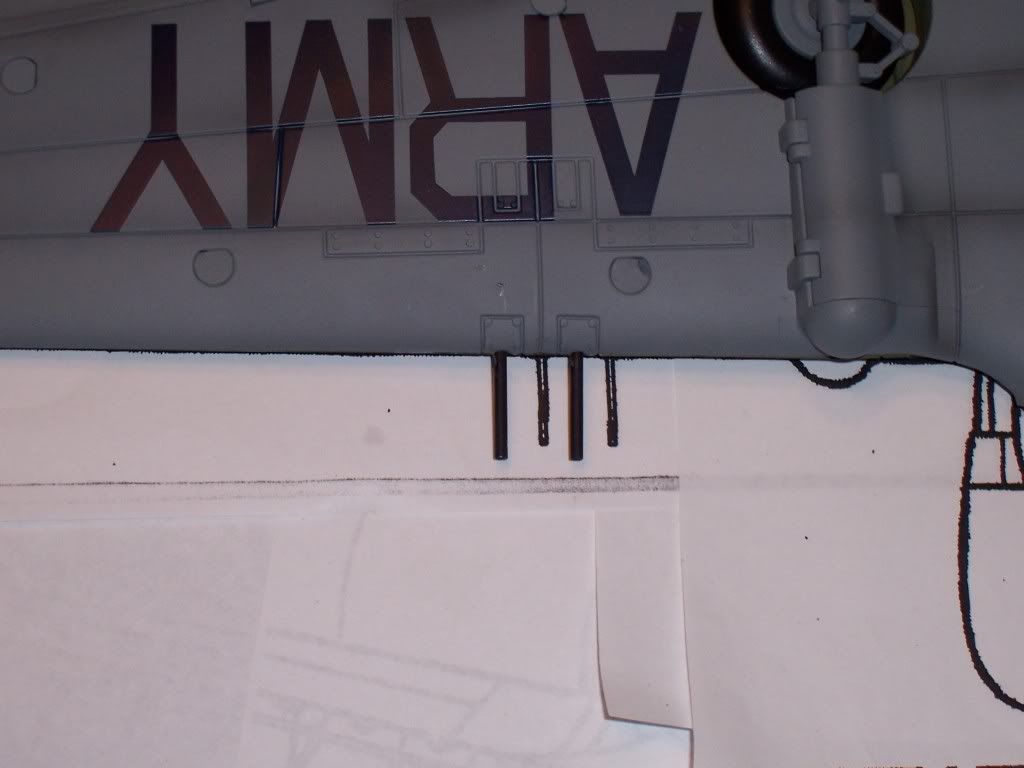
gun placement
Posted: Thu Jul 19, 2007 10:47 am
by aae83
From what I've seen, very few of the 1/18 aircraft are what I'd consider true scale, though generally they're close enough for my satisfaction. Serious compromises are made all over the place from canopy/cockpit opening to wing/empennage thickness, to landing gear geometry and bomb bay door hinges, to scale rope for antenna wire.
For my purposes, I would be inclined to err in the direction of simplicity, keeping in mind these are toys and not museum quality representations. Unless museum quality is your goal...
I would also be wary of relying on any particular set of drawings without going back to the real aircraft for confirmation. Drawings can be off, as well. Look at all the variations in model kit shapes.
Just some thoughts, for what they're worth... I'm still with you, whether you go standoff or true scale.
Posted: Sat Jul 21, 2007 5:51 am
by pickelhaube
Hopefully my nephew will be over this Sun. to help me load pictures so we can get this ball rolling

Posted: Sun Jul 22, 2007 10:08 am
by pickelhaube
Posted: Sun Jul 22, 2007 3:00 pm
by ChairmanMilo
Awesome start photos, tell your nephew thank you from all of us!
While it pains my heart to think that poor P-40 is going to be diced up, I'm hoping that it'll turn out great in the end.
Posted: Sun Jul 22, 2007 8:25 pm
by pickelhaube
If you guys look at the pictures you can see the the fuse is about 1/4 thicker top to botom. This really bugs me. This I will change . The rudder has to be changed as well. In my opion.
The things that are open for debate are:
1. The rear glass , it is about 1/2 inch short. This realy does not bug me. Should it be done closer to scale?
2. The gun placement, is 3/8 inch off. Again is this worth crying over.
3. Stablizer , I think that it is close enough.
Any comments? I will try to slice and dice tomorow
Posted: Tue Jul 24, 2007 1:10 am
by aae83
Hey, pickelhaube.
Thanks for the pics! It's great to see your work in progress.
Some comments and analysis...
In your overlay of the aft fuselages, it's hard to tell what you're using as a reference for alignment. It looks like you might be using the leading edge of the vertical tail. When the model and the drawing are aligned this way, are the headrests in the same spot? I would think that might be a good reference point: start at the headrest and then see how the aft fuselages align.
I wanted to see how your profiles matched a photo of a P-36; I found a pretty good one for comparison on wikipedia:
http://upload.wikimedia.org/wikipedia/c ... 2_side.jpg
As an experiment, I overlaid your images on the above photo. When I did this, I scaled the drawing and the model each to best fit the photo, from the headrest aft. The result makes the aft fuselages look pretty close, with the P-40 looking slightly long, as if maybe the fuselage was lengthened somewhat from the P-36. (The cowling for the Allison also looks huge; need to overlay real profiles for the P-36 and P-40 to see if this is out of whack.)
P-36 drawing and P-40 model scaled and overlayed:

P-36 drawing and P-36 photo overlayed:

P-40 model and P-36 photo overlayed:

The other thing I noticed is neither the drawing nor the model has the vertical tail and rudder correctly shaped, at least for the P-36 variant in the photo.
Here's a link to my webshots album, if you want to see larger images:

I imagine you scaled your drawing to true 1/18th scale. If so, I'm wondering how close the P-40 is to true 1/18th scale. It could be slightly on the small side, fuselage-wise, which would also throw the alignment off.
It'd be a shame to jump into major reshaping of the fuselage if a scale difference is the problem. I'd be tempted to look into rescaling your profile drawing until the fuselages are at their closest, and then look into reshaping the vertical tail/rudder to match the photo. Something to consider, anyway.
And I could very well be full of crap, too. Wouldn't be the first time...
John, aae
Posted: Tue Jul 24, 2007 4:09 am
by Spudkopf
Hey Pickelhaube
I may have some more accurate plans kicking around here somewhere, I see if I can dig something up for you.