JSI Tomcat - Super Detailing???
-
thatf14guy
- Officer - 1st Lieutenant

- Posts: 521
- Joined: Thu Nov 19, 2009 5:58 am
-
deankleines
- Corporal

- Posts: 84
- Joined: Mon Dec 21, 2009 6:22 pm
-
deankleines
- Corporal
- Posts: 84
- Joined: Mon Dec 21, 2009 6:22 pm
Dismembering the "bang seat"
Well - I took the plung and used a flat blade screwdriver to take apart the seat. Came apart fine.
Going to do a whole host of adds here including the survival kit and rocket motors.
Dean ( "Destructo" )
Going to do a whole host of adds here including the survival kit and rocket motors.
Dean ( "Destructo" )
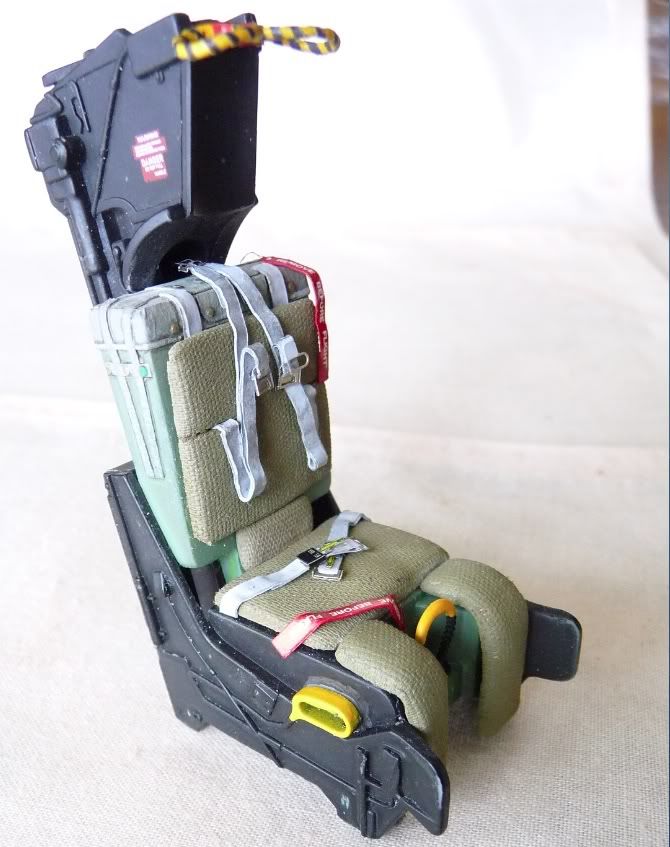
GRU7 Progress
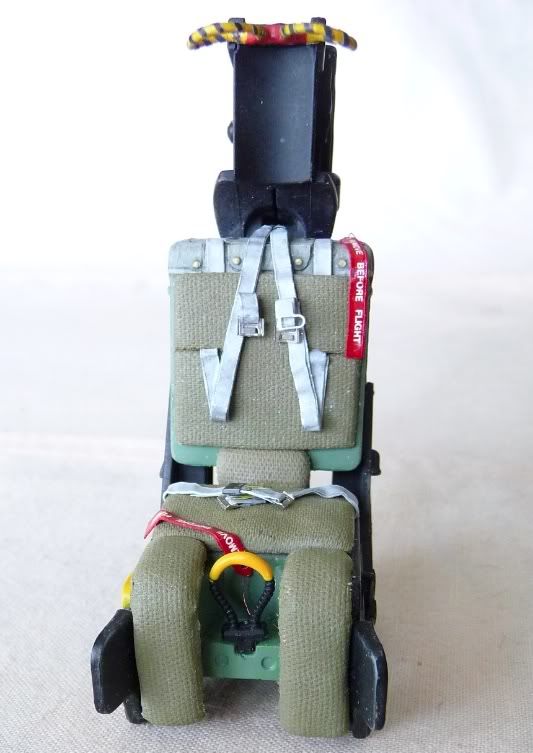
Snowed today in Michigan, school was canceled so I worked on the ol' GRU7. Still a long way to go. The stock lower pull handle needs to be replaced (way fat!) A bunch of tubing and wires need to be installed and I have to do this all over again for the rear seat. I'll included some progress pics with more to follow later.
<a href="http://s160.photobucket.com/albums/t197 ... nt=4-1.jpg" target="_blank"><img src="http://i160.photobucket.com/albums/t197/mcaulk/4-1.jpg" border="0" alt="Photobucket"></a>
Flattened the cushions and painted them "Sac Bomber Tan" Actually have uncovered pictures of at least 4 different style of cushions so if you stay away from hot pink you should be ok.
<a href="http://s160.photobucket.com/albums/t197 ... rent=4.jpg" target="_blank"><img src="http://i160.photobucket.com/albums/t197/mcaulk/4.jpg" border="0" alt="Photobucket"></a>
The buckles are a tad small for this scale. They are Eduards 1/32nd scale seem closer to 1/24th. They are way to big for that scale but just a little small for 1/18 but the only alternative was to scratch build a set. I started then contemplated gouging out my eyes but instead chose to compromise until someone makes a set.
<a href="http://s160.photobucket.com/albums/t197 ... 7Front.jpg" target="_blank"><img src="http://i160.photobucket.com/albums/t197 ... 7Front.jpg" border="0" alt="Photobucket"></a>
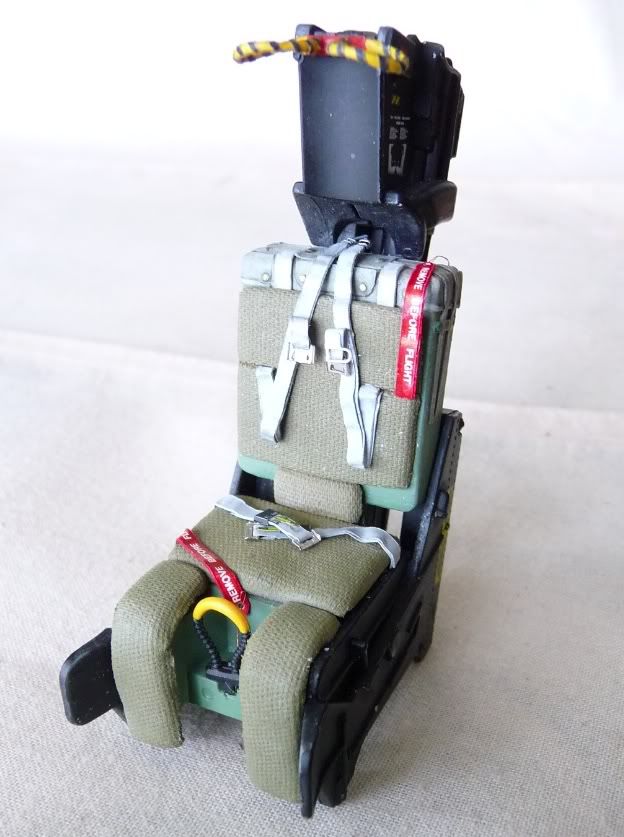
Probably need to weather the cushions a little more but that can wait till I finish adding the necessary detail. I have no idea where to pin the Remove Before Flight tags... just threw them in for color. If anyone has any pics showing some on a seat please post em.
<a href="http://s160.photobucket.com/albums/t197 ... eBelts.jpg" target="_blank"><img src="http://i160.photobucket.com/albums/t197 ... eBelts.jpg" border="0" alt="Photobucket"></a>
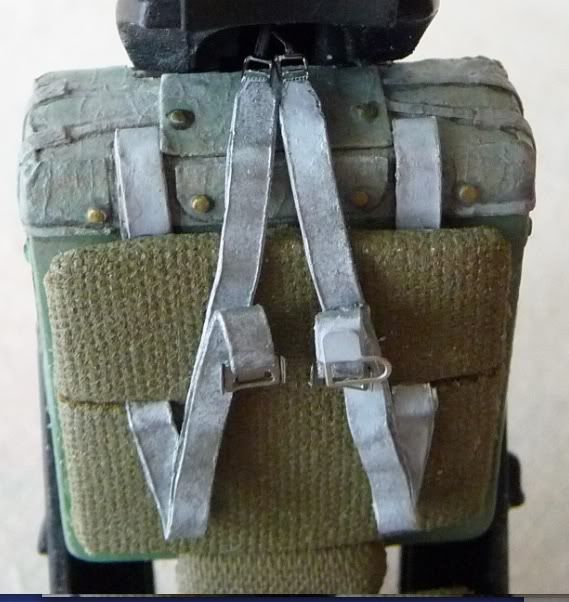
Close-up of the harness system. Used old tooth paste tube foil for the straps.
<a href="http://s160.photobucket.com/albums/t197 ... nt=4-1.jpg" target="_blank"><img src="http://i160.photobucket.com/albums/t197/mcaulk/4-1.jpg" border="0" alt="Photobucket"></a>
Flattened the cushions and painted them "Sac Bomber Tan" Actually have uncovered pictures of at least 4 different style of cushions so if you stay away from hot pink you should be ok.
<a href="http://s160.photobucket.com/albums/t197 ... rent=4.jpg" target="_blank"><img src="http://i160.photobucket.com/albums/t197/mcaulk/4.jpg" border="0" alt="Photobucket"></a>
The buckles are a tad small for this scale. They are Eduards 1/32nd scale seem closer to 1/24th. They are way to big for that scale but just a little small for 1/18 but the only alternative was to scratch build a set. I started then contemplated gouging out my eyes but instead chose to compromise until someone makes a set.
<a href="http://s160.photobucket.com/albums/t197 ... 7Front.jpg" target="_blank"><img src="http://i160.photobucket.com/albums/t197 ... 7Front.jpg" border="0" alt="Photobucket"></a>
Probably need to weather the cushions a little more but that can wait till I finish adding the necessary detail. I have no idea where to pin the Remove Before Flight tags... just threw them in for color. If anyone has any pics showing some on a seat please post em.
<a href="http://s160.photobucket.com/albums/t197 ... eBelts.jpg" target="_blank"><img src="http://i160.photobucket.com/albums/t197 ... eBelts.jpg" border="0" alt="Photobucket"></a>
Close-up of the harness system. Used old tooth paste tube foil for the straps.
Last edited by mcaulk on Mon Feb 22, 2010 5:23 pm, edited 1 time in total.
-
Jwcarpenter
- Corporal
- Posts: 61
- Joined: Fri Dec 11, 2009 8:01 am

I found the perfect site for you "adventurous soles" out there looking to upgrade you A to a Bombcat D model. One of the major changes was in the ejection seats from the original GRU-7(A) to the more modern SJU-17 (or NACES) seats. This sights has it all for you....
http://www.ejectionsite.com/seatgalnf.htm
http://www.ejectionsite.com/seatgalnf.htm
US Army MP Corps combat veteran Operation Desert Shield/Desert Storm

Working an a 2nd Monster Cat
Working on a 2nd big cat. This one from the same squadron but done in the 3 gray TPS low viz scheme. Wanted to do a "B" to utilize the GE-F110 engine nozzles soon to be released by Skyworks!
<a href="http://s160.photobucket.com/albums/t197 ... ght4sm.jpg" target="_blank"><img src="http://i160.photobucket.com/albums/t197 ... ght4sm.jpg" border="0" alt="Photobucket"></a>
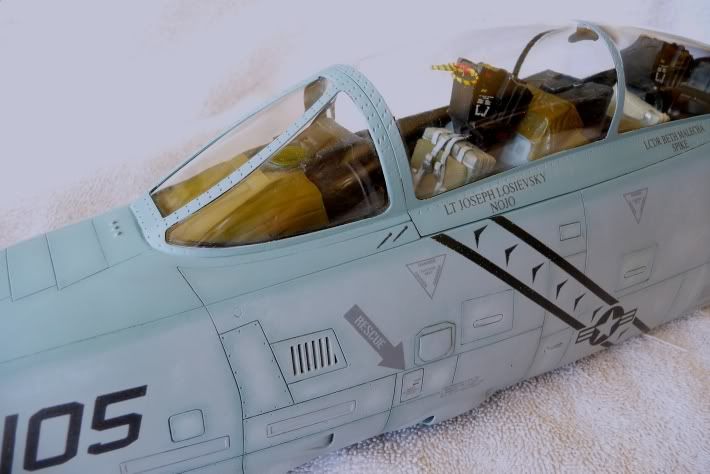
<a href="http://s160.photobucket.com/albums/t197 ... Office.jpg" target="_blank"><img src="http://i160.photobucket.com/albums/t197 ... Office.jpg" border="0" alt="Photobucket"></a>
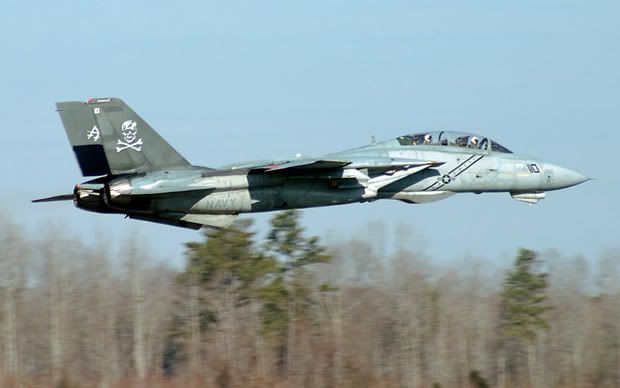
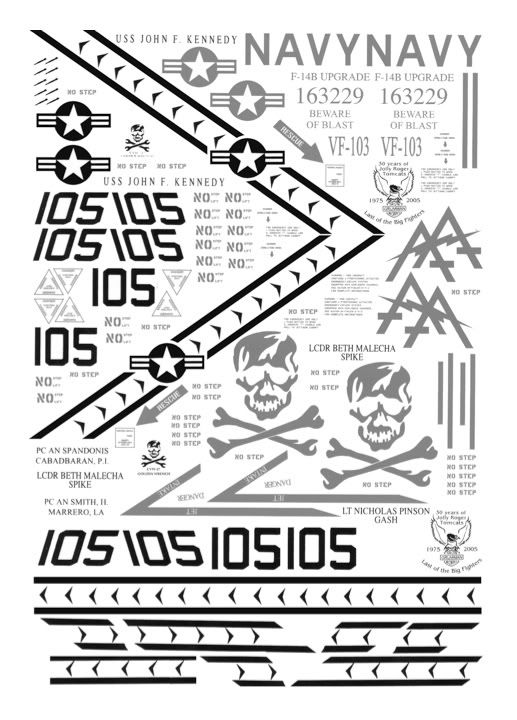
The aircraft I am modeling is an F-14B 163229 between December 2004 and January 2005. There are no markings in 1/18 scale so I make my own on an ink jet printer. Toughest part was sizing on the final print image.
<a href="http://s160.photobucket.com/albums/t197 ... Decals.jpg" target="_blank"><img src="http://i160.photobucket.com/albums/t197 ... Decals.jpg" border="0" alt="Photobucket"></a>
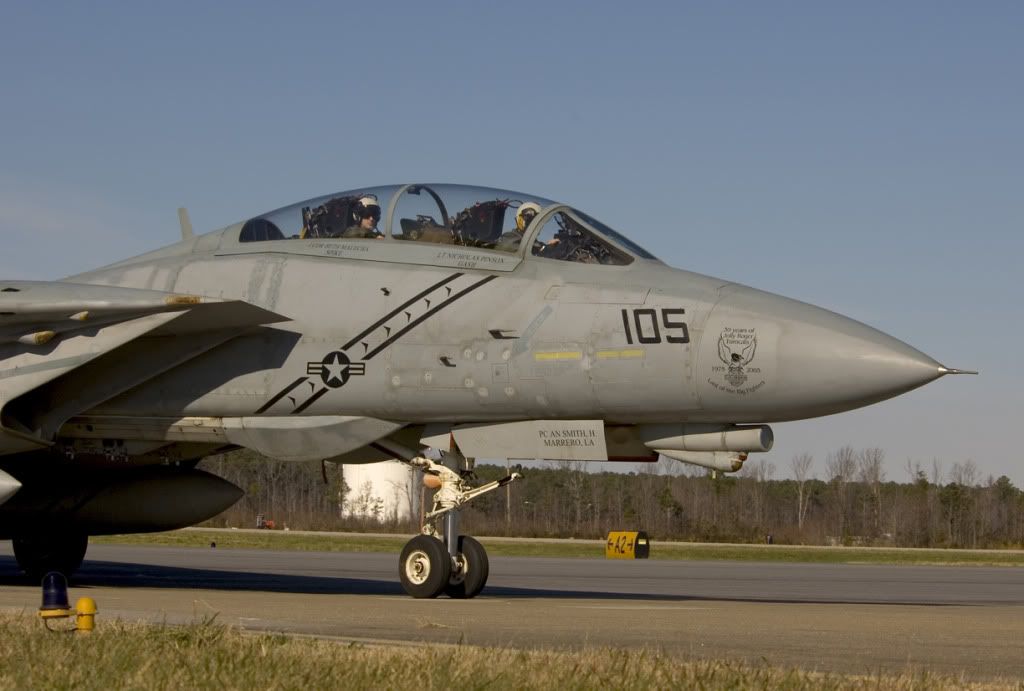
This is a pic of the real bird. The TPS scheme looks gray sometimes and then it looks blue depending on the light
<a href="http://s160.photobucket.com/albums/t197 ... 6346-1.jpg" target="_blank"><img src="http://i160.photobucket.com/albums/t197 ... 6346-1.jpg" border="0" alt="Photobucket"></a>
Before painting I did a lot of sanding to subdue the panel lines which on the stock kit are way to deep. This was time consuming but looks much more to scale. Drilled out the Gun Gas Vents an added a few rivets. (*note I removed the probes and TV chin pod for detailing and will add them back later)
<a href="http://s160.photobucket.com/albums/t197 ... sVents.jpg" target="_blank"><img src="http://i160.photobucket.com/albums/t197 ... sVents.jpg" border="0" alt="Photobucket"></a>
I airbrushed Model Master Enamels for the 3 grays:
Upper surface FS 35237 Meduim Gray (This looks really blue when you first put it on but looks right after weathering)
Mid Fuselage FS 3632o Dark Ghost Gray
Bottom FS 36375 Light Ghost Gray
<a href="http://s160.photobucket.com/albums/t197 ... tFront.jpg" target="_blank"><img src="http://i160.photobucket.com/albums/t197 ... tFront.jpg" border="0" alt="Photobucket"></a>
<a href="http://s160.photobucket.com/albums/t197 ... dFront.jpg" target="_blank"><img src="http://i160.photobucket.com/albums/t197 ... dFront.jpg" border="0" alt="Photobucket"></a>
More to follow. mcaulk... out
<a href="http://s160.photobucket.com/albums/t197 ... ght4sm.jpg" target="_blank"><img src="http://i160.photobucket.com/albums/t197 ... ght4sm.jpg" border="0" alt="Photobucket"></a>
<a href="http://s160.photobucket.com/albums/t197 ... Office.jpg" target="_blank"><img src="http://i160.photobucket.com/albums/t197 ... Office.jpg" border="0" alt="Photobucket"></a>
The aircraft I am modeling is an F-14B 163229 between December 2004 and January 2005. There are no markings in 1/18 scale so I make my own on an ink jet printer. Toughest part was sizing on the final print image.
<a href="http://s160.photobucket.com/albums/t197 ... Decals.jpg" target="_blank"><img src="http://i160.photobucket.com/albums/t197 ... Decals.jpg" border="0" alt="Photobucket"></a>
This is a pic of the real bird. The TPS scheme looks gray sometimes and then it looks blue depending on the light
<a href="http://s160.photobucket.com/albums/t197 ... 6346-1.jpg" target="_blank"><img src="http://i160.photobucket.com/albums/t197 ... 6346-1.jpg" border="0" alt="Photobucket"></a>
Before painting I did a lot of sanding to subdue the panel lines which on the stock kit are way to deep. This was time consuming but looks much more to scale. Drilled out the Gun Gas Vents an added a few rivets. (*note I removed the probes and TV chin pod for detailing and will add them back later)
<a href="http://s160.photobucket.com/albums/t197 ... sVents.jpg" target="_blank"><img src="http://i160.photobucket.com/albums/t197 ... sVents.jpg" border="0" alt="Photobucket"></a>
I airbrushed Model Master Enamels for the 3 grays:
Upper surface FS 35237 Meduim Gray (This looks really blue when you first put it on but looks right after weathering)
Mid Fuselage FS 3632o Dark Ghost Gray
Bottom FS 36375 Light Ghost Gray
<a href="http://s160.photobucket.com/albums/t197 ... tFront.jpg" target="_blank"><img src="http://i160.photobucket.com/albums/t197 ... tFront.jpg" border="0" alt="Photobucket"></a>
<a href="http://s160.photobucket.com/albums/t197 ... dFront.jpg" target="_blank"><img src="http://i160.photobucket.com/albums/t197 ... dFront.jpg" border="0" alt="Photobucket"></a>
More to follow. mcaulk... out

-
supersonicfifi
- Officer - Colonel

- Posts: 1269
- Joined: Wed Jun 01, 2005 2:47 pm
- Location: FRANCE
nice display
I always thought the bombcat was great !
SUPER NICE WORK ( maybe i will send you a second one to do it again !)
BRAVO !
1/18 mirage 2000 & RAFALE should i say more ?
-
supersonicfifi
- Officer - Colonel
- Posts: 1269
- Joined: Wed Jun 01, 2005 2:47 pm
- Location: FRANCE
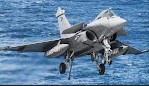
1/72 display
I v'e got numerous F 14 in 1/72 scale ( A & B models) here is one the funniest :

1/18 mirage 2000 & RAFALE should i say more ?
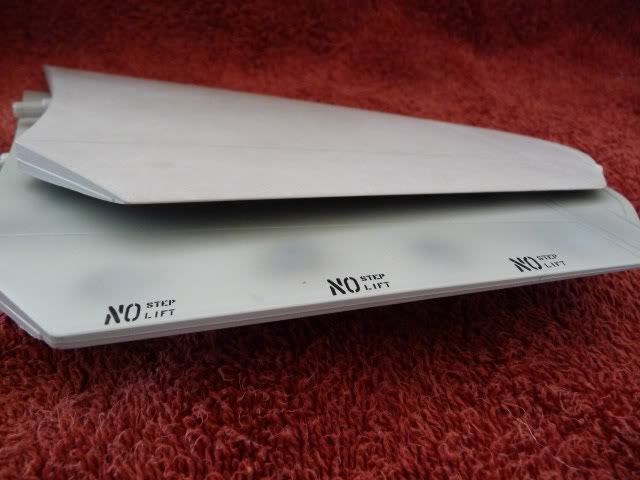
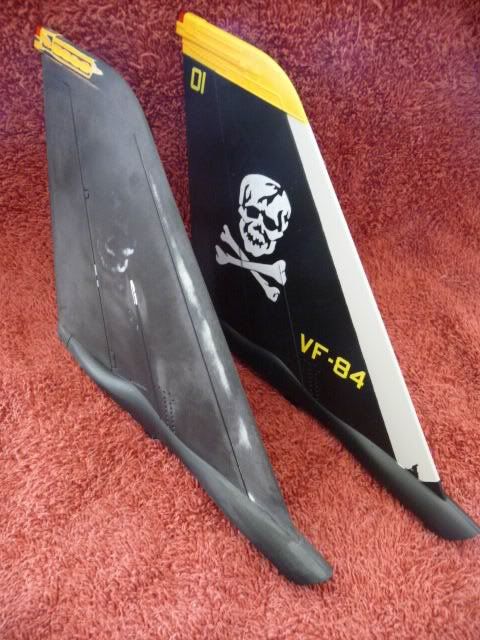
Back working on the big Cat Lets begin with the vertical and horizontal stabilizers. Not very exciting I know but a necessary evil particularly with this model as the Chinese manufacture chose to make them more like the armor on an Abrams tank than a supersonic aircraft.
So break out your Dremel a sanding block some super glue a couple of bottles of vintage Ripple and have at it.
<a href="http://s160.photobucket.com/albums/t197 ... _of_43.jpg" target="_blank"><img src="http://i160.photobucket.com/albums/t197 ... _of_43.jpg" border="0" alt="Photobucket"></a>
Next a couple of before and after shots:
<a href="http://s160.photobucket.com/albums/t197 ... iling1.jpg" target="_blank"><img src="http://i160.photobucket.com/albums/t197 ... iling1.jpg" border="0" alt="Photobucket"></a>
<a href="http://s160.photobucket.com/albums/t197 ... aling2.jpg" target="_blank"><img src="http://i160.photobucket.com/albums/t197 ... aling2.jpg" border="0" alt="Photobucket"></a>
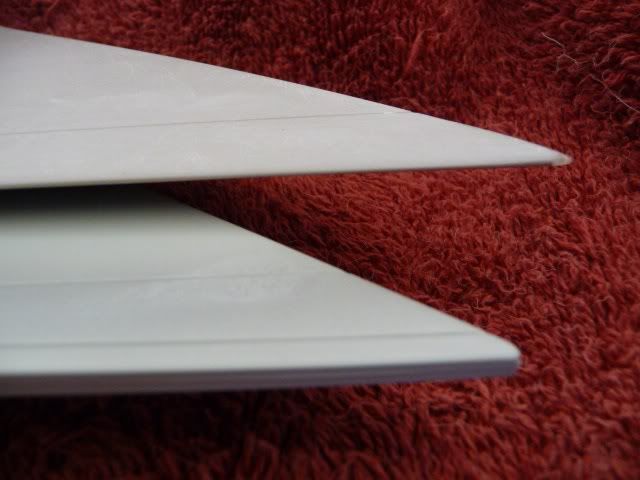
That was the trailing edges now the leading edges... you would think these would be a bit thinner... not a chance. * In real life the edges are actually very thin and dangerously sharp. I didn't want to make the plastic to thin so they are still a tad thick.
<a href="http://s160.photobucket.com/albums/t197 ... ading1.jpg" target="_blank"><img src="http://i160.photobucket.com/albums/t197 ... ading1.jpg" border="0" alt="Photobucket"></a>
*Note - the tip of the stab is blunted from the factory requiring added plastic or in this case built up layers of super glue cured and sanded to a point.
<a href="http://s160.photobucket.com/albums/t197 ... ading2.jpg" target="_blank"><img src="http://i160.photobucket.com/albums/t197 ... ading2.jpg" border="0" alt="Photobucket"></a>
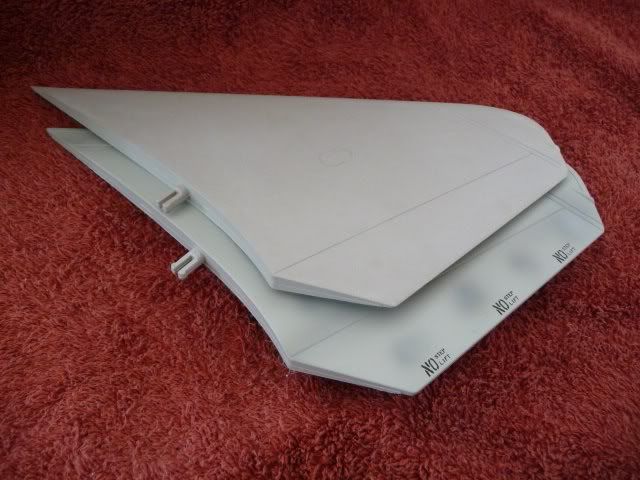
The vertical stabs are better but still require some attention. The rivets are roughly the size of scale oranges and need to be replaced with more realistic pin vise representations and the seams need to be filled and sanded.
<a href="http://s160.photobucket.com/albums/t197 ... Tails1.jpg" target="_blank"><img src="http://i160.photobucket.com/albums/t197 ... Tails1.jpg" border="0" alt="Photobucket"></a>
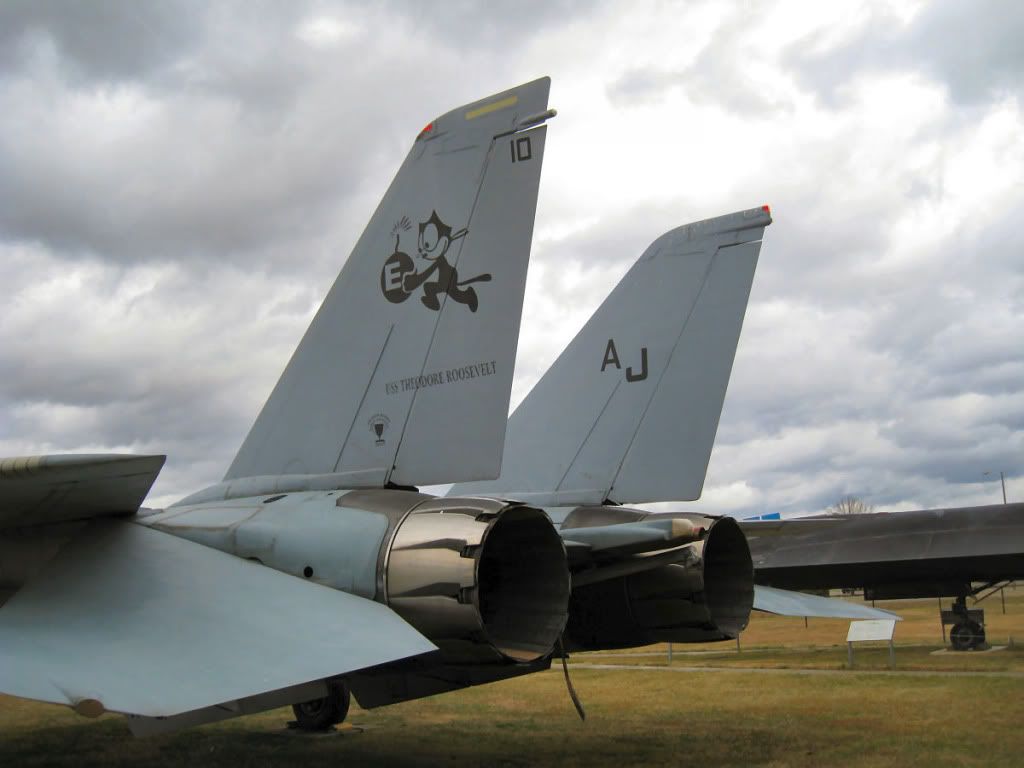
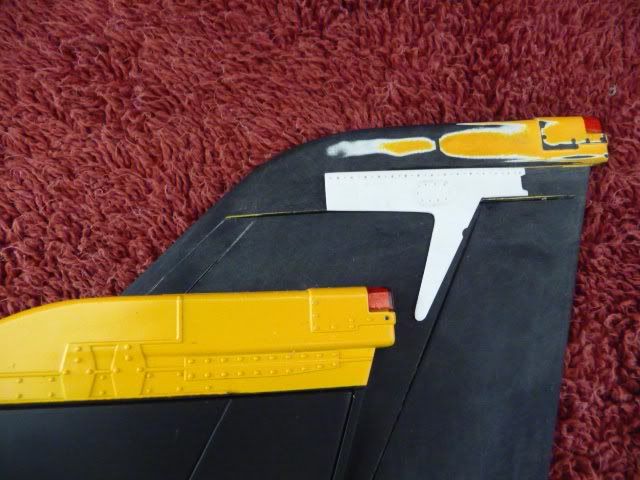
I am doing a later Bombcat which had stiffeners added to both sides of tails. This treatment came fairly early in the life of the Tomcat and was retro fitted to most A models.
<a href="http://s160.photobucket.com/albums/t197 ... Tails2.jpg" target="_blank"><img src="http://i160.photobucket.com/albums/t197 ... Tails2.jpg" border="0" alt="Photobucket"></a>
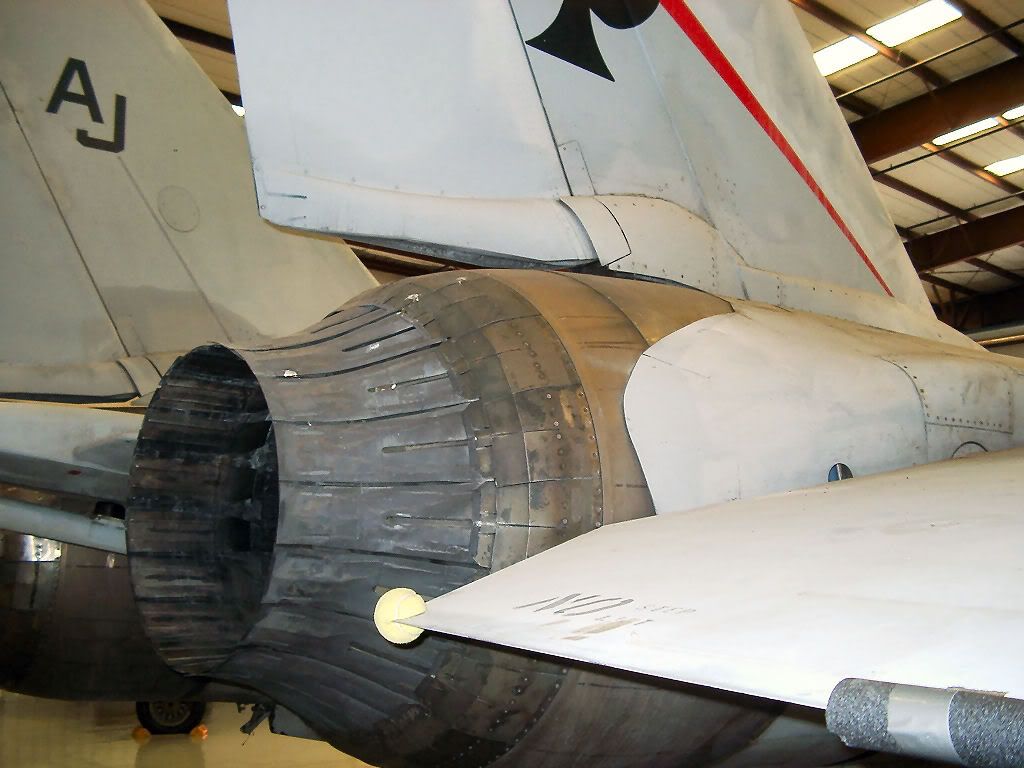
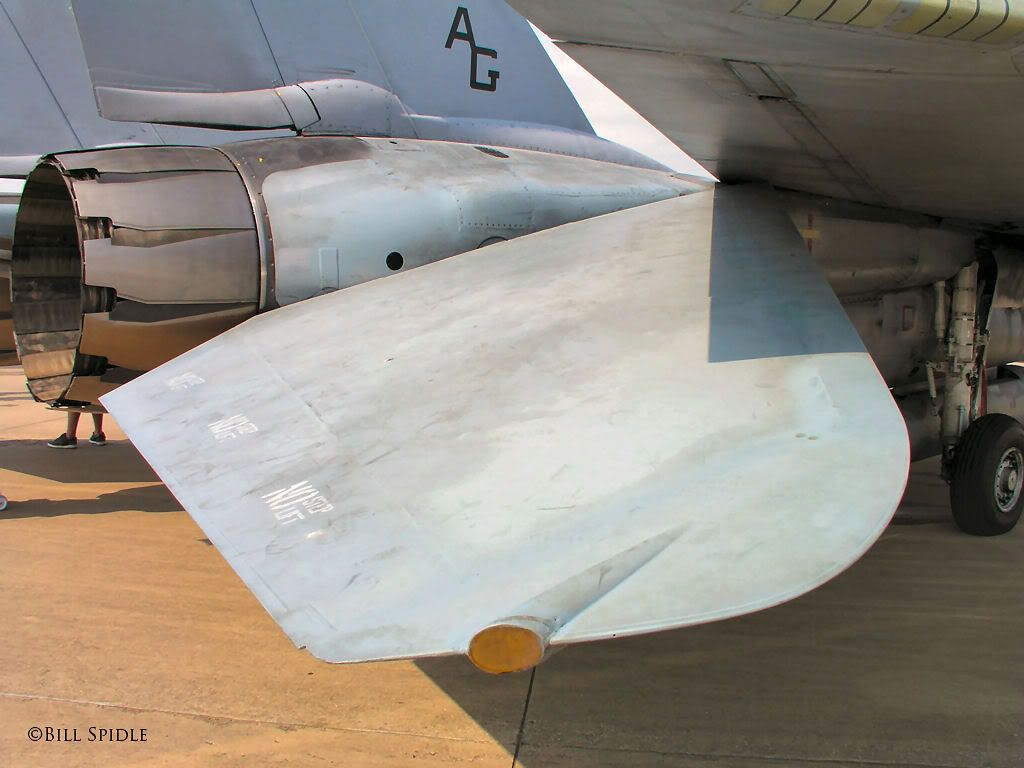
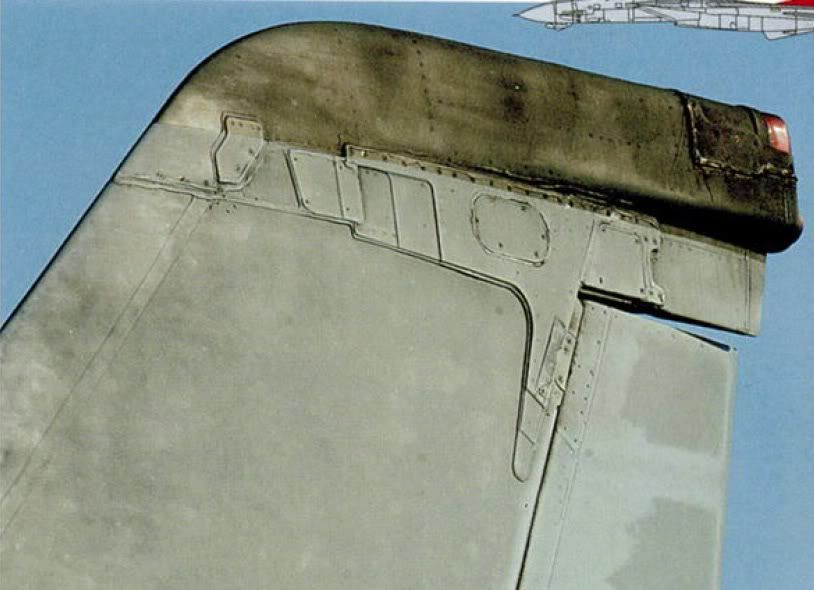
The detail is washed out in these pics... here is a good shot of the real thing.
<a href="http://s160.photobucket.com/albums/t197 ... =Stiff.jpg" target="_blank"><img src="http://i160.photobucket.com/albums/t197 ... /Stiff.jpg" border="0" alt="Photobucket"></a>
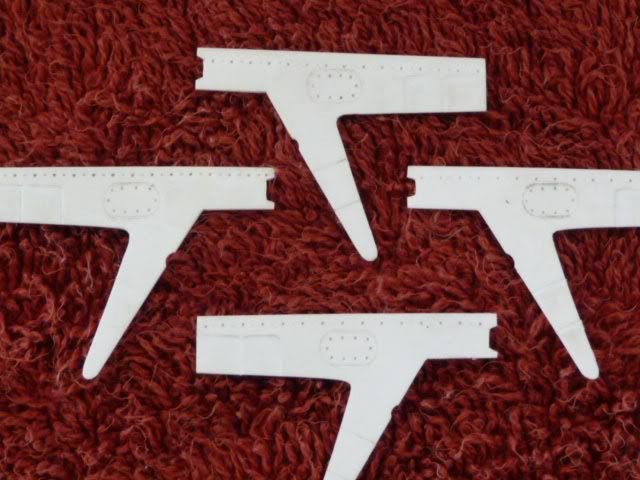
Did I mention that you get to make four of these? Yea! Just hit the Ripple put on some good music and gut it out.
<a href="http://s160.photobucket.com/albums/t197 ... tiffX4.jpg" target="_blank"><img src="http://i160.photobucket.com/albums/t197 ... tiffX4.jpg" border="0" alt="Photobucket"></a>
I sandwiched four layers of stock plastic together with a small dot of super glue then cut, filed and sanded the basic shape. This ensured that they would all be alike. Afterwards each layer was seperated and detail was carved and scribed into the plastic.
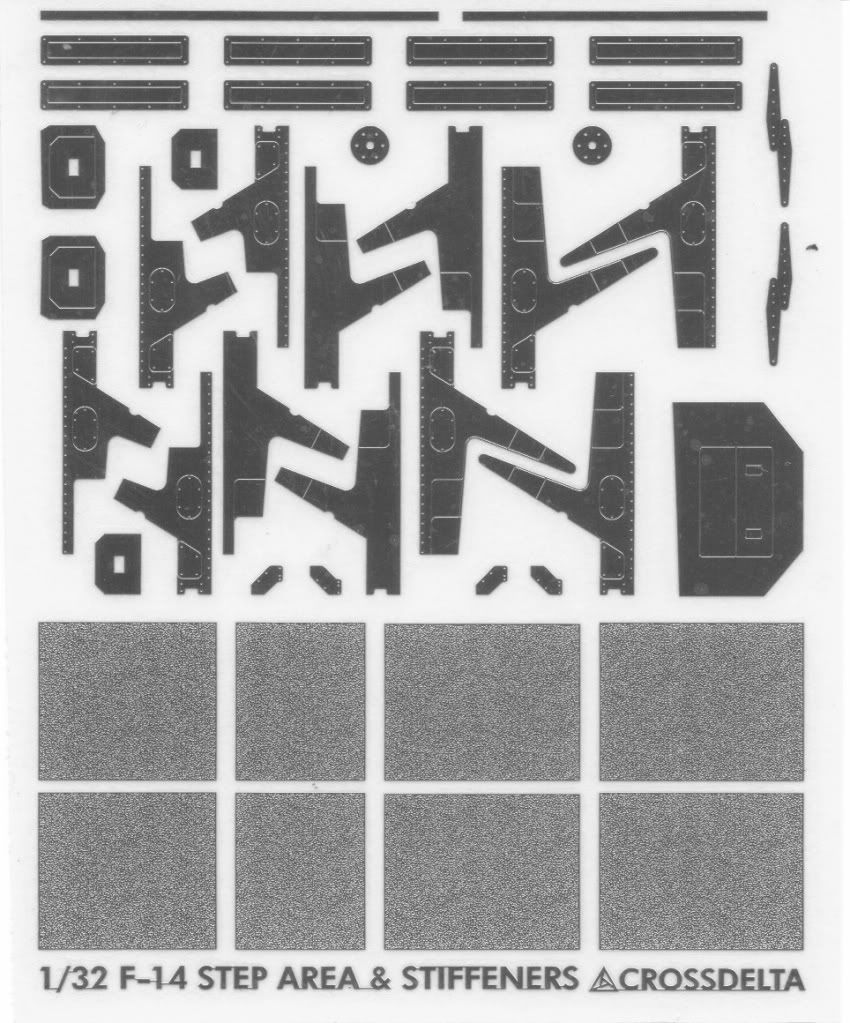
Used the CROSSDELTA fine 32nd offering as the pattern. Scanned then enlarged to 1/18th scale and WAMO! Stiffeners!
<a href="http://s160.photobucket.com/albums/t197 ... feners.jpg" target="_blank"><img src="http://i160.photobucket.com/albums/t197 ... feners.jpg" border="0" alt="Photobucket"></a>
Next up? Torn between assembling the SkyWorks landing gear or reworking the GE-110 engine fairings. More to follow.
mcaulk... out!
So break out your Dremel a sanding block some super glue a couple of bottles of vintage Ripple and have at it.
<a href="http://s160.photobucket.com/albums/t197 ... _of_43.jpg" target="_blank"><img src="http://i160.photobucket.com/albums/t197 ... _of_43.jpg" border="0" alt="Photobucket"></a>
Next a couple of before and after shots:
<a href="http://s160.photobucket.com/albums/t197 ... iling1.jpg" target="_blank"><img src="http://i160.photobucket.com/albums/t197 ... iling1.jpg" border="0" alt="Photobucket"></a>
<a href="http://s160.photobucket.com/albums/t197 ... aling2.jpg" target="_blank"><img src="http://i160.photobucket.com/albums/t197 ... aling2.jpg" border="0" alt="Photobucket"></a>
That was the trailing edges now the leading edges... you would think these would be a bit thinner... not a chance. * In real life the edges are actually very thin and dangerously sharp. I didn't want to make the plastic to thin so they are still a tad thick.
<a href="http://s160.photobucket.com/albums/t197 ... ading1.jpg" target="_blank"><img src="http://i160.photobucket.com/albums/t197 ... ading1.jpg" border="0" alt="Photobucket"></a>
*Note - the tip of the stab is blunted from the factory requiring added plastic or in this case built up layers of super glue cured and sanded to a point.
<a href="http://s160.photobucket.com/albums/t197 ... ading2.jpg" target="_blank"><img src="http://i160.photobucket.com/albums/t197 ... ading2.jpg" border="0" alt="Photobucket"></a>
The vertical stabs are better but still require some attention. The rivets are roughly the size of scale oranges and need to be replaced with more realistic pin vise representations and the seams need to be filled and sanded.
<a href="http://s160.photobucket.com/albums/t197 ... Tails1.jpg" target="_blank"><img src="http://i160.photobucket.com/albums/t197 ... Tails1.jpg" border="0" alt="Photobucket"></a>
I am doing a later Bombcat which had stiffeners added to both sides of tails. This treatment came fairly early in the life of the Tomcat and was retro fitted to most A models.
<a href="http://s160.photobucket.com/albums/t197 ... Tails2.jpg" target="_blank"><img src="http://i160.photobucket.com/albums/t197 ... Tails2.jpg" border="0" alt="Photobucket"></a>
The detail is washed out in these pics... here is a good shot of the real thing.
<a href="http://s160.photobucket.com/albums/t197 ... =Stiff.jpg" target="_blank"><img src="http://i160.photobucket.com/albums/t197 ... /Stiff.jpg" border="0" alt="Photobucket"></a>
Did I mention that you get to make four of these? Yea! Just hit the Ripple put on some good music and gut it out.
<a href="http://s160.photobucket.com/albums/t197 ... tiffX4.jpg" target="_blank"><img src="http://i160.photobucket.com/albums/t197 ... tiffX4.jpg" border="0" alt="Photobucket"></a>
I sandwiched four layers of stock plastic together with a small dot of super glue then cut, filed and sanded the basic shape. This ensured that they would all be alike. Afterwards each layer was seperated and detail was carved and scribed into the plastic.
Used the CROSSDELTA fine 32nd offering as the pattern. Scanned then enlarged to 1/18th scale and WAMO! Stiffeners!
<a href="http://s160.photobucket.com/albums/t197 ... feners.jpg" target="_blank"><img src="http://i160.photobucket.com/albums/t197 ... feners.jpg" border="0" alt="Photobucket"></a>
Next up? Torn between assembling the SkyWorks landing gear or reworking the GE-110 engine fairings. More to follow.
mcaulk... out!
Converting From A to B.
As mentioned previously my daughter was married recently and the lead up was time consuming with multiple tasks that ate into my plans for the Tomcat. Now with the wedding behind its onward and upward.
Christa...
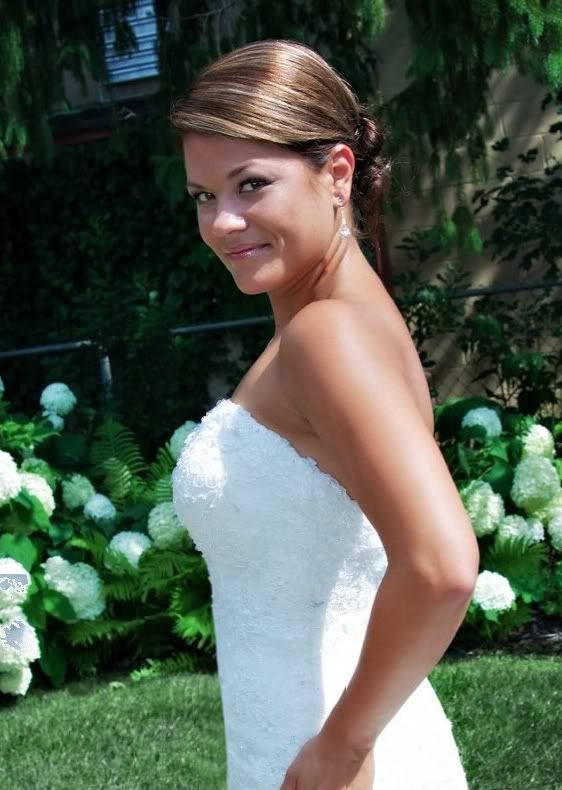
Now back to the Tomcat.
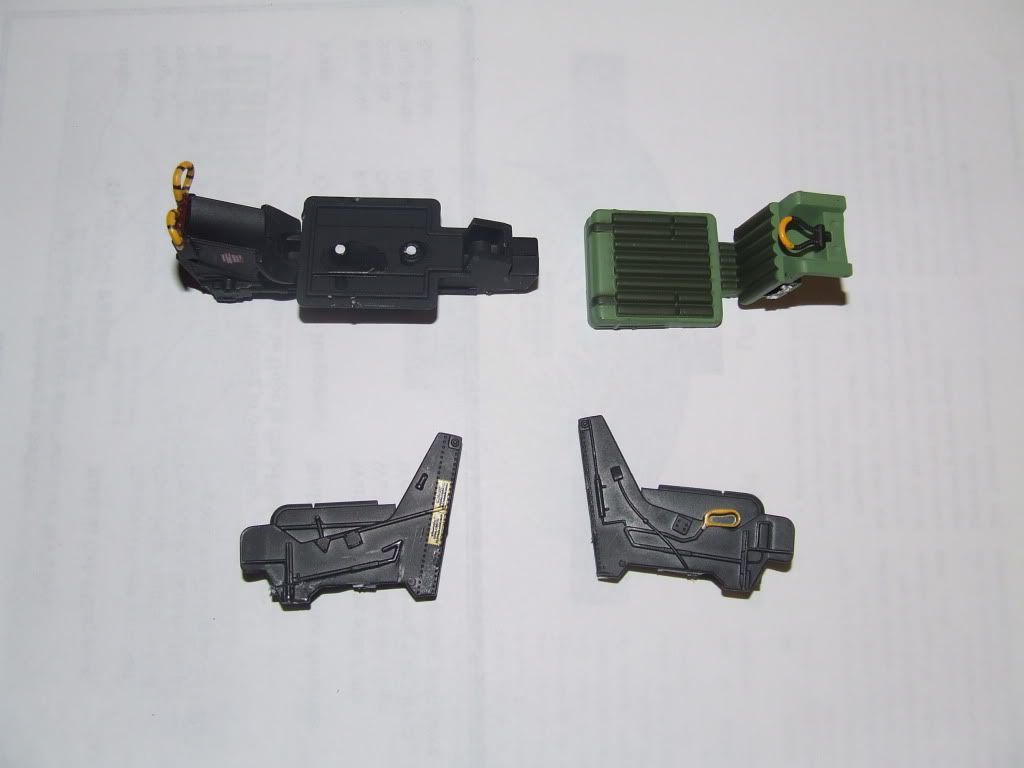
The JSI Cat is kind of a mixed airframe with parts from the A/B and or D. The engines on the model are the early troublsome Pratt & Whitney TF30s pictured below... followed by the much improved GE F-110 turbo fans.
This pic is of the model with both types of nozzles in place for comparison.
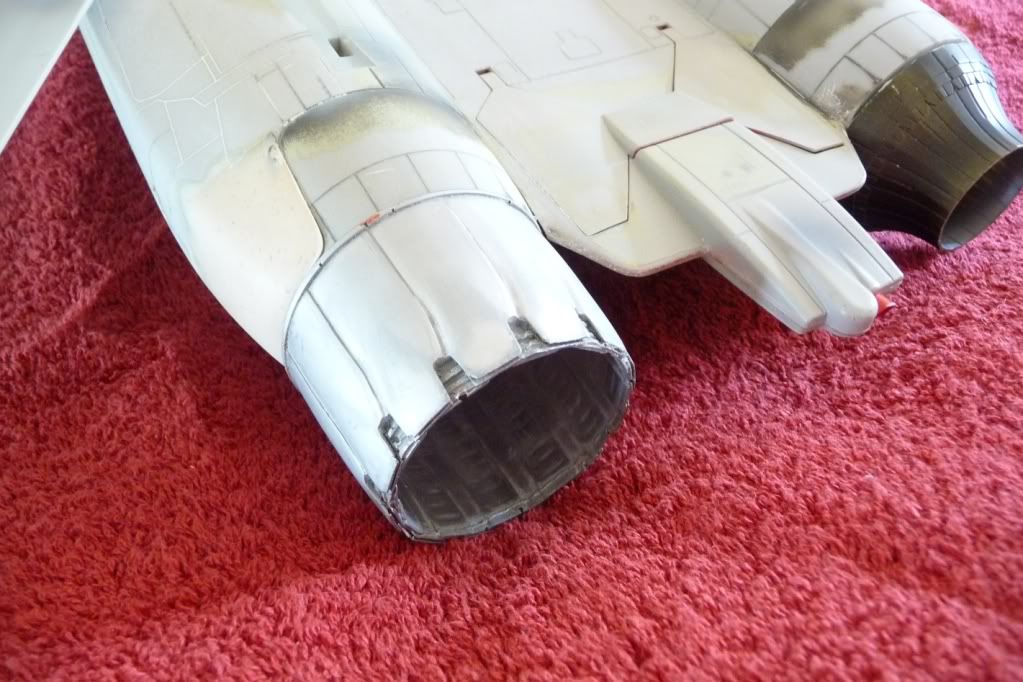
Converting the JSI F-14 from the "A" to the "B" really starts with these engines. Actually the nozzles are done by Jack at SkyWorks and they are great! The problem is the model fairings. The two versions are really quite different but take heart the task is relatively simple.
I began by filling the outer fairing panel lines in with Cyanoacrylate (super glue) then sanding smooth. On the "B" modle this area is smooth and very dark metallic gray.
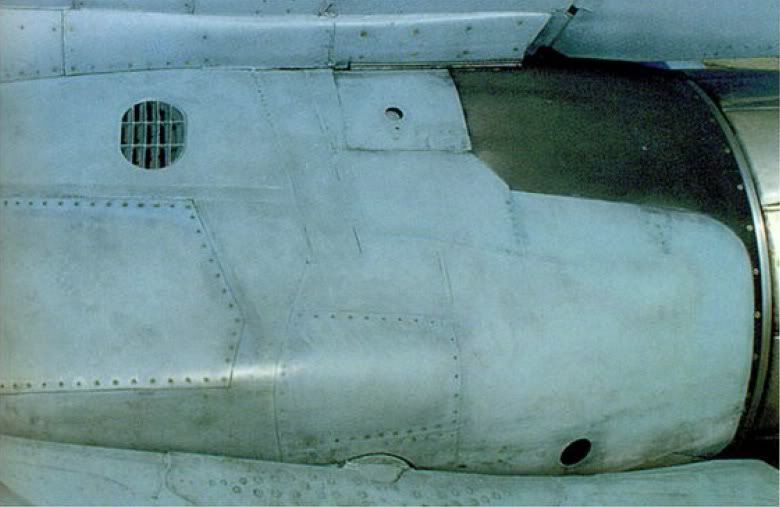
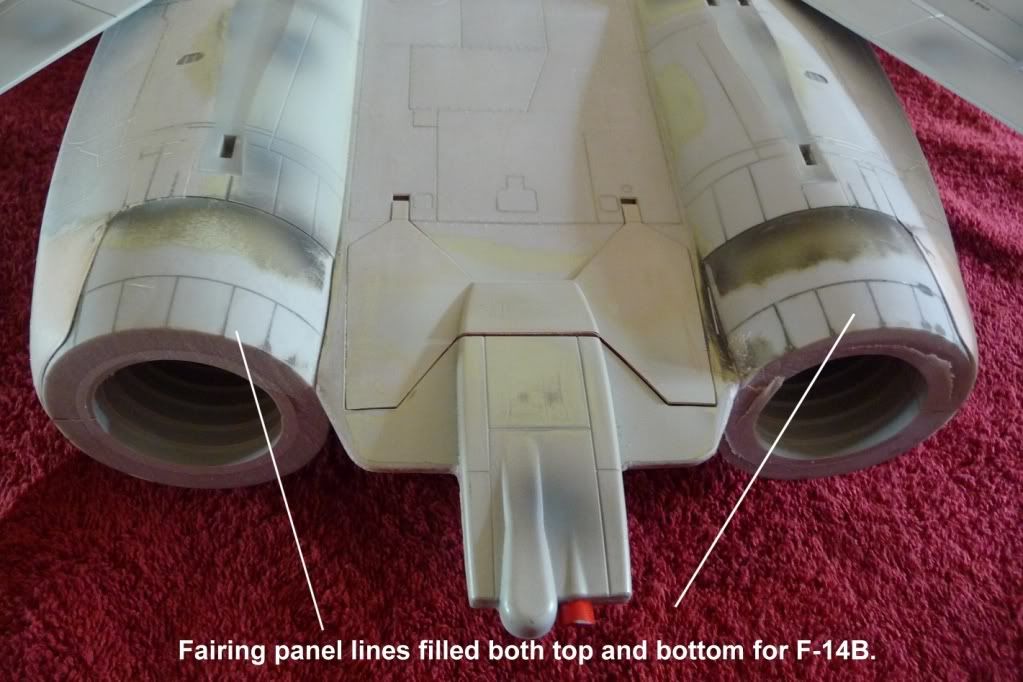
Next I cut the new fairing outline from thin Evergreen stock plastic and attach over the old "A" fairings. (This gave me a base to work from) In the pic you can make out the white plastic under the filler. This looks more realistic than making that joint solid as on the real thing the engine is not connected to the fairing but slides in and out for servicing.
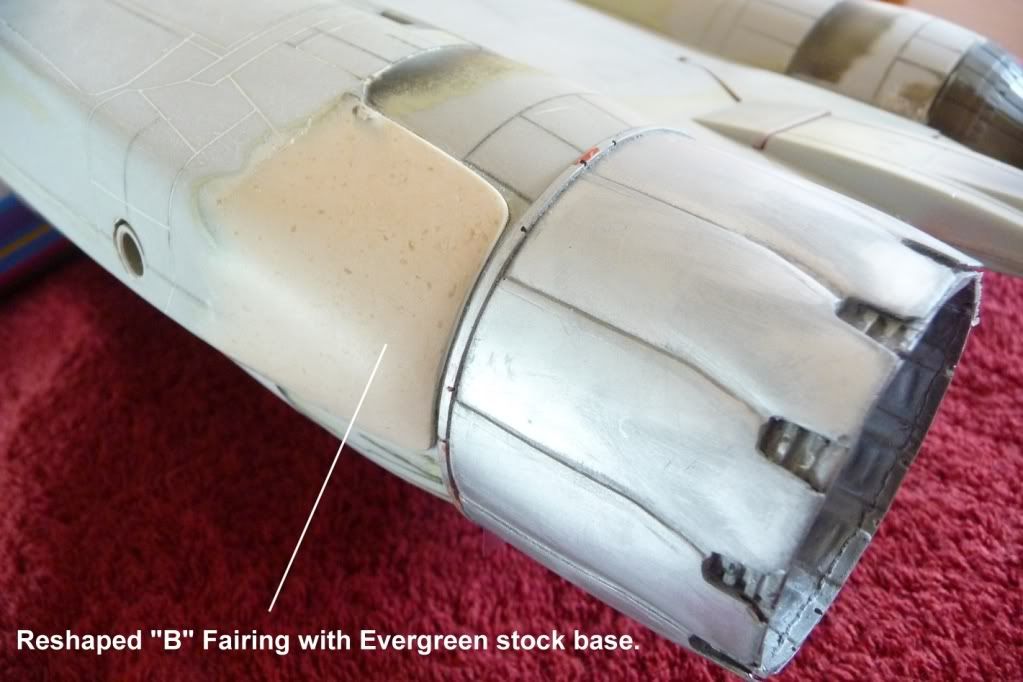
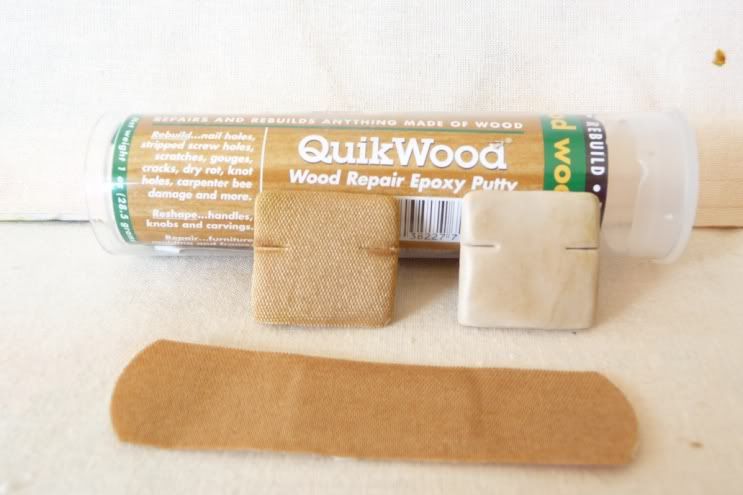
For filler I used "QuickWood" Epoxy putty. Stuff is great! Is workable for about 15 mins... enough time to get the approximate outline. I let it dry overnight then sanded to shape. Dries hard and sands smooth as plastic.
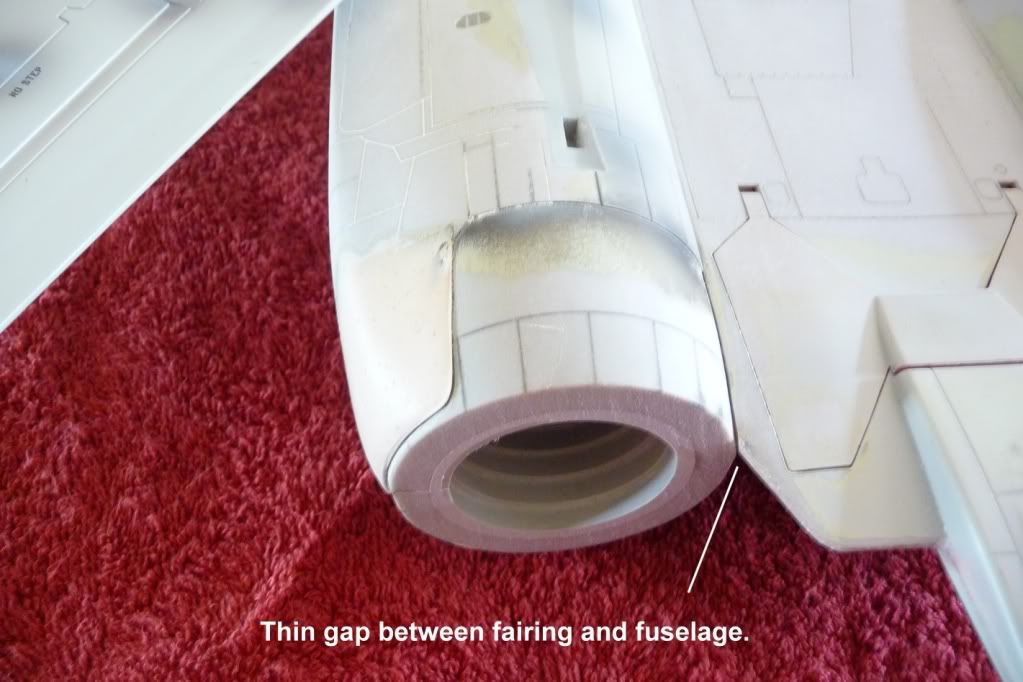
There should be a thin gap between the inside of the engine fairing and the rear fuselage. Is a pain in the &%$#% but adds to the illusion. I used a good old #11 Exacto and some thin sand paper. I started slow using the back of the blade and working from both top and bottom until I had a gap all the way through. When I over did it in a spot and the gap was too wide I put Tamyia masking tape on the engine side and ran a bead of super glue until the thickness seemed right and re-sanded.
Next installment will address the landing gear problem.
mcaulk... out.
Christa...
Now back to the Tomcat.
The JSI Cat is kind of a mixed airframe with parts from the A/B and or D. The engines on the model are the early troublsome Pratt & Whitney TF30s pictured below... followed by the much improved GE F-110 turbo fans.
This pic is of the model with both types of nozzles in place for comparison.
Converting the JSI F-14 from the "A" to the "B" really starts with these engines. Actually the nozzles are done by Jack at SkyWorks and they are great! The problem is the model fairings. The two versions are really quite different but take heart the task is relatively simple.
I began by filling the outer fairing panel lines in with Cyanoacrylate (super glue) then sanding smooth. On the "B" modle this area is smooth and very dark metallic gray.
Next I cut the new fairing outline from thin Evergreen stock plastic and attach over the old "A" fairings. (This gave me a base to work from) In the pic you can make out the white plastic under the filler. This looks more realistic than making that joint solid as on the real thing the engine is not connected to the fairing but slides in and out for servicing.
For filler I used "QuickWood" Epoxy putty. Stuff is great! Is workable for about 15 mins... enough time to get the approximate outline. I let it dry overnight then sanded to shape. Dries hard and sands smooth as plastic.
There should be a thin gap between the inside of the engine fairing and the rear fuselage. Is a pain in the &%$#% but adds to the illusion. I used a good old #11 Exacto and some thin sand paper. I started slow using the back of the blade and working from both top and bottom until I had a gap all the way through. When I over did it in a spot and the gap was too wide I put Tamyia masking tape on the engine side and ran a bead of super glue until the thickness seemed right and re-sanded.
Next installment will address the landing gear problem.
mcaulk... out.
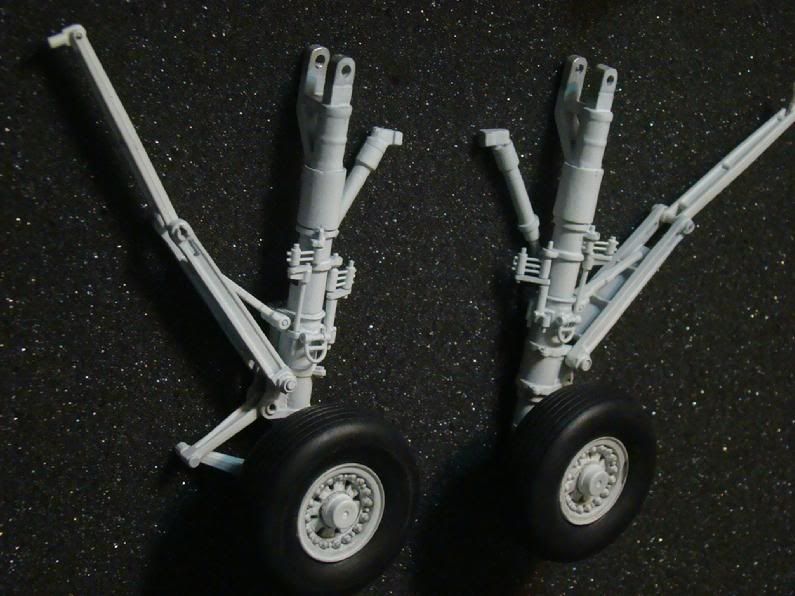
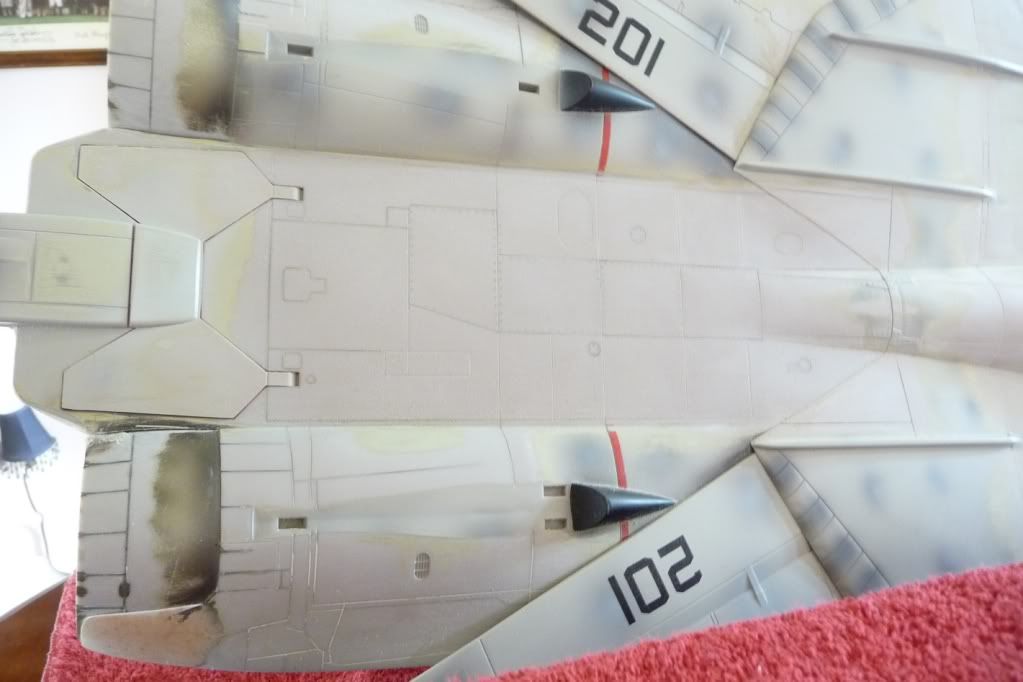
Main Landing Gear
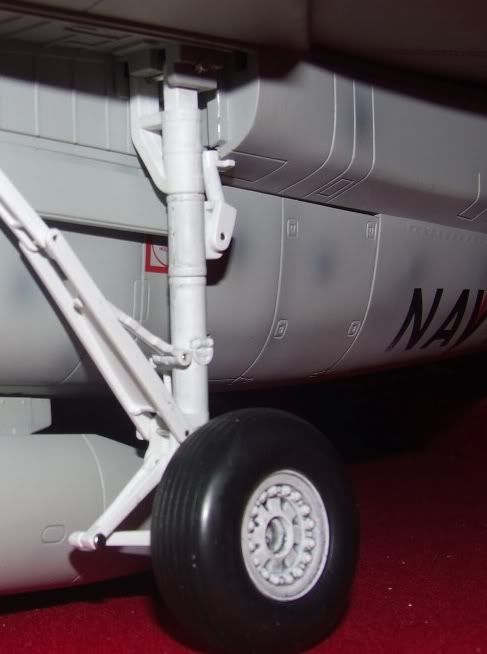
The above pic is what comes on the JSI bird from the factory in China and is not very good. The gear is undersized, inaccurate and unstable. Jack to the rescue! That's right SkyWorks has available cast metal gear for the big 1/18th scale Grumman. They come in two flavors... assembled and unassembled.
http://www.warbird-photos.com/gpxd/viewtop...c&start=180
Being brave or cheap… mostly the later, I chose to put them together myself. This involves the normal clean up associated with cast metal parts and some drilling… then assembling with supplied pins and some strategically placed super glue.
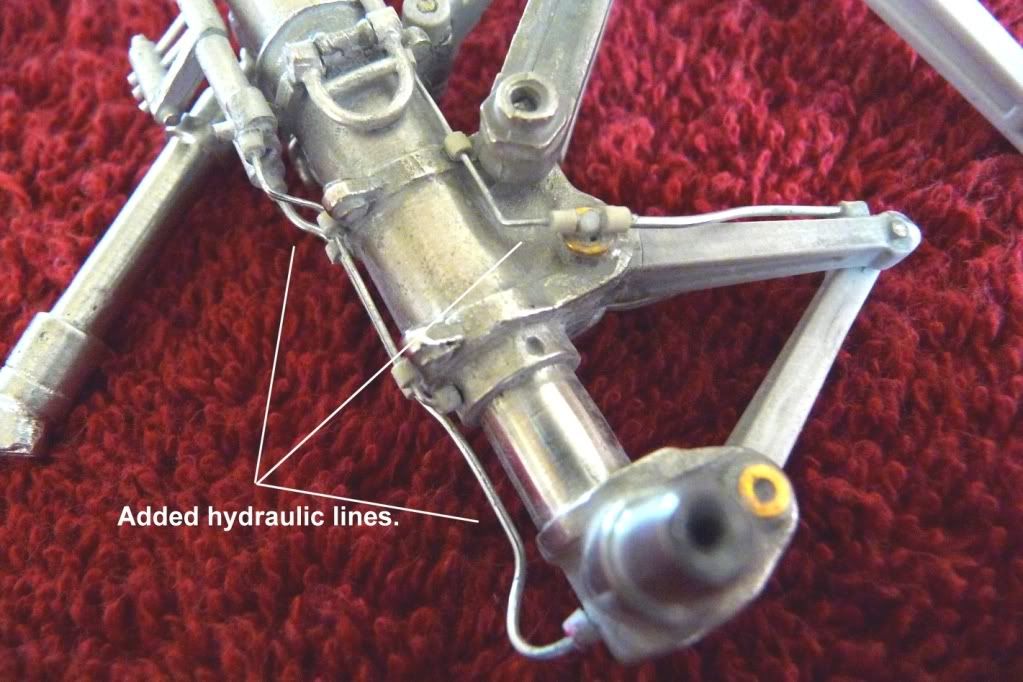
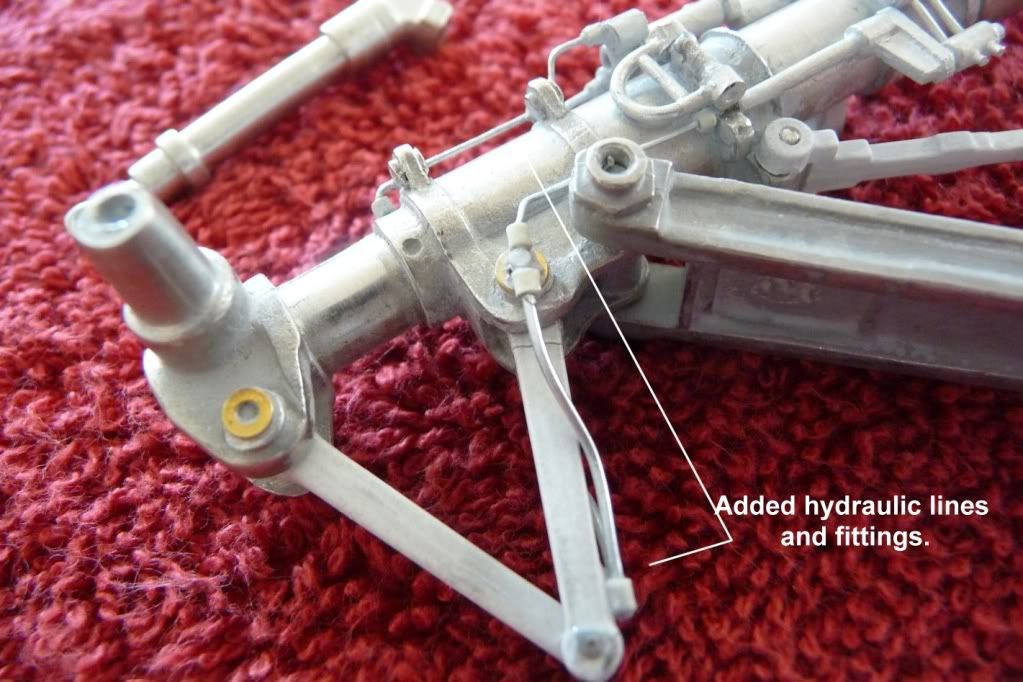
I also added some hydraulic lines and fittings made from electrical wire insultation. My gear now awaits the paint shop followed by weathering. More pics when that is finished.
Next up... what to do with the trench sized panel lines?
Mcaulk out.
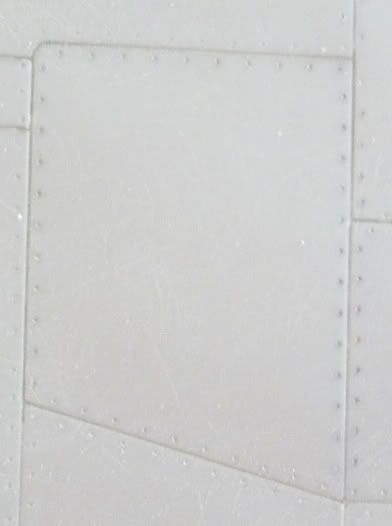
Panel Lines
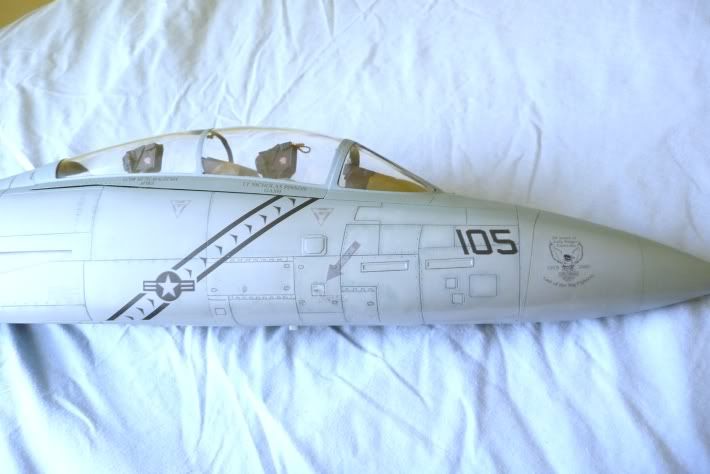
For some reason the makers of most of these pre-assembled display models feel compelled to make the panel lines extra deep. Some are worse than others and this Tomcat is not ridiculous but the channels are pretty heavy. One observation regarding this JSI model. The overall shape of the airplane and placement of the panels seems to be very accurate just a little overdone. The first pic is of the plane weathered but stock depth panel lines.
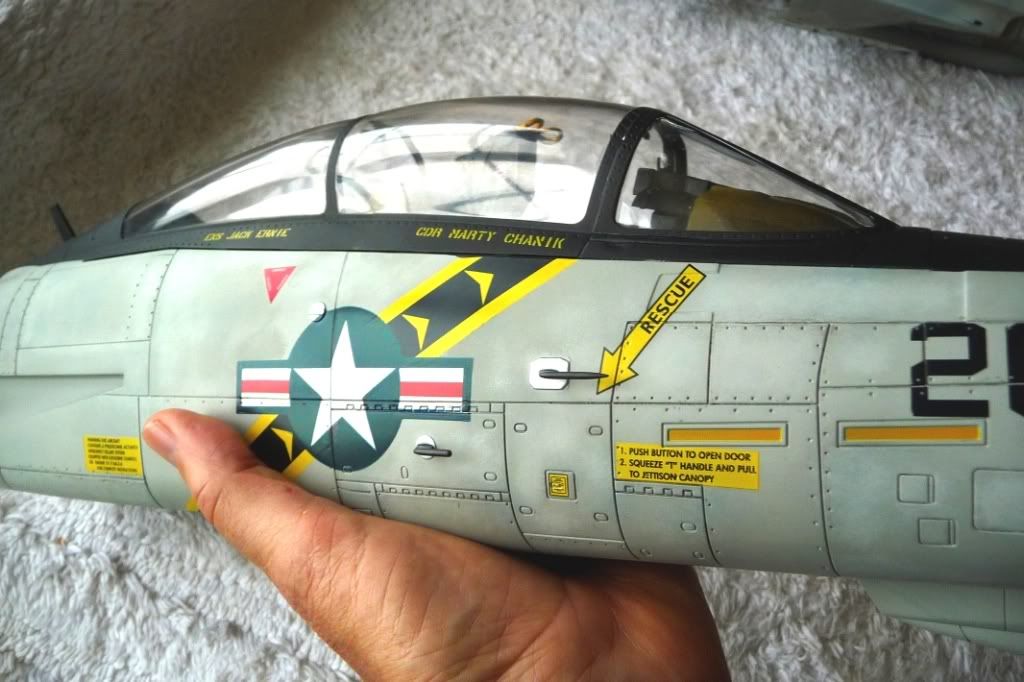
The next couple of pics reflects panel lines that have been reduced and IMHO look a little more realistic.
To get this I attack each trench with my trusty Dremel.

I used the pictured grinding wheel to shallow out and narrow each panel line. You have to be careful as this thing eats plastic.
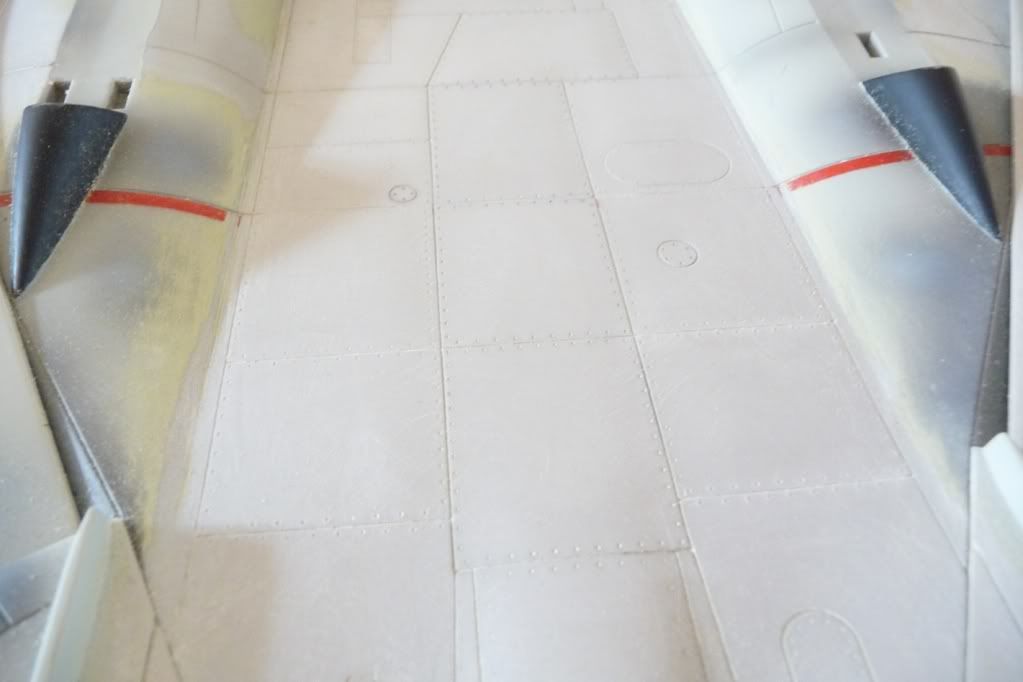
After grinding the sanding begins which I hate but no way around it so I secure a beverage(s) park in front of the flat panel, tune to the Military Channel and begin. The grinding is pretty rough so it requires quite a bit of sanding to get the surface smooth again.
This approach tends to produce a subtle stressed metal effect which I think is more realistic than a completely flat model. Next comes the rivets.
mcaulk out!
The next couple of pics reflects panel lines that have been reduced and IMHO look a little more realistic.
To get this I attack each trench with my trusty Dremel.
I used the pictured grinding wheel to shallow out and narrow each panel line. You have to be careful as this thing eats plastic.
After grinding the sanding begins which I hate but no way around it so I secure a beverage(s) park in front of the flat panel, tune to the Military Channel and begin. The grinding is pretty rough so it requires quite a bit of sanding to get the surface smooth again.
This approach tends to produce a subtle stressed metal effect which I think is more realistic than a completely flat model. Next comes the rivets.
mcaulk out!
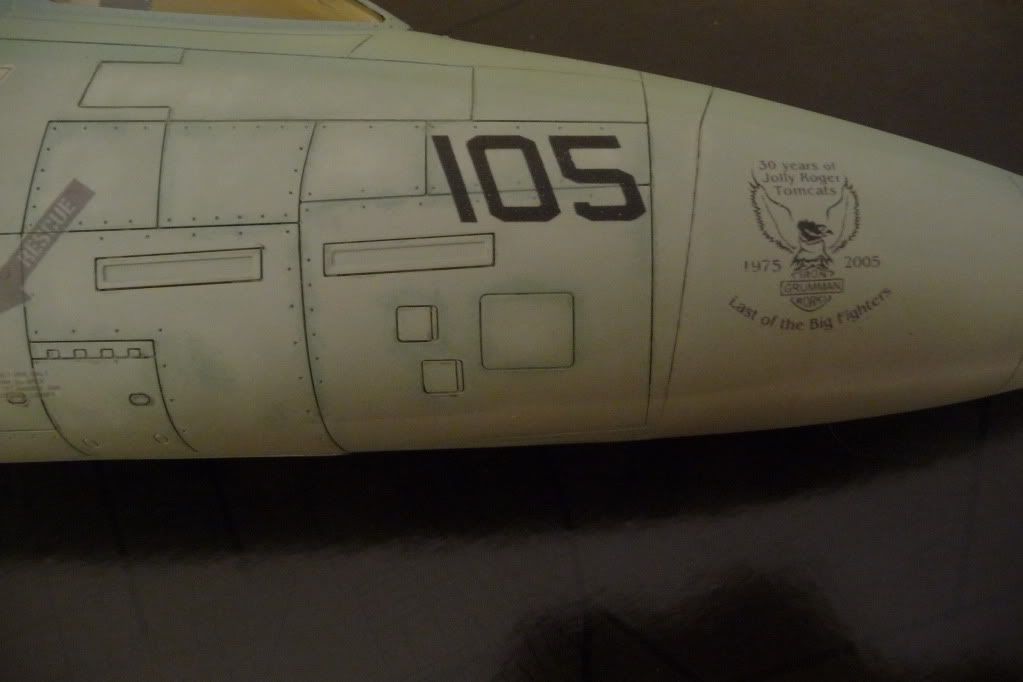
Tomcat Rivets
The Tomcat is absolutely covered with rivets... well all aluminum aircraft are but they really show up on the F-14. A couple of examples:
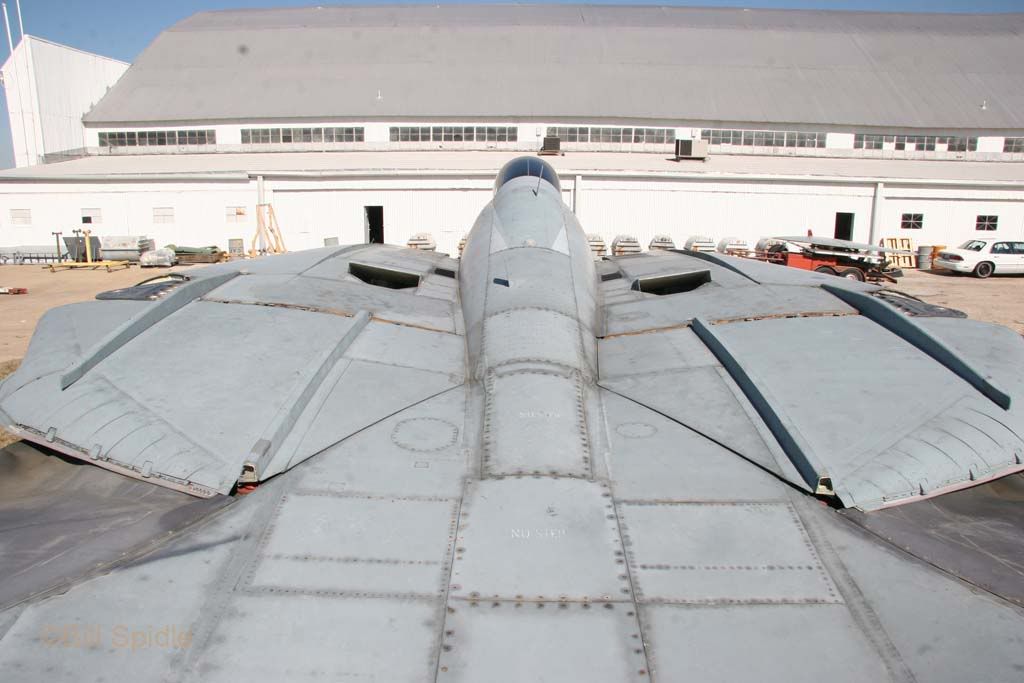
Some of this is due the the low viz paint scheme and anti-corrosion spot painting to fight salt water damage while on cruise.
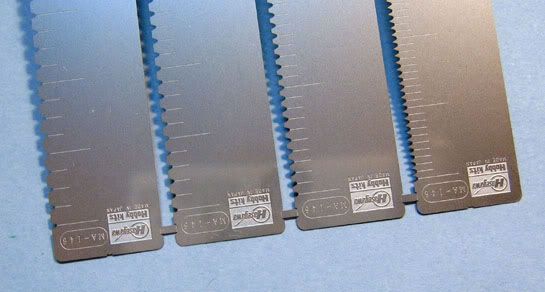
Riveting although somewhat tedious is one of my favorite parts of the process. I have several riveters including 3 sizes of "Rosies" however with most of the Tomcat I use a flat rivet gauge tool from Hasegawa.
I usually tape it down with blue painters tape once in place and then impress the initial rivet location with a semi dull medium size needle in a pin vise.
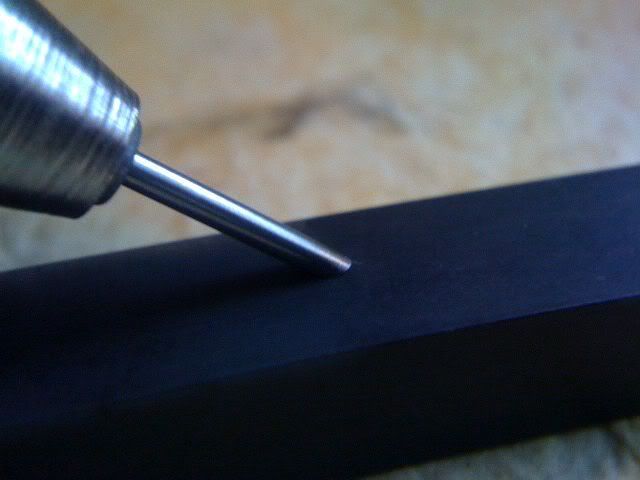
After I have the rivet pattern in I go back with a larger duller needle and make the permanent rivet impression.
Sometimes I run a thinned wash into the panel lines and the rivets. In this shot I have enhanced the rivets by drybrushing a different shade of gray or different color from the TPS scheme.
Some of this is due the the low viz paint scheme and anti-corrosion spot painting to fight salt water damage while on cruise.
Riveting although somewhat tedious is one of my favorite parts of the process. I have several riveters including 3 sizes of "Rosies" however with most of the Tomcat I use a flat rivet gauge tool from Hasegawa.
I usually tape it down with blue painters tape once in place and then impress the initial rivet location with a semi dull medium size needle in a pin vise.
After I have the rivet pattern in I go back with a larger duller needle and make the permanent rivet impression.
Sometimes I run a thinned wash into the panel lines and the rivets. In this shot I have enhanced the rivets by drybrushing a different shade of gray or different color from the TPS scheme.
-
USCGSARdog
- Officer - 1st Lieutenant
- Posts: 619
- Joined: Mon Oct 04, 2004 6:42 pm
- Location: Richmond, VA
Beautiful work mcaulk.... your attention to detail is phenomenal. I am slowly working on my D model conversion, and let me say, your work is very inspiring. Keep those pics coming!
Btw, I see you made the trip to see AJ 110 over at RIC! Good reference material there. LMK if you need anymore pics... I have quite a few detail shots of this AC.
-Rob
Btw, I see you made the trip to see AJ 110 over at RIC! Good reference material there. LMK if you need anymore pics... I have quite a few detail shots of this AC.
-Rob
_______________________________
"You have to go out, but you don't have to come back".
"You have to go out, but you don't have to come back".
Feedback
Rob,
Thanks for the positive feedback. As you know this is a pretty ambitious project requiring many hours of work. Would love to see some of your pics when you get the chance. Thanks for the offer on research shots may take you up on it. In the mean time take care happy modeling.
Mike
Thanks for the positive feedback. As you know this is a pretty ambitious project requiring many hours of work. Would love to see some of your pics when you get the chance. Thanks for the offer on research shots may take you up on it. In the mean time take care happy modeling.
Mike
tko211,
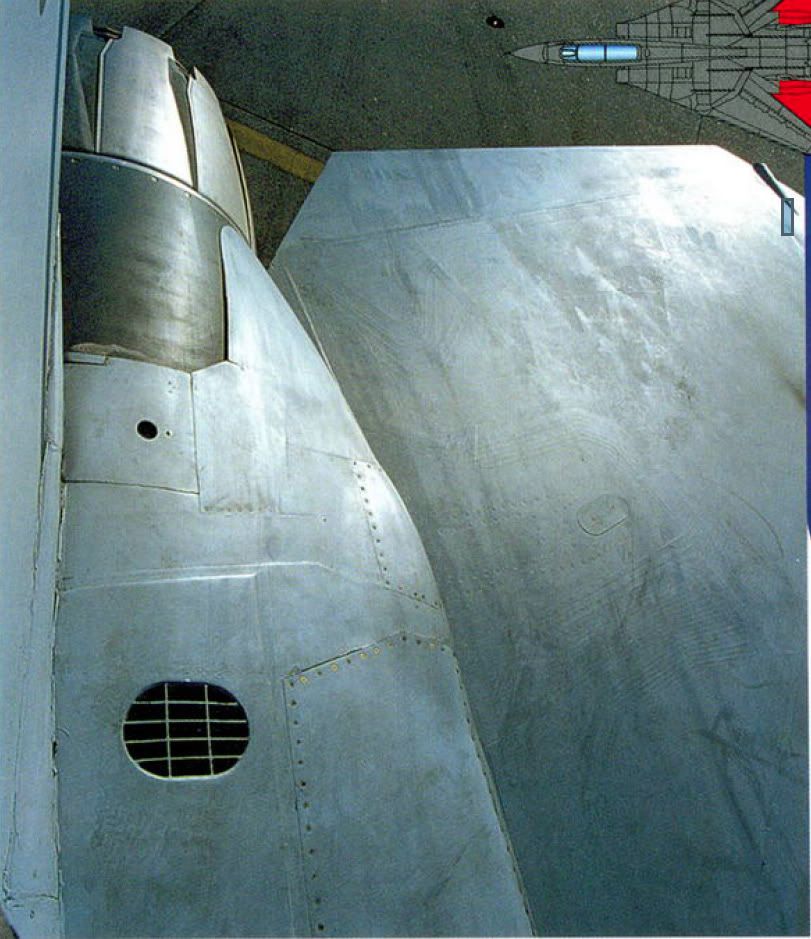
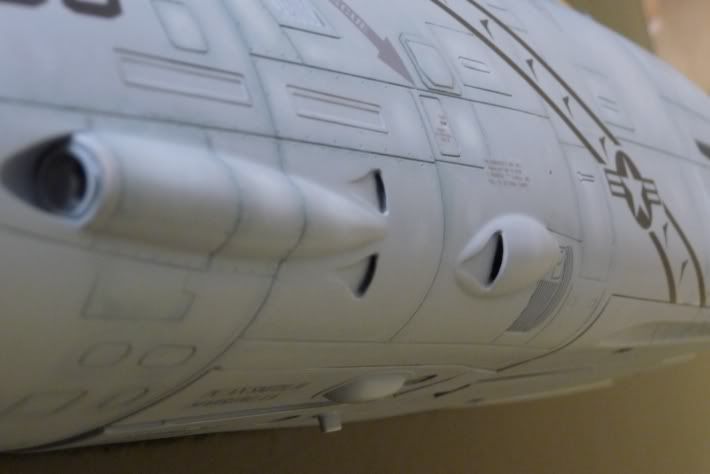
Thanks for the feedback. Yea but to be honest I sometimes wonder if it will ever end. Reworking the panel lines and airframe is taking more then twice as long as my original estimate but I should know by now that is normal. Anyway I will be happy when this is finished. Spent 1/2 the day carving out the louvered vents just aft of the wing-walks. Tedious but they look much better than the stock item.
Regards,
Mike
Yeah, as a repainter I have found that things just take a lot longer than folks really understand. I can't imagine the amount of time and hours you have and will still invest into this project. It is a great looking model and after you are through with it it will have to be the most accurate F-14 in 1:18 scale!
For the viewing audience at home would you share with us the hours spent so far and what kind of price you would have to put on it if you were to sell it? I just want to give everyone an idea of exactly how much work something like this is. I bet it's an eye-opener and certainly says a lot about your passion and talent for this level of re-work.
It's looking amazing! Keep it going.

Guys,
Thanks for the encouragement... it is appreciated and at times very much needed.
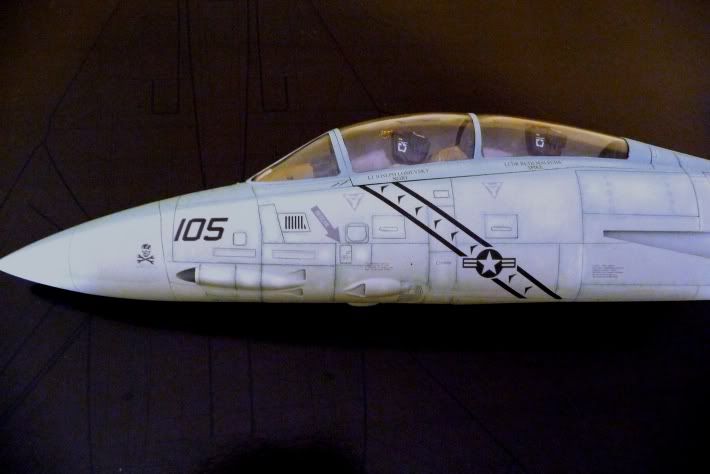
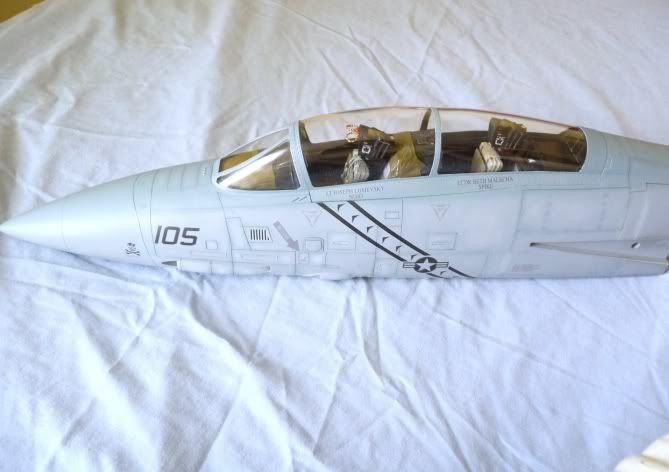
Had planned to simultaneously work an "A" in the VF-111 Sundowners markings. The plan for that Cat was/is a canopy open super detailed cockpit. Have the front fuselage disassembled and the front office ready for detailing but summer is running out. In three weeks I will be back at school teaching history so I am focusing ont this low viz Jolly Roger bird with the hope of completion before the first day of school. Going to be tight.
Thanks again,
Mike
Thanks for the encouragement... it is appreciated and at times very much needed.
Had planned to simultaneously work an "A" in the VF-111 Sundowners markings. The plan for that Cat was/is a canopy open super detailed cockpit. Have the front fuselage disassembled and the front office ready for detailing but summer is running out. In three weeks I will be back at school teaching history so I am focusing ont this low viz Jolly Roger bird with the hope of completion before the first day of school. Going to be tight.
Thanks again,
Mike