My first model build- 1/48 Pegasus Zero (Completed 4/2!)

Your forum dedicated to 1/32nd and smaller plastic and metal figures and vehicles.
Post Reply
Ferrari250GTO
Officer - 2nd Lieutenant
Posts: 272
Joined: Mon Aug 10, 2009 8:58 pm
Location: Philadelphia, PA

My first model build- 1/48 Pegasus Zero (Completed 4/2!)

Post by Ferrari250GTO » Sun Mar 14, 2010 3:17 am

And so my journey begins. I will be starting my first model on monday when I get the last supply I need to build it, liquid cement. I have gotten all necessary model building materials. (OK I need a paint tray too :D)
The table itself is setup in a temporarily vacant room, so the table is also of the temporary type. (It's pretty solid though) Aside from paints and the models, mostly all of the materials we had, or got at Wal-mart.
Friday, I cut the parts from the trees. I snapped the model together in about 10 minutes just to get a feel for things.
I will try to provide nearly daily photographical updates on the project.
Here is what my table looks like currently: (If you're wondering why so many paint colors, it's for my next project- a Pegasus Bf 109)
Overview
Image

Tray
Image
Last edited by Ferrari250GTO on Fri Apr 02, 2010 6:23 pm, edited 1 time in total.

Dauntless
Officer - Brigadier General
Posts: 4107
Joined: Tue Jul 01, 2008 12:18 am
Location: Albuquerque

Post by Dauntless » Sun Mar 14, 2010 8:01 am

Cool 8)

Where'd you get that apparatus with the magnifying glass and pinchers, and what is it called?

I need one of those for sure.
::::::::::::::::::::::::::::::::::::::::::::::::::::::::::::::::>=}:
Good trader list: hworth18, Threetoughtrucks, mikeg, cjg746, jlspec

Panzer_M
Officer - Brigadier General
Posts: 4129
Joined: Wed Jul 26, 2006 12:23 am
Location: Port St. Johns

Post by Panzer_M » Sun Mar 14, 2010 8:17 am

good traders/sellers/buyers
Alloyskull(x2), PanzerArm(x2), Ostketten, Mikeg,tmanthegreat,Coreyeagle48

Dauntless
Officer - Brigadier General
Posts: 4107
Joined: Tue Jul 01, 2008 12:18 am
Location: Albuquerque

Post by Dauntless » Sun Mar 14, 2010 8:39 am

That one's got a light on it too. Very useful good price.

Thanks, bookmarked it.
::::::::::::::::::::::::::::::::::::::::::::::::::::::::::::::::>=}:
Good trader list: hworth18, Threetoughtrucks, mikeg, cjg746, jlspec

Panzer_M
Officer - Brigadier General
Posts: 4129
Joined: Wed Jul 26, 2006 12:23 am
Location: Port St. Johns

Post by Panzer_M » Sun Mar 14, 2010 9:16 am

his model is 2X.XX$ at my local HobbyTownUSA

I get alot of my Tools from Modelexpo, good prices, fast shipping.
good traders/sellers/buyers
Alloyskull(x2), PanzerArm(x2), Ostketten, Mikeg,tmanthegreat,Coreyeagle48

Ferrari250GTO
Officer - 2nd Lieutenant
Posts: 272
Joined: Mon Aug 10, 2009 8:58 pm
Location: Philadelphia, PA

Post by Ferrari250GTO » Sun Mar 14, 2010 1:34 pm

Here is the exact one I got
http://myatomic.com/catalog/viewsku?sku=XAC75170
I will wash the parts today. I might also do some sanding, therefore, maybe some painting. We shall see.

Panzer_M
Officer - Brigadier General
Posts: 4129
Joined: Wed Jul 26, 2006 12:23 am
Location: Port St. Johns

Post by Panzer_M » Sun Mar 14, 2010 1:45 pm

yea I know, HobbyTownUSAs can be a complete rip-off, or a good price depending on what you buy, like mine has Flames of War, buy 2 get the 3rd 1/2 off, which could be a deal(although there are cheaper stores on ebay which sell the models for 9.99 Free Ship vs 11.00 and up at walk-in stores).but tools, esp the name brand stuff, Xacto, Gameworkshop(which I hate myself) are all over-priced.

all depends on what you buy, like Diamond Files, I never buy from a Hobbyshop, always from Home-Depot, better price, better case, and last set had a nice handle you inserted the file into.

but for things like Xacto, sanding supplies, Bone Saws, MittierBoards, Sprue clippers, Vises, stands etc..ModelExpo normally has the best prices..Also Airbrush/Air compressors are good for entry level stuff. but there are better sources for air-supplies for more advanced needs.
good traders/sellers/buyers
Alloyskull(x2), PanzerArm(x2), Ostketten, Mikeg,tmanthegreat,Coreyeagle48

Ferrari250GTO
Officer - 2nd Lieutenant
Posts: 272
Joined: Mon Aug 10, 2009 8:58 pm
Location: Philadelphia, PA

Post by Ferrari250GTO » Sun Mar 14, 2010 8:04 pm

Got the instrument panel and cockpit painted, I think the engine cover needs a little touch up.

Image

Ferrari250GTO
Officer - 2nd Lieutenant
Posts: 272
Joined: Mon Aug 10, 2009 8:58 pm
Location: Philadelphia, PA

Post by Ferrari250GTO » Fri Apr 02, 2010 6:17 pm

I have been a bad boy. Like always, my attempts to keep updating things have failed. I am finished with the Zero model. It was very enjoyable building it, especially since it was my first model. I enjoyed working on it in bits and pieces and snapping it together to see how far I had gotten. I have a feeling I will be making models for a while, so long as I can get better at it.
I think that I did an OK, just OK, job on my first model. There are definitely many things that I can improve on.
My main problems are:
The engine cover- When I painted it, it seemed as though some areas ended up darker than others. I think that I needed to do it in coats, rather than just keep adding on while it was drying.
The overall gray color- I did as the directions it said, which was to paint it in IJN Gray (Kure) However, I still believe it was too dark. Should I have thinned the paint more, used less paint, or something else?
The decals- I used a small brush to cover the area I was putting the decal on, with Micro set. Then about an hour later, I used a brush to put some Micro Sol on it. The next day I used a brush to put Micro flat on it. Now, I can still see the outline on the decal, and for the Red circles, I can see right through them in some parts. What did I do wrong?

Here are the pics of the completed model-

Image

Image

Image

Thanks for looking!

Ferrari250GTO
Officer - 2nd Lieutenant
Posts: 272
Joined: Mon Aug 10, 2009 8:58 pm
Location: Philadelphia, PA

Post by Ferrari250GTO » Sun Apr 04, 2010 5:41 pm

Anybody? Anybody want the next model to be better or worth looking at?
Thanks! :)

ostketten
Officer - Brigadier General
Posts: 3240
Joined: Wed Apr 05, 2006 6:23 am
Location: Washington DC area
Contact:

Post by ostketten » Sun Apr 04, 2010 6:04 pm

Considering it's your first model I think it turned out nice. 8) I would think building a 1/48 model would be a challenge as it's quite small. Good luck on your next build.
Gen. George S. Patton Jr., 28th Regimental Colonel, 3rd Armored Cavalry Regiment, U.S. Army, "Blood and Steel"

Ferrari250GTO
Officer - 2nd Lieutenant
Posts: 272
Joined: Mon Aug 10, 2009 8:58 pm
Location: Philadelphia, PA

Post by Ferrari250GTO » Sun Apr 04, 2010 7:10 pm

ostketten wrote:Considering it's your first model I think it turned out nice. 8) I would think building a 1/48 model would be a challenge as it's quite small. Good luck on your next build.
Thank you sir! :)
I am content with the results for the most part. (my problems are in my previous post) It was hard for some of the parts, such as masking off the canopy. That took like 2 hours! But that's ok, it was worth the time :)

snake
Officer - Brigadier General
Posts: 3657
Joined: Mon Mar 23, 2009 12:28 am
Location: Victoria,B.C. Canada

Post by snake » Sun Apr 04, 2010 9:34 pm

Practice makes perfect F250GTO. :wink:

As you can probably tell,it is tougher than it looks.

Your skills will improve,but it will take some time,and more models.

Stick with the cheaper models until your skills improve.The only problem with the cheaper models though,is that the fit and finish are not as good as the more expensive ones,so that is a challenge in itself.

Hey,you have to start somewhere,right. :wink:

Panzer_M
Officer - Brigadier General
Posts: 4129
Joined: Wed Jul 26, 2006 12:23 am
Location: Port St. Johns

Post by Panzer_M » Sun Apr 04, 2010 10:54 pm

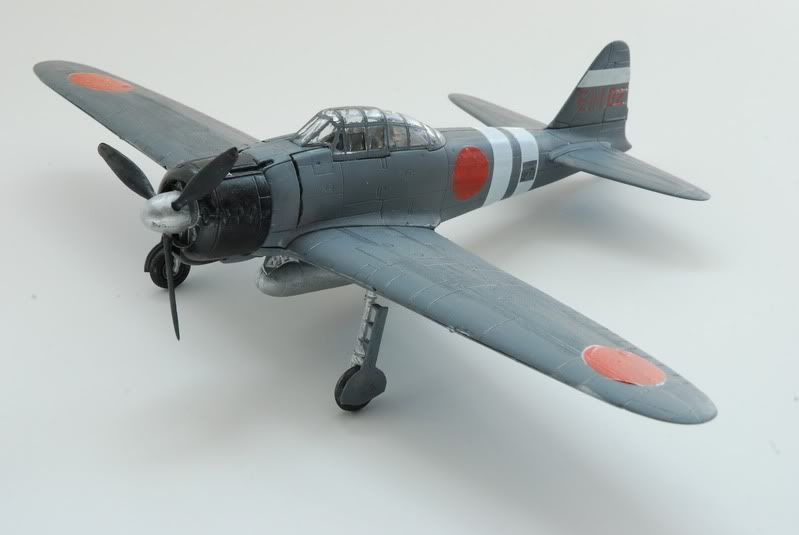
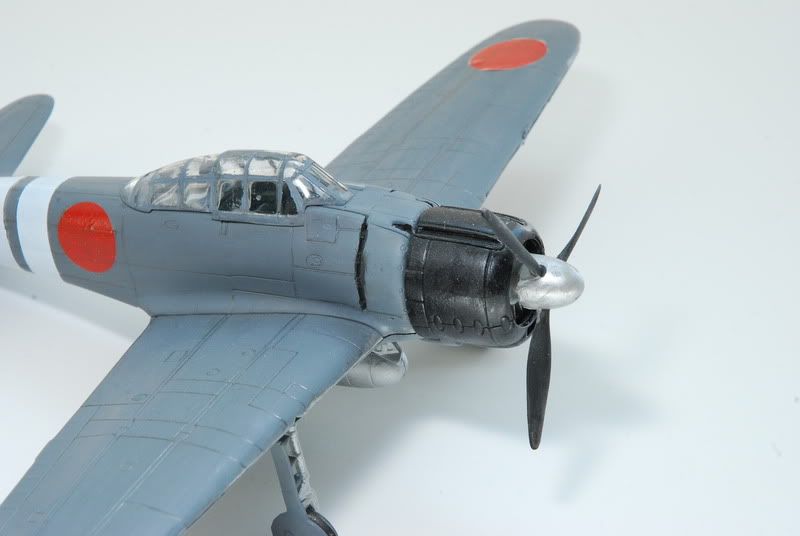
A simple wash/ink wash will make the panel lines pop out more and leading edges, cowlings and prop chip marks are easy to do with a pin brush and some basic alum colored paint. another easy one taking random panels and making them a tad darker than the surrounding ones to show replacement in the fieldshop by the handlers.

important thing about weathering is a little goes a long way. Don't feel you need to over-indulge, you are modelling a in-service piece of hardware and not a relic for the norm..although that can be reversed :wink:

I like the lived in look, but not the on the way to the junk-pile weathering I've seen here on some customs...or FOV's normal dip in thinned black a few times and it's Collector's grade realism piece. :roll:

Subtle is good, Subtle works. Other than those points not bad for a first time with a brush. For the next one I suggest a primer, and thinner coats of brush applied paint..and a wide selection of brush sizes and types..heck I have 20$(I think 25-27 is the most I've paid, but I love to hit the sales) ones from Michael's and packs of cheapos from Walmart that all have been found to have a niche use...also when it comes to tools always think outside the box, if it works it's not wrong IMO.

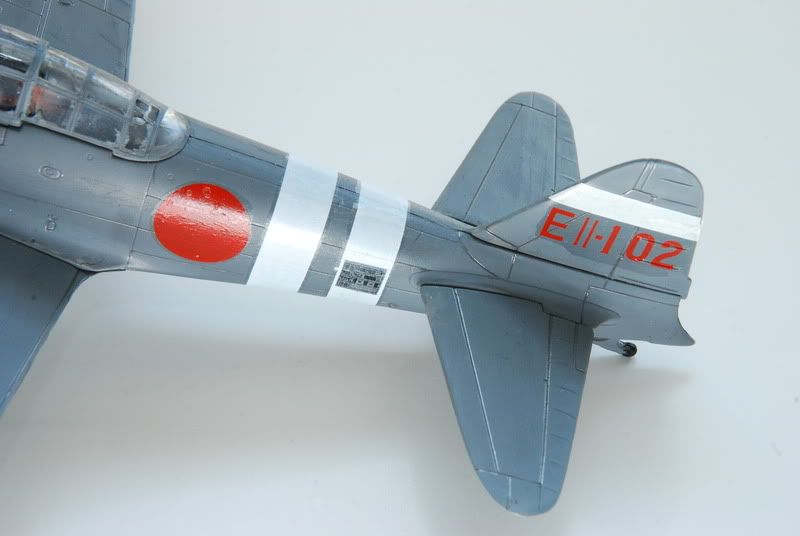
Also for the canopy, I can think of two easy bits of advice. Model master's Clear parts glue, great stuff for the simple reason unlike every other glue, it doesn't cloud clear plastic. And also if you dip the canopy in Future Floor polish, which is a acrylic floor wax(protector actually) it will enhance the clarity. And the only other thing I can say about greenhouses on planes, masking tape, #11 Xacto, time and a steady hand(or if you can find them the pre-cut mask ;) ) def show results. I thinking masking canopies is prob why I gave up 1/72 planes for a long time for 1:32 planes and armour.

sorry if that is a ramble, still tired from easter dinner and trying to get some stuff ready for the shuttle launch this morning.
good traders/sellers/buyers
Alloyskull(x2), PanzerArm(x2), Ostketten, Mikeg,tmanthegreat,Coreyeagle48

Ferrari250GTO
Officer - 2nd Lieutenant
Posts: 272
Joined: Mon Aug 10, 2009 8:58 pm
Location: Philadelphia, PA

Post by Ferrari250GTO » Tue Apr 06, 2010 7:58 pm

Thank you guys for the much neeeded advice!
Panzer-
You seem to be the man to go to for modelling help, so I will ask you some questions.
For weathering, what do you think of these?-
https://www.myatomic.com/catalog/viewsk ... aint_set_b
https://www.myatomic.com/catalog/viewsk ... ster_c_set
For a primer, I was thinking about either of these Tamiya sprays, but I don't know whether I should get gray or white?-
https://www.myatomic.com/catalog/viewsk ... gray_180ml
https://www.myatomic.com/catalog/viewsk ... hite_180ml

Last question for now- what about a clear coat, how should I go about doing that without an airbrush?

Thank you very much

nooker21
Officer - 2nd Lieutenant
Posts: 321
Joined: Tue Oct 05, 2004 9:32 am
Location: Anaheim, CA

Post by nooker21 » Fri Apr 09, 2010 5:32 pm

I think your Zero is too dark because you used IJN grey instead of IJN light grey. Also, decals will go on better with a glossy coat of paint, which you can then cover with a flat clear coat to reduce the shiny edges of the decals. Hope these pointers help for next time...

Ferrari250GTO
Officer - 2nd Lieutenant
Posts: 272
Joined: Mon Aug 10, 2009 8:58 pm
Location: Philadelphia, PA

Post by Ferrari250GTO » Thu Apr 29, 2010 3:45 pm

nooker21 wrote:I think your Zero is too dark because you used IJN grey instead of IJN light grey. Also, decals will go on better with a glossy coat of paint, which you can then cover with a flat clear coat to reduce the shiny edges of the decals. Hope these pointers help for next time...
Hi, sorry I haven't responded yet. My home computer has a nasty virus and I only have limited computer access.
I used the Kure version of IJN gray. I believe that was lighter than the Sasebo version. Those pointers helped this time. You will see the results of my next model very soon in the 1/32 forum.

Panzer_M
Officer - Brigadier General
Posts: 4129
Joined: Wed Jul 26, 2006 12:23 am
Location: Port St. Johns

Post by Panzer_M » Thu Apr 29, 2010 9:00 pm

I got all the Tamiya makeup kits..kinda weird when I first started using the medium, since it's not the normal route I go for weathering, using washings, inks and pigment powders..but I do like the options, like the Rust(s) and Soot esp. Never used the white/Snow, or the armoured color high lights on a model..just paper card stock toying with it for effect.
good traders/sellers/buyers
Alloyskull(x2), PanzerArm(x2), Ostketten, Mikeg,tmanthegreat,Coreyeagle48

Panzer_M
Officer - Brigadier General
Posts: 4129
Joined: Wed Jul 26, 2006 12:23 am
Location: Port St. Johns

Post by Panzer_M » Thu Apr 29, 2010 9:08 pm

I use for primers, White and the Fine Grey from Tamiya
also I use flat black from Warpainter, and for a quick wargame job that is going to get handled and traveled the cans of Panzergelb(Tamiya), Panzer Grey, Afrika Brown(Model masters enamels) and Luftwaffe colors in cans by Tamiya.
good traders/sellers/buyers
Alloyskull(x2), PanzerArm(x2), Ostketten, Mikeg,tmanthegreat,Coreyeagle48

Jackson
Officer - 1st Lieutenant
Posts: 495
Joined: Fri Jan 13, 2006 12:19 pm
Contact:

Post by Jackson » Fri Apr 30, 2010 8:12 am

all the fun in modelling is putting them together and you did a fine job of havin fun...good job...

Ferrari250GTO
Officer - 2nd Lieutenant
Posts: 272
Joined: Mon Aug 10, 2009 8:58 pm
Location: Philadelphia, PA

Post by Ferrari250GTO » Fri Apr 30, 2010 3:52 pm

Thanks guys!
Panzer, see my new Bf-109 post for what I did for weathering. For my next model that I started already (after the one in the new post) I used Tamiya light gray spray primer.
Thanks

Post Reply