Page 4 of 5
Re: FW 190 as a kit
Posted: Tue Jun 26, 2018 5:55 pm
by Axis Nightmare
Just placed the order. This is the most excited I've been about anything 1/18 in a long time! A lot of that is based on the markings being the same as our Museum's plane.
Now to see which is finished first, my model or the full sized model.

Re: FW 190 as a kit
Posted: Wed Jun 27, 2018 10:18 am
by tmanthegreat
I’m tempted to place an order for this as well, but I want to see if my local hobby store will get it in first before ordering online. It’s great to finally have an FW-190A8 in 1/18.
That said, I still have to finish my FW-190A5 kit! It’s been nearly 8 months and while it was an easy build, trying to get the “messy” paint scheme of Josef Priller’s plane to look right (in my mind) took a long time. When combined with starting a new full time job plus the fact that I got distracted by some other projects, I’ve still not managed to finish the model! But over the past week or so, I’ve gotten back on it and am moving closer to completion as time allows...
Re: FW 190 as a kit
Posted: Sat Jun 30, 2018 9:01 am
by Axis Nightmare
Came already today! There is a second markings option if you don't want Heinz Bar's red 13. Now to see if I can use the progress from the A-5 to complete it with the A-8. There are only a few of changes. I intentionally avoided all those features.

Re: FW 190 as a kit
Posted: Sun Jul 01, 2018 12:08 pm
by Axis Nightmare
There is a great deal more different than I anticipated between the A-5 and A-8 kit. I expected the extra wing bulges and such to be a separate piece that would have to be added when in fact they retooled the wings with everything molded in. The sliding canopy is completely different as a bulged style as apposed to the flat hood on the A-5 and has the upgraded headrest. The bulges for the bigger cowl guns is just a replacement part. The cowl gun bay and cockpit interior seem identical. The sub-assemblies I did from the A-5 kit were control surfaces, horizontal stabilizer and cockpit interior so I'm good to go.

Re: FW 190 as a kit
Posted: Mon Jul 02, 2018 6:03 pm
by tmanthegreat
Can’t wait to see your progress, Axis! My A5 continues slowly, but I will need to get the A8 kit soon enough...
Just seeing these alternate paint schemes plus the A8 retooling tells me just how much of an opportunity was missed when Merit (or whoever made/distributed their products overseas) only did the one Herman Graff FW-190A5 in prebuilt fashion. By the looks of the repaints, it almost seems like more aircraft were planned but never produced
Re: FW 190 as a kit
Posted: Thu Jul 05, 2018 4:21 am
by Axis Nightmare
It's odd that they provided the bulged canopy hood with the revised solid headrest more associated with F models and Doras. In all the images I've seen of A-8's, I've only found one with the bulged canopy hood. It would only take an A-5 wing with the A-8 fuselage and canopy to make a nice F. They include bombs and shackles with the kits.
Re: FW 190 as a kit
Posted: Sat Jul 07, 2018 7:07 am
by Axis Nightmare
Here's the retooled wing for the A-8. The outboard cannon gun ports, cartridge ejectors and upper wing bulges are nicely molded in.


Re: FW 190 as a kit
Posted: Sat Jul 07, 2018 12:49 pm
by Axis Nightmare
Here's the A-8 kit supplied blown canopy hood with the A-5 kit supplied hood. The A-5 has the flatter style with the antennae attach point.

So the possibly dumb question is if the A-5 molds for the wings have been totally reworked to make the A-8, does that end production of the A-5? Or do these big companies have multiple molds for each component available?
Re: FW 190 as a kit
Posted: Sat Jul 07, 2018 3:51 pm
by [CAT]CplSlade
Based on my experience with some kits, this may indeed mean no more A-5's unless they cut a new wing mold. Generally they cut a single mold and work it to death, resulting in eventual misaligned parts and flash.
Re: FW 190 as a kit
Posted: Sun Jul 08, 2018 5:18 pm
by Axis Nightmare
So like the A-5, the A-8 kit includes bombs. There is no reference to them in the assembly instructions. If they are planning an F-8 they will need to resurrect the A-5 wing as the F models had no outboard wing cannon. The F would be an A-5 wing with wing shackles and the A-8 fuselage.
Re: FW 190 as a kit
Posted: Mon Jul 09, 2018 9:16 am
by Axis Nightmare
Well I'm not one to include a pilot in a model unless it is to be hanging but I had this nice pilot figure I think was from a BBi 109G? and it had all the belts and harness equipment already on it so I thought I'd try it out. Two tricks I had to use. One: Trimming of the pilot's rear and legs to fit the seat and get extended beyond the instrument panels. Trick two, is what you see is a dry fit. The pilot will be in place BEFORE the instrument panels are glued in--a luxury you won't get with a pre-built. This way his big feet are already past the instrument panels. I did enough test fits/trims to be sure he is going to fit. He clears the canopy hood also. He fits with his feet right up to the rudder pedals.
The down side? I spent a lot of time detailing the interior and after a dry fit with the fuselage halves closed you can't see anything but the top half of the pilot!

Oh well, I know it's in there. Once the halves are glued together, I don't think he will come out. I just think the detailed pilot is too nice not to use and it saves me from trying to make or purchase detailed belts and harnesses.


Re: FW 190 as a kit
Posted: Mon Jul 09, 2018 7:21 pm
by tmanthegreat
Looking good, Axis!
That is the BBI BF-109G pilot and the figure itself is a little under scaled. On my prebuilt FW-190A5, I used the top half of a spare 21st FW-190/BF-109G pilot figure, the one in the black flightsuit with the parachute straps. It fit in realistically though doesn’t have the legs (not that you could really see them anyways).
I’m eager to see how the rest of your build progresses.
A couple pointers that may make painting easier that I learned the hard way:
* Keep the wings separate from the main fuselage until painted; same with the horizontal stabilizers. That will help with some of the masking on the fuselage.
* You should be able to glue the engine cowling to the fuselage and still attach the wings later. The nearly identical prebuilt model came with the wings and stabilizers unattached so they should be able to snap in place on a near-finished model.
* The gaps between the wings and fuselage are a bit large and difficult to fill, so you almost have to just leave them there - this was originally a toy after all. The fit on some of the other parts is pretty good however.
Re: FW 190 as a kit
Posted: Tue Jul 10, 2018 3:14 am
by normandy
Nice choise for the pilot Axis, I've seen this BBI figure but never owned one. I've used the 21st Stuka
pilots in a few of custom planes but the figures with the belts and harness equipment make a big difference.
I'll stay tuned...

Re: FW 190 as a kit
Posted: Tue Jul 10, 2018 4:00 am
by USCGMK2
I like how you did the pilot install Axis. I just ordered my A-8 yesterday and got lucky with free shipping, but it shall sit in the box along with the A-5 for now. I wonder what their future plans are for these? An 190F with a torpedo would be cool, I wonder if they'll go as far as doing a Dora, probably not but I'd like one.
Re: FW 190 as a kit
Posted: Wed Jul 11, 2018 10:23 am
by Axis Nightmare
Thanks for the tips T-man. As it turns out I had already attached the wing. I scraped and trimmed and test fit again and again to get the most flush fit I could as well as a good dihedral and am pretty satisfied with the results. The flat winged no dihedral prebuilts from over the years used to drive me nuts.

For a plane this size, the gap is not bad at all. I can certainly live with it. Note the pilot is missing! I turned the plane upside down and he fell out.

I thought sure it wouldn't go back in without a fight but I must have trimmed off more than I thought because he does in fact slip in and out smooth as silk. I still might leave off the stabilizers and even the cowl (mostly because of the yellow panel) for painting. Still don't know why they refuse to mold the clear separate from the canopy frames. Especially as a big and expensive as this plane.

What a difference that would make. I also scored the outlines for the attach clamps on the cowling gun bay cover. They were almost invisible as they were but should be seen. As always, the painting will be the real challenge!

Re: FW 190 as a kit
Posted: Wed Jul 11, 2018 2:35 pm
by tmanthegreat
This FW-190 kit itself is really very simple - around 150 parts, not too many tiny details, generally good part fit. it’s just getting the painting to look right that has been my challenge, though my FW-190A5 looks far better than the pics I posted a few months ago! I think I’ve finally just settled on something and after a few more touch ups, it is nearly ready to go for sealing, decals, and weathering. In truth, I feel I should have been done with my FW-190 6-8 months ago, but a new job and work schedule really killed my model building productivity compared to this time last year.
Re: FW 190 as a kit
Posted: Wed Aug 22, 2018 8:35 am
by tmanthegreat
A little bit of an update...
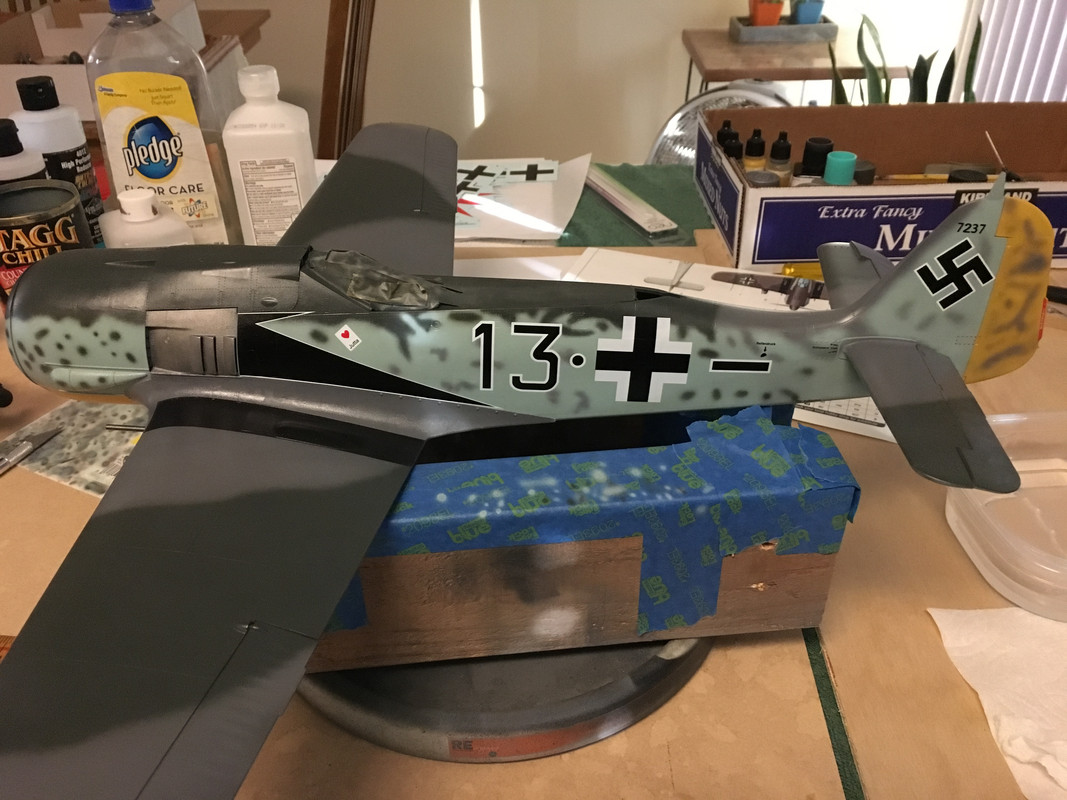
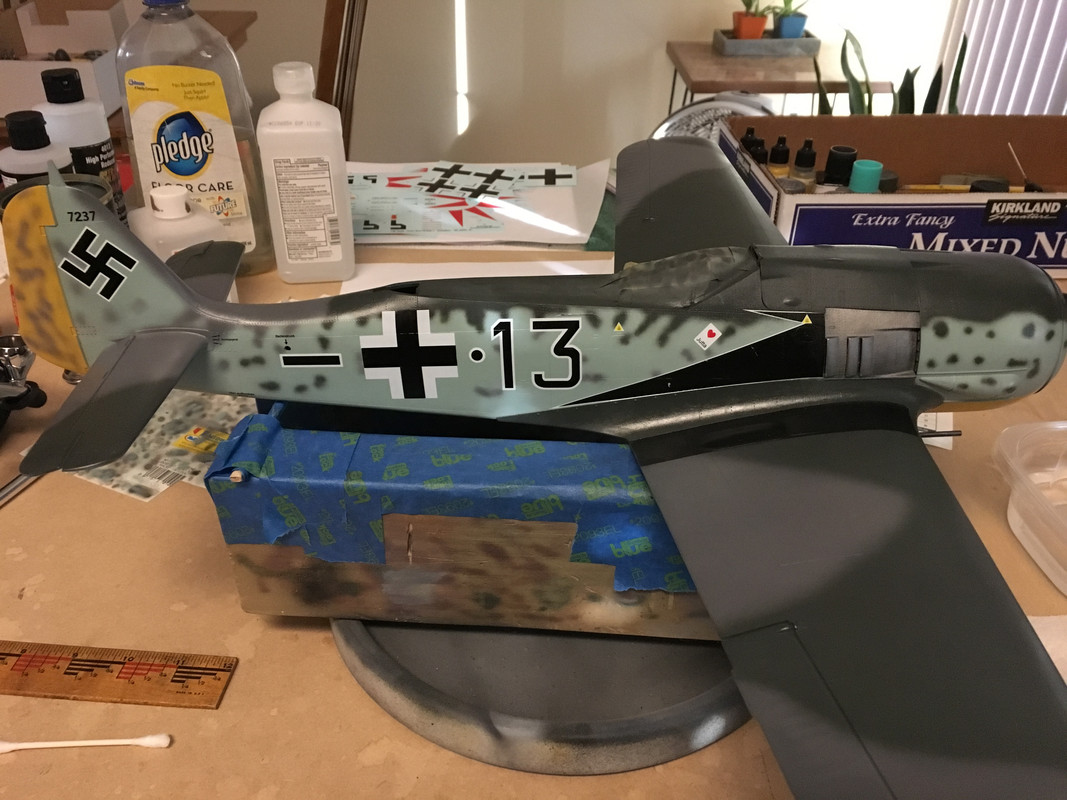
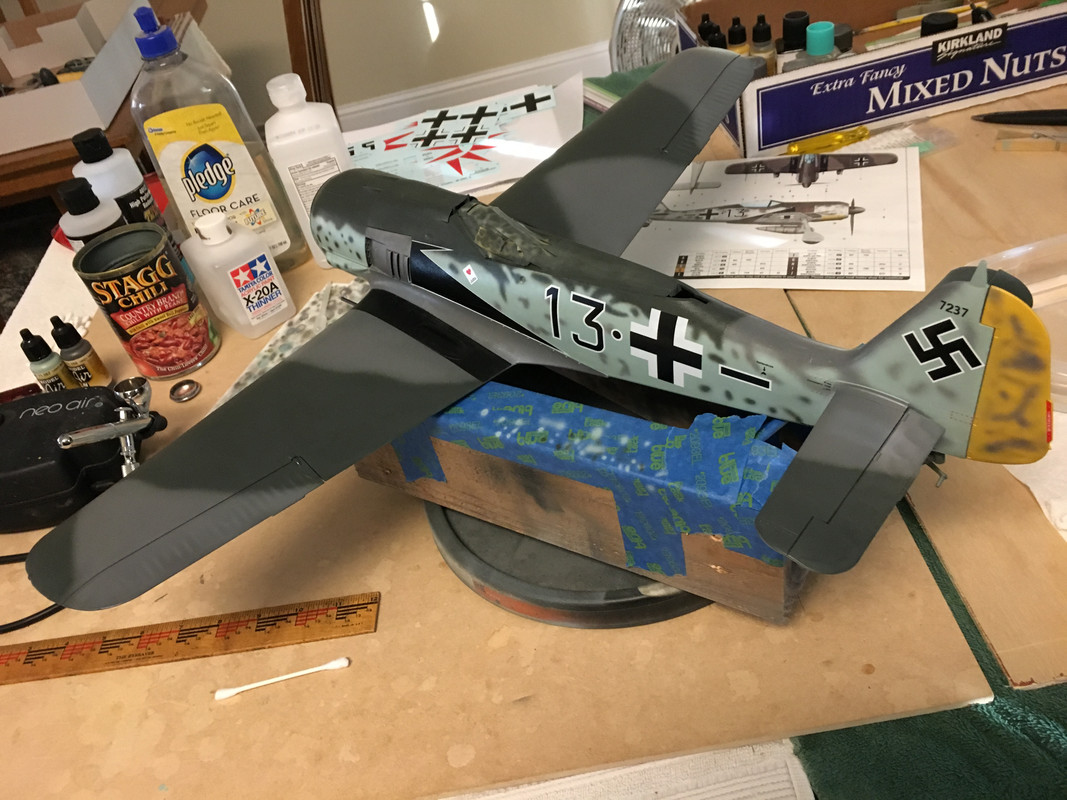
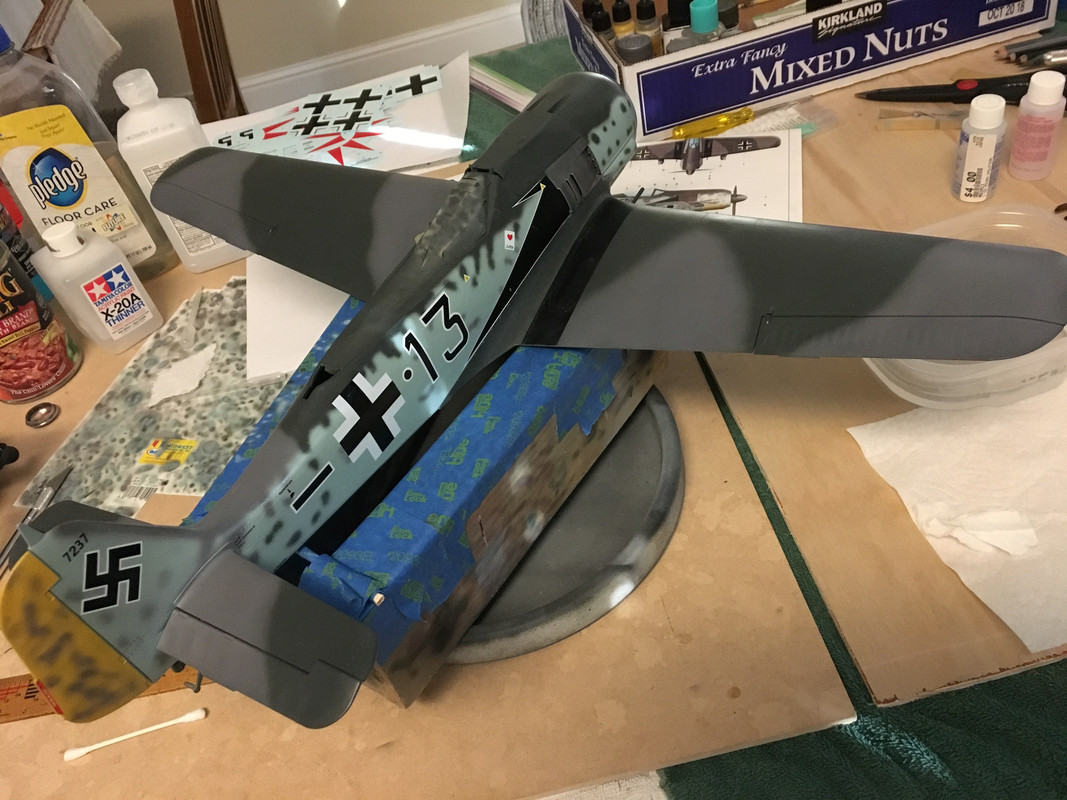
I’ve finally gotten to the decal application stage on my Priller FW-190. The Hobby Boss decals are large and a bit thick, which makes them easier to work with, but also presents some challenges... The decals are more difficult to smoothly blend with the surfaces and the large size and irregular shape of some of the markings can be difficult to work with as well... On my model, I found that applying a gloss base using thinned future floor wax (klear) before decal application helped, as has use of the Micro Set setting solution and repeated applications of the Micro Sol decal softening solution.
Also, be sure to remove the tape off the back of the decal sheets where the manufacturer secured the protective tissue paper over the sheet (I have no idea why they used tape). Any tape left on the back of the decal paper under a marking can inhibit the proper soaking of the decal, as I learned the hard way with a prominent marking on my model. Thankfully I was able to largely fix the decal - the sturdy texture was a godsend in that case as it meant the decal didn’t sliver or tear while I worked to smooth it out. While there are a couple small abrasions, I plan to cover those eventually with some black paint or weathering...
I’ll post some progress pics when I’m a little further along.
Re: FW 190 as a kit
Posted: Fri Aug 24, 2018 10:20 am
by tmanthegreat
Re: FW 190 as a kit
Posted: Fri Aug 24, 2018 11:07 am
by Axis Nightmare
I don't think you're giving yourself enough credit. That looks amazing! Congratulations on the paint job. I hope mine is half that good!
Re: FW 190 as a kit
Posted: Fri Aug 24, 2018 11:58 am
by tmanthegreat
Thanks Axis

I’m sure you will do fine on yours in the end, you just have to keep working at it. For me, it took a LOT of practice and time. I would try something, it wouldn’t sit well with me, I would repaint, and try again... The challenge was that Priller’s plane had a sloppy paint job and I had to make my work look sloppy without being sloppy (if you get my drift) all while trying to keep the paint job as accurate to the real plane as I could. The starboard side is more conjecture however, as no photos exist of the plane from that angle.
I’ll post more in the coming weeks as this project heads toward competition, but I’m also eager to see the work of other board members
Re: FW 190 as a kit
Posted: Sun Sep 09, 2018 4:45 pm
by tmanthegreat
My Priller FW-190 is finished!!
This took way too long, but I am very happy with the end results
The Hobby Boss kit has its flaws, but was an overall easy build and provided me an excellent "canvass" to try my hand at painting a Luftwaffe scheme as well as some new weathering and finishing techniques.
The aircraft replicates the FW-190A-5 "Black 13/Jutta" flown by Major Josef "Pips" Priller, Geshwaderkommadore of JG-26, in May-June 1943 in France. It was camouflaged in the standard Luftwaffe day fighter colors, RLM 74 gray green, RLM 75 gray-violet, RLM 76 light blue with the spinner being green RLM 70 and the rudder and underside of the engine cowling being yellow RLM 04, somewhat mottled with RLM 75. You can see the stylized eagle's wing design applied along the exhaust area and Priller's personal "Jutta" nose art. My model has been fitted with the centerline rack and 300 liter drop tank.
I've posted some photos, including a diorama replicating the famous photo of this aircraft. Enjoy


Cockpit Interior:

Comparison shot with the Merit Prebuilt FW-190A-5:

Priller Legacy - 21c XD FW-190D9 and the Hobby Boss FW-190A:

Diorama Photos
(I don't have a model of Priller's BMW 327, so a Kubelwagen had to stand in

)


The historical photo of Priller's FW-190A-5, upon which this model is based:

Re: FW 190 as a kit
Posted: Sun Sep 09, 2018 5:11 pm
by Axis Nightmare
You should indeed be proud of your work. I hope to get back to my A-8 soon.
Re: FW 190 as a kit
Posted: Mon Sep 10, 2018 11:39 am
by Crazy Kraut
WOW
really excellent work. Congrats for this Beauty.
Re: FW 190 as a kit
Posted: Mon Sep 10, 2018 2:26 pm
by cnq
Excellent work. I like it.
I have not built a 1/18 model yet until I get a larger work bench
Re: FW 190 as a kit
Posted: Tue Sep 11, 2018 9:02 am
by tmanthegreat
Thanks everyone for the kind comments
Personally, I’m really happy with how the plane came out in the end, and there were a lot of times I felt it might become a disaster! It took a bit of time to perfect the paint job (namely the mottling) so that it looked more or less correct, and had that sloppy look without actually being sloppy, if you get what I mean
It was all good practice in the end and boosted my confidence...
I can’t wait to see what other members that got this kit (or the A-8 version) are able to do!