Hello all,
I finally started a couple of weeks ago a project, that has been in the planning stage for a very long time... a Ta152H-0/H-1 in 1/18 scale! This is my first custom project in 1/18, so there will be a lot for me to learn during the construction. I wanted to share this thing with the forum, which has been a great source of inspiration to me, and also great source for splendid new additions to my humble collection (Pickelhaube's Ho229A-0 and JNewboy's Fw190D-11 to mention a few).
I'll start unfolding the project with a plenty of photos in the coming posts...
Ye Olde Finn,
aka. Juha from Finland
1/18 Ta152H custom - work in progress...
-
Ye Olde Finn
- Private First Class

- Posts: 21
- Joined: Tue Oct 01, 2013 12:18 am
-
Ye Olde Finn
- Private First Class
- Posts: 21
- Joined: Tue Oct 01, 2013 12:18 am
Re: 1/18 Ta152H custom - work in progress...
So, let's start off with the planning...
First of all, when comparing the various evolutions of the same bird, namely the...
- Fw190D-9/11/13
- Ta152C-0/1
- Ta152H-0/1
...we notice, that the fuselage of all these three variations builds up from exactly the very same parts on the area between: the engine aft-firewall and the fuselage aft-end extension-plug, just before the empennage assembly.

So this area may be used fully from a Fw190D-9 fuselage.
Further, if we superimpose a Fw190D-9 and a Ta152H-0 on top of each other, for both the fuselage and the wing we see the areas where the structures differ:


So again, most of the wing of a Fw190D-9 is usable and also the Jumo213 engine assembly is usable, it just needs to be moved a bit...
Here comparing a disassembled Fw190D-9 wing with the plan:


Continued in the next post...
First of all, when comparing the various evolutions of the same bird, namely the...
- Fw190D-9/11/13
- Ta152C-0/1
- Ta152H-0/1
...we notice, that the fuselage of all these three variations builds up from exactly the very same parts on the area between: the engine aft-firewall and the fuselage aft-end extension-plug, just before the empennage assembly.
So this area may be used fully from a Fw190D-9 fuselage.
Further, if we superimpose a Fw190D-9 and a Ta152H-0 on top of each other, for both the fuselage and the wing we see the areas where the structures differ:
So again, most of the wing of a Fw190D-9 is usable and also the Jumo213 engine assembly is usable, it just needs to be moved a bit...
Here comparing a disassembled Fw190D-9 wing with the plan:
Continued in the next post...
Last edited by Ye Olde Finn on Tue Jul 19, 2016 11:54 am, edited 1 time in total.
-
Ye Olde Finn
- Private First Class
- Posts: 21
- Joined: Tue Oct 01, 2013 12:18 am
Re: 1/18 Ta152H custom - work in progress...
I started modifying the wings first. One pair of wings is needed for the wing root/main area, and another set for making the new wingtips. The required modifications are:
1) Cutting the tips off of the root/main wings and ailerons. These "short" ailerons will become the inner ailerons. These ailerons will retain their functionality.
2) Cutting (longer) tips off the other set of wings for making the new wingtips. These need to be cut in two also longitudinally and the thickness of the skins needs to be sanded down and adjusted until correct shape and thickness is achieved. In order to have a nice even aerodynamic continuity for the whole new wing span.
3) The parts cut off before from the inner ailerons are added to the other pair of ailerons to make the outer "long" ailerons. I didn't make these functional, but it would have been possible.
4) The wingtip-end shape has to be altered also, here with putty:


To be continued...
1) Cutting the tips off of the root/main wings and ailerons. These "short" ailerons will become the inner ailerons. These ailerons will retain their functionality.
2) Cutting (longer) tips off the other set of wings for making the new wingtips. These need to be cut in two also longitudinally and the thickness of the skins needs to be sanded down and adjusted until correct shape and thickness is achieved. In order to have a nice even aerodynamic continuity for the whole new wing span.
3) The parts cut off before from the inner ailerons are added to the other pair of ailerons to make the outer "long" ailerons. I didn't make these functional, but it would have been possible.
4) The wingtip-end shape has to be altered also, here with putty:
To be continued...
Last edited by Ye Olde Finn on Tue Jul 19, 2016 11:57 am, edited 1 time in total.
-
Jnewboy
- Officer - Brigadier General

- Posts: 2124
- Joined: Mon Dec 13, 2010 1:46 am
- Location: California
- Contact:
Re: 1/18 Ta152H custom - work in progress...
Good to hear from you! I love your new project!! Looks fantastic!!

-
pickelhaube
- Officer - Brigadier General
- Posts: 9647
- Joined: Mon Jan 22, 2007 5:52 am
- Location: New Orleans
Re: 1/18 Ta152H custom - work in progress...
Looking good so far.
You may want to consider using Bondo for your filler . It is 2 part and sets up pretty quick so there is no need to wait.
You can continue building without having to wait over night.
It sands pretty easy as well.
It is also cheap.
You may want to consider using Bondo for your filler . It is 2 part and sets up pretty quick so there is no need to wait.
You can continue building without having to wait over night.
It sands pretty easy as well.
It is also cheap.
Kirk Douglas : Mine hit the ground first
John Wayne : Mine was taller

John Wayne : Mine was taller

Re: 1/18 Ta152H custom - work in progress...
How funny, I have just been gathering the info to do the same. The Ta 152H has been a favorite of mine for ages and will look great in 1/18th.
If you do a bit of searching on the net someone started the same conversion some years back and there are good references from modelers who converted 1/32 Fw 190D's into TA 152s.
Will definately keep track of this one
If you do a bit of searching on the net someone started the same conversion some years back and there are good references from modelers who converted 1/32 Fw 190D's into TA 152s.
Will definately keep track of this one
-
normandy
- Officer - Brigadier General
- Posts: 6028
- Joined: Mon Oct 04, 2004 6:30 pm
- Location: Atlantic Coast
Re: 1/18 Ta152H custom - work in progress...
Welcome to the site! This looks like a great custom in the works.
-
Ye Olde Finn
- Private First Class
- Posts: 21
- Joined: Tue Oct 01, 2013 12:18 am
Re: 1/18 Ta152H custom - work in progress...
And the story continues...
Here's the wing assembly after bonding the "long" outer ailerons to the new wingtips plus bonding the complete wingtips to the main wing...

...now we put the wing assy away for a while and start modifying the fuselage.
The needed modifications here are as follows:
1) Cut the engines away from both the models so, that you get roughly a 35 mm (1.378 inch) extension to the front fuselage ("short" cut to one engine, "long" cut to the other) see the photos below and the drawing earlier on. You also need thick slices of plastic (from the "donor" plane) in order to make a lap-joint. Also, carefully position the loose engine and the rest of the fuselage on top of 1/18 scale drawing in order to find the correct vertical position & angle to the engine, then bond.

2) As visible in the above photo, the aft-part of the wing-to-fuselage fillet has to be cut open and the fillet front-end lowered, this in order to meet the engine-side part of the fillet. Naturally this creates angular wedge-shape gaps to both fuselage sides, that need to be filled. I made this operation by cutting the fuselage sides with hot needle just above the fillet upper line and bonding angled-wedge -shaped plastic parts to the gaps (these coming again from the donor plane).
Before lowering the aft-fillet:

After lowering the aft-fillet, plus bonding the gap-fillers and applying some putty:

Next is the modification of the cowling area in front of the cockpit. Both the MG access cowl-hatches (we need two here) need to be taken loose (from both the planes) and modified to "flat" surfaces by removing the bulges of the Dora's machine guns. When flattened these can be slightly re-shaped and aligned in order to form a continuous upper cowl shape. Putty or equal is also needed here to close all the small gaps and in order to smoothen the general surface:

Next up, vertical tail and continuing with the wing assy...
Here's the wing assembly after bonding the "long" outer ailerons to the new wingtips plus bonding the complete wingtips to the main wing...
...now we put the wing assy away for a while and start modifying the fuselage.
The needed modifications here are as follows:
1) Cut the engines away from both the models so, that you get roughly a 35 mm (1.378 inch) extension to the front fuselage ("short" cut to one engine, "long" cut to the other) see the photos below and the drawing earlier on. You also need thick slices of plastic (from the "donor" plane) in order to make a lap-joint. Also, carefully position the loose engine and the rest of the fuselage on top of 1/18 scale drawing in order to find the correct vertical position & angle to the engine, then bond.
2) As visible in the above photo, the aft-part of the wing-to-fuselage fillet has to be cut open and the fillet front-end lowered, this in order to meet the engine-side part of the fillet. Naturally this creates angular wedge-shape gaps to both fuselage sides, that need to be filled. I made this operation by cutting the fuselage sides with hot needle just above the fillet upper line and bonding angled-wedge -shaped plastic parts to the gaps (these coming again from the donor plane).
Before lowering the aft-fillet:
After lowering the aft-fillet, plus bonding the gap-fillers and applying some putty:
Next is the modification of the cowling area in front of the cockpit. Both the MG access cowl-hatches (we need two here) need to be taken loose (from both the planes) and modified to "flat" surfaces by removing the bulges of the Dora's machine guns. When flattened these can be slightly re-shaped and aligned in order to form a continuous upper cowl shape. Putty or equal is also needed here to close all the small gaps and in order to smoothen the general surface:
Next up, vertical tail and continuing with the wing assy...
Last edited by Ye Olde Finn on Tue Jul 19, 2016 12:02 pm, edited 1 time in total.
-
Ye Olde Finn
- Private First Class
- Posts: 21
- Joined: Tue Oct 01, 2013 12:18 am
Re: 1/18 Ta152H custom - work in progress...
Rolling forward with full steam... now towards the vertical tailplane.
This is the easiest part of the mod. Just cut the antenna stud away and apply more material to the leading edge upper corner of the tailplane. I did this completely with putty, I think it needed three layers (I use a specific putty from hardware store, it's meant for fixing the house (walls or floors or anything) ...works brilliantly with plastic models too. It dries in a couple of hours). Here are some shots:


This is fairly easy as the fuselage may be positioned on top of the drawing (or vica versa) until the correct shape has been achieved.
Now we get back to the wing assy.
1) We still need to add more material to the wing root area trailing edges. Actually we need to make the flaps trailing edges more angled - see the earlier wing drawing comparison for details. I made this mod by removing the flaps from the donor plane and carving two (LH and RH) thick wedges out of these. Again, some putty is needed after bonding.
2) Secondly we need to extend the aft-extension -part of the wing assy, which goes below the aft fuselage. Here we can take the equal section from the donor plane and just extend the extension. If you do this carefully, you can actually use the screw to fasten the wing assy to the fuselage from this new extension part...


After all this we are already over half-way...
Now we can finally bond (and screw) the wing assy to the fuselage assy and apply putty over the bondlines in order to dilute all gaps:


Coming next... making the wing trailing edge large fillet shape that meets the fuselage, modifying the engine ram-air scoop, modding the landing gear doors and adding some details...
This is the easiest part of the mod. Just cut the antenna stud away and apply more material to the leading edge upper corner of the tailplane. I did this completely with putty, I think it needed three layers (I use a specific putty from hardware store, it's meant for fixing the house (walls or floors or anything) ...works brilliantly with plastic models too. It dries in a couple of hours). Here are some shots:
This is fairly easy as the fuselage may be positioned on top of the drawing (or vica versa) until the correct shape has been achieved.
Now we get back to the wing assy.
1) We still need to add more material to the wing root area trailing edges. Actually we need to make the flaps trailing edges more angled - see the earlier wing drawing comparison for details. I made this mod by removing the flaps from the donor plane and carving two (LH and RH) thick wedges out of these. Again, some putty is needed after bonding.
2) Secondly we need to extend the aft-extension -part of the wing assy, which goes below the aft fuselage. Here we can take the equal section from the donor plane and just extend the extension. If you do this carefully, you can actually use the screw to fasten the wing assy to the fuselage from this new extension part...
After all this we are already over half-way...
Now we can finally bond (and screw) the wing assy to the fuselage assy and apply putty over the bondlines in order to dilute all gaps:
Coming next... making the wing trailing edge large fillet shape that meets the fuselage, modifying the engine ram-air scoop, modding the landing gear doors and adding some details...
Last edited by Ye Olde Finn on Tue Jul 19, 2016 12:18 pm, edited 1 time in total.
-
Jnewboy
- Officer - Brigadier General
- Posts: 2124
- Joined: Mon Dec 13, 2010 1:46 am
- Location: California
- Contact:
Re: 1/18 Ta152H custom - work in progress...
Looks great!! I may have to try this someday!
You may want to remove the glass or tape over it to protect it during sanding. Keep up the great work!
You may want to remove the glass or tape over it to protect it during sanding. Keep up the great work!
-
supersonicfifi
- Officer - Colonel

- Posts: 1269
- Joined: Wed Jun 01, 2005 2:47 pm
- Location: FRANCE
Re: 1/18 Ta152H custom - work in progress...
You CAN pull a little down the rear wheel of th fw190 it looks better not many seems To notice that it s possible
1/18 mirage 2000 & RAFALE should i say more ?
-
Ye Olde Finn
- Private First Class
- Posts: 21
- Joined: Tue Oct 01, 2013 12:18 am
Re: 1/18 Ta152H custom - work in progress...
Hi again!
Some last items before painting...
1) The engine air intake scoop modifications: I pulled the Dora's scoop off the fuselage and added new material with putty until desired shape was attained (adding, sanding, checking, more adding, more sanding, more checking... you know the stuff). Furthermore I reshaped the air intake frontal face with hand-held power-tool and added some plastic wire-mesh inside it. Here are some photos:


2) Now I notice, I didn't take proper photos of all the final phases, so I don't have a good photo showing the modification of the wing trailing edge fillet shape. But, basically, a fairly large new fillet shape is needed here, which I made out of the donor planes flap parts... Once again, some putty is needed after bonding.
Here's a photo before:
And after:

3) Some small details to the bottom of the plane were:
- adding the main landing gear inner doors
- reshaping the main landing gear well's trailing edges (to a rectangular corner shape), so that these new inner doors would (theoretically) fit in
- cutting holes for 20 mm (wing) and 30 mm (engine) cannon ammo ejector chutes
- adding the whip aerial for FuG16
I also left the auxiliary fuel tank rack mounting holes intact, if I want to add it later (the Ta152H had this capability, even though there are no historical photos showing it ever used...at least I haven't seen one).


In the next episode: the paint-job...
Some last items before painting...
1) The engine air intake scoop modifications: I pulled the Dora's scoop off the fuselage and added new material with putty until desired shape was attained (adding, sanding, checking, more adding, more sanding, more checking... you know the stuff). Furthermore I reshaped the air intake frontal face with hand-held power-tool and added some plastic wire-mesh inside it. Here are some photos:
2) Now I notice, I didn't take proper photos of all the final phases, so I don't have a good photo showing the modification of the wing trailing edge fillet shape. But, basically, a fairly large new fillet shape is needed here, which I made out of the donor planes flap parts... Once again, some putty is needed after bonding.
Here's a photo before:
And after:
3) Some small details to the bottom of the plane were:
- adding the main landing gear inner doors
- reshaping the main landing gear well's trailing edges (to a rectangular corner shape), so that these new inner doors would (theoretically) fit in
- cutting holes for 20 mm (wing) and 30 mm (engine) cannon ammo ejector chutes
- adding the whip aerial for FuG16
I also left the auxiliary fuel tank rack mounting holes intact, if I want to add it later (the Ta152H had this capability, even though there are no historical photos showing it ever used...at least I haven't seen one).
In the next episode: the paint-job...
Last edited by Ye Olde Finn on Tue Jul 19, 2016 12:24 pm, edited 3 times in total.
-
Ye Olde Finn
- Private First Class
- Posts: 21
- Joined: Tue Oct 01, 2013 12:18 am
Re: 1/18 Ta152H custom - work in progress...
I started the actual work Sept.01.2013... so after roughly a month we have a new custom aircraft template. I'm quite satisfied with the results, even though there are some shortcomings for the purists...
1) The canopy sliding part and the propeller blades of a Fw190D are not exactly the same as with Ta152H. I can accept this minor inaccuracy.
2) I left all the aileron trim tabs as they were in the Fw190D (i.e. protruding from the wing trailing edges)... in a Ta152H they seem to be exactly even with the trailing edges. Again, I think they look nicer like this, but it would have been easy to cut them off...
3) THE MAJOR INACCURACY is in the way how I did the wing: as you can check from the superimposed wing plan, the dimensions & shapes I did are correct, BUT the wing total span IS SLIGHTLY TOO SMALL: In a correct model it needs to be 800 mm (31.5 inches), my method ends up with 778 mm (30.6 inches). Why is this so? Because the Ta152H wing roots are actually longer than the ones a Fw190D used (Fw190D didn't have inner landing gear doors).
IF YOU WANT TO CORRECT THIS: you need to cut the wing in two from the centerline: add new wing spars (to get the rigidity back) and add new material to the centerline bottom area of the wings. I initially considered to do also this mod, but then I came to the conclusion that it is way much easier to make the the wing-to-fuselage fillets if at least some of the mating shapes are directly fittable...
Here are photos of the structurally finished bird - judge by yourselves if you can spot the inaccuracies...


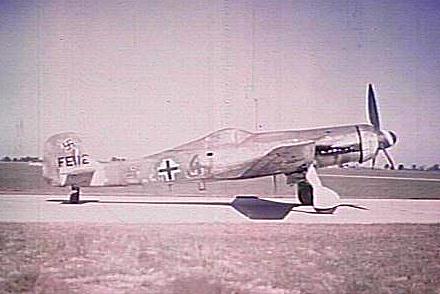
I plan to finish this bird as "Green 6" of Stab-flight of JG301. Here's an old RAF captured equipment listing document extract, which reveals the Werk Nummer as 150004:

There is also a famous photo of her as captured in Leck (without the prop blades) for example in Hitchcock's "The Focke-Wulf Ta152" monolith on pages 116-117.
Actually I would like to ask from you, if anyone would be willing to help me a bit with the custom stencils? I would need:
- 2 pcs white outline crosses (1000mm -type) for the wing upper surfaces
- 2 pcs black outline crosses (1000mm -type) for the wing lower surfaces
- 2 pcs black outline crosses (800mm -type) for the fuselage sides
- 2 pcs "Green 6" individual AC ident. numbers
Ye Olde Finn,
aka. Juha from Finland
1) The canopy sliding part and the propeller blades of a Fw190D are not exactly the same as with Ta152H. I can accept this minor inaccuracy.
2) I left all the aileron trim tabs as they were in the Fw190D (i.e. protruding from the wing trailing edges)... in a Ta152H they seem to be exactly even with the trailing edges. Again, I think they look nicer like this, but it would have been easy to cut them off...
3) THE MAJOR INACCURACY is in the way how I did the wing: as you can check from the superimposed wing plan, the dimensions & shapes I did are correct, BUT the wing total span IS SLIGHTLY TOO SMALL: In a correct model it needs to be 800 mm (31.5 inches), my method ends up with 778 mm (30.6 inches). Why is this so? Because the Ta152H wing roots are actually longer than the ones a Fw190D used (Fw190D didn't have inner landing gear doors).
IF YOU WANT TO CORRECT THIS: you need to cut the wing in two from the centerline: add new wing spars (to get the rigidity back) and add new material to the centerline bottom area of the wings. I initially considered to do also this mod, but then I came to the conclusion that it is way much easier to make the the wing-to-fuselage fillets if at least some of the mating shapes are directly fittable...
Here are photos of the structurally finished bird - judge by yourselves if you can spot the inaccuracies...
I plan to finish this bird as "Green 6" of Stab-flight of JG301. Here's an old RAF captured equipment listing document extract, which reveals the Werk Nummer as 150004:
There is also a famous photo of her as captured in Leck (without the prop blades) for example in Hitchcock's "The Focke-Wulf Ta152" monolith on pages 116-117.
Actually I would like to ask from you, if anyone would be willing to help me a bit with the custom stencils? I would need:
- 2 pcs white outline crosses (1000mm -type) for the wing upper surfaces
- 2 pcs black outline crosses (1000mm -type) for the wing lower surfaces
- 2 pcs black outline crosses (800mm -type) for the fuselage sides
- 2 pcs "Green 6" individual AC ident. numbers
Ye Olde Finn,
aka. Juha from Finland
Last edited by Ye Olde Finn on Tue Jul 19, 2016 11:50 am, edited 2 times in total.

-
pickelhaube
- Officer - Brigadier General
- Posts: 9647
- Joined: Mon Jan 22, 2007 5:52 am
- Location: New Orleans
Re: 1/18 Ta152H custom - work in progress...
Hey Juha,
Any updates ?
PM me about the stencils .
Any updates ?
PM me about the stencils .
Kirk Douglas : Mine hit the ground first
John Wayne : Mine was taller
John Wayne : Mine was taller
-
Ye Olde Finn
- Private First Class
- Posts: 21
- Joined: Tue Oct 01, 2013 12:18 am
Re: 1/18 Ta152H custom - work in progress...
Hello again...
I've been "silent" for some weeks now. This has been due to work/travelling, so no progress to report with the Ta152. But, last weekend I managed to get back to the project... so next step was the painting.
First some shots of the maskings before painting the bottom surfaces (with RLM76)...

...and then after:


Then progressing towards the upper surfaces, here a combination of RLM82 and RLM83
(I used the Ta152H-0 factory camouflage pattern as given in Hitchcock pages 108-109)


...then adding the tailband for JG301 (red+yellow):


I used mostly Tamiya-colours with a simple spaygun (too simple actually, I should have bought a more decent one, this cost me only 25 usd).
The swastikas are from 21st Century Fw190D decal set and the fuselage crosses are made of old 1:48 scale Ju88 wing cross decals...
Mr. Pickel kindly promised to send me the big crosses for the wings, but I understand he was quite recently wounded in action .
.
Some more detail paintwork I still need to do are:
- Engine exhaust stack-panel background to black
- Inner landing gear door insides to gray-green
- Propeller blades into dark-green (RLM70)
- Bright green bar over the yellow-red tailband
- Bright green individual AC ident. numbers to fuselage sides
- Engine exhaust fume stains
- Cannon & empty cartridge ejector stains...
Coming up in the next episode: closing the project and having a group photoshoot with collection-mates...
I've been "silent" for some weeks now. This has been due to work/travelling, so no progress to report with the Ta152. But, last weekend I managed to get back to the project... so next step was the painting.
First some shots of the maskings before painting the bottom surfaces (with RLM76)...
...and then after:
Then progressing towards the upper surfaces, here a combination of RLM82 and RLM83
(I used the Ta152H-0 factory camouflage pattern as given in Hitchcock pages 108-109)
...then adding the tailband for JG301 (red+yellow):
I used mostly Tamiya-colours with a simple spaygun (too simple actually, I should have bought a more decent one, this cost me only 25 usd).
The swastikas are from 21st Century Fw190D decal set and the fuselage crosses are made of old 1:48 scale Ju88 wing cross decals...
Mr. Pickel kindly promised to send me the big crosses for the wings, but I understand he was quite recently wounded in action
Some more detail paintwork I still need to do are:
- Engine exhaust stack-panel background to black
- Inner landing gear door insides to gray-green
- Propeller blades into dark-green (RLM70)
- Bright green bar over the yellow-red tailband
- Bright green individual AC ident. numbers to fuselage sides
- Engine exhaust fume stains
- Cannon & empty cartridge ejector stains...
Coming up in the next episode: closing the project and having a group photoshoot with collection-mates...
Last edited by Ye Olde Finn on Tue Jul 19, 2016 11:45 am, edited 1 time in total.

Re: 1/18 Ta152H custom - work in progress...
You made a reference earlier that the TA 152H was designed to carry an extra tank centerline, but that there was no "proof" of one ever doing it. Sorry, but not true. Your design to include is indeed accurate....I don't know the owner, but you might check this photo out. It is aledged to be a TA 152H-0 and clearly shows the centerline tank attached.
http://img130.imageshack.us/img130/6622/ta152h115ld.jpg
Found another one for you...
https://i.ytimg.com/vi/UTUha-wVsq0/mqdefault.jpg
http://img130.imageshack.us/img130/6622/ta152h115ld.jpg
Found another one for you...
https://i.ytimg.com/vi/UTUha-wVsq0/mqdefault.jpg
US Army MP Corps combat veteran Operation Desert Shield/Desert Storm
-
greendevil41
- Corporal

- Posts: 68
- Joined: Thu Jun 30, 2011 11:22 pm
Re: 1/18 Ta152H custom - work in progress...
This is really a well researched and well executed project. To your "to do" list I would add filling in those holes in the main gear doors and get a better airbrush. That plane deserves a super nice paint job! Whats your next project?
-
supersonicfifi
- Officer - Colonel
- Posts: 1269
- Joined: Wed Jun 01, 2005 2:47 pm
- Location: FRANCE
Re: 1/18 Ta152H custom - work in progress...
nice ! really cool plane !
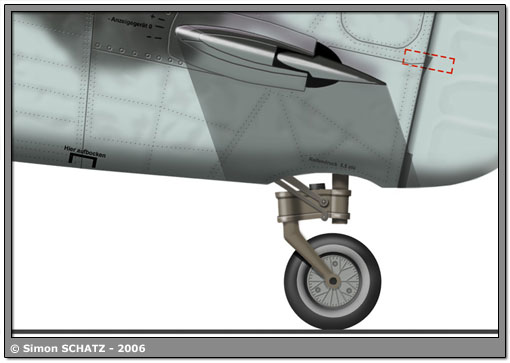
if you can take care of the tail wheel : it is slightly moveable as seen on this picture :

Your plane will have a better stance ! Well done

if you can take care of the tail wheel : it is slightly moveable as seen on this picture :
Your plane will have a better stance ! Well done
1/18 mirage 2000 & RAFALE should i say more ?
-
Ye Olde Finn
- Private First Class
- Posts: 21
- Joined: Tue Oct 01, 2013 12:18 am
Re: 1/18 Ta152H custom - work in progress...
Hi!
Thanks for all for the nice feedback and reference contributions!
I will definitively check the tailwheel adjustability. I also agree the (main wheel shaft pin) holes in the main landing gear leg doors need to be filled and painted over...I'll add that to my to-do-list too.
Also thanks for pointing out the reference photos of auxiliary fuel tank actually fitted under a Ta152!
-
normandy
- Officer - Brigadier General
- Posts: 6028
- Joined: Mon Oct 04, 2004 6:30 pm
- Location: Atlantic Coast
Re: 1/18 Ta152H custom - work in progress...
Finn, Your doing a fantastic job on your 152!!! Very Cool.
-
supersonicfifi
- Officer - Colonel
- Posts: 1269
- Joined: Wed Jun 01, 2005 2:47 pm
- Location: FRANCE
Re: 1/18 Ta152H custom - work in progress...
For the tailwheel take care To move it carefully ..... Well done
1/18 mirage 2000 & RAFALE should i say more ?
-
Ye Olde Finn
- Private First Class
- Posts: 21
- Joined: Tue Oct 01, 2013 12:18 am
Re: 1/18 Ta152H custom - work in progress...
Hello again!
Finally I've progressed with the last details...
Some additional paintwork/finishing/stenciling has now been completed:
1) For the landing gears:
- Main landing gear leg door pin holes closing with plugs + filling + painting over
- Main landing gear inner door insides to gray-green
- Tailwheel adjustment to a more proper height
2) Fuselage sides detailing:
- Engine exhaust stack-panel background to black
- Bright green bar over the yellow-red tailband
- Bright green individual AC ident. numbers to fuselage sides (just hand painted)
3) Stains & wiring:
- Engine exhaust fume stains
- Cannon & empty cartridge ejector stains (under the wings)
- Aerial wire between the canopy and vertical tail tip
The very last items I'm still missing are:
- Werknummers to vertical tail sides (the current ones are obviously too small )
)
- Wing upper and lower crosses - any updates on these Pickel?
- The cockpit ladder extension part to white/red stripes
- Maybe painting the propeller blades - or just leaving them as they are (black)
So, here are some photos of the current status:


Greetings from snowy Finland,
Juha
Finally I've progressed with the last details...
Some additional paintwork/finishing/stenciling has now been completed:
1) For the landing gears:
- Main landing gear leg door pin holes closing with plugs + filling + painting over
- Main landing gear inner door insides to gray-green
- Tailwheel adjustment to a more proper height
2) Fuselage sides detailing:
- Engine exhaust stack-panel background to black
- Bright green bar over the yellow-red tailband
- Bright green individual AC ident. numbers to fuselage sides (just hand painted)
3) Stains & wiring:
- Engine exhaust fume stains
- Cannon & empty cartridge ejector stains (under the wings)
- Aerial wire between the canopy and vertical tail tip
The very last items I'm still missing are:
- Werknummers to vertical tail sides (the current ones are obviously too small
- Wing upper and lower crosses - any updates on these Pickel?
- The cockpit ladder extension part to white/red stripes
- Maybe painting the propeller blades - or just leaving them as they are (black)
So, here are some photos of the current status:
Greetings from snowy Finland,
Juha
Last edited by Ye Olde Finn on Tue Jul 19, 2016 11:39 am, edited 2 times in total.
-
Ye Olde Finn
- Private First Class
- Posts: 21
- Joined: Tue Oct 01, 2013 12:18 am
Re: 1/18 Ta152H custom - work in progress...
And here comes the historical details appendix for the research-oriented audience...
All the Ta152H-0's and H-1's that were operationally used by the Stab-flight of the JG 301 were allocated to the unit between December 1944 and April 1945 as follows:
12.1944 -> 1 AC (24.12.44: WNr 150009)
01.1945 -> 0 AC
02.1945 -> 4 AC (04.02.45: WNr 150003 & 150006 + 20.02.45: WNr 150004 & 150008)
03.1945 -> 2 AC (09.03.45: WNr 150010 + 13.03.45: WNr 150007)
04.1945 -> 2 AC (08.04.45: WNr 150168 and WNr 150169)
The individual AC identities and histories may be summarised as (this much can be established from all the research done so far):
WNr 150009 = GREEN 1, 3 or 5
WNr 150003 = GREEN 1, 3 or 5
WNr 150006 = GREEN 1, 3 or 5
WNr 150004 = GREEN 6 -> captured at Leck
WNr 150008 = GREEN 2? -> crashed by Rechlin test unit on 20.02.1945
WNr 150010 = GREEN 4 -> captured at Aalborg (now in Smithsonian collection)
WNr 150007 = WHITE 7 -> captured at Stendal [has green Stab-bar]
WNr 150168 = GREEN 9 -> captured at Leck
WNr 150169 = GREEN 8
From the flight logbooks of some of the famous JG301 pilots we may learn, that the planes were operated at least on the following dates...
Extracts from Roderich Cescotti’s logbook:
Nr.1445 Ta 152H-0 GREEN 5 “plazflug”
Stendal, 4. Apr. 45, takeoff 06:51
Nr.1446 Ta 152H-1 GREEN 8 “plazflug”
Stendal, 7. Apr. 45, takeoff 09:05
Nr.1447 Ta 152H-1 GREEN 8 “plazflug”
Stendal, 7. Apr. 45, takeoff 09:39
Nr.1448 Ta 152H-1 GREEN 9 “plazflug”
Stendal, 7. Apr. 45, takeoff 10:47
Nr.1449 Ta 152H-1 green 8 “plazflug”
Stendal, 7. Apr. 45, takeoff 11:37
Extracts from Jupp Keil's logbook:
Nr.160 Ta 152 GREEN 3 combat mission:
Stendal on 10. Apr. 45, takeoff 19:13 landing Sachau 20:45 duration 92 min
"N. Braunschweig Luftkampf mit 15 Thunderbolt. 1 w. Abschuß" = Shot down P-47.
Nr.163 Ta 152 GREEN 1 combat mission:
Hagenow on 17. Apr. 45, takeoff 07:35 landing Stendal 08:45 duration 70 min
Extracts from Walter Loos'es logbook:
Nr.876 Ta 152 GREEN 4 combat mission:
Neustadt-Glewe, 24. Apr. 45, takeoff 15:50 landing 16:55. Shot down Yak-9.
Extracts from Willi Reschke's logbook:
Nr.816, Ta 152, GREEN 9, combat mission:
Neustadt-Glewe, 24. Apr. 45, takeoff 08:00 landing 09:15. Shot down 2x Yak-9.