Page 4 of 19
Posted: Sat Dec 12, 2009 8:25 am
by JoeS
Hey TKO
I'm going to repaint the F-14 as soon as mine lands here in the UK thanks to Isaiah of MTS. Just wanted to tap into your expertise if I may- what Tamiya grey did you use XF?? I tend to gravitate towards Humbrol and Lifecolour as they appear to be close the Federal std shades for US aircraft without too much mixing. Also the vinyl masks are they cut from the 3M frisket type sheets? Look forward to the photos of your custom fix.
Thanks
JoeS.
Posted: Sat Dec 12, 2009 10:19 am
by aferguson
another problem i just realized with these spots is that the scheme on this Tomcat is a hi viz one, meaning it sports a gloss grey finish. Gloss grey didn't weather very much, as it cleaned well and was much more resistant to the elements than the low viz paints.
So, blending in the spots is not a great solution anyway. They really need to be eliminated, which means somehow wiping them off or repainting the whole $200 plane.
Posted: Sat Dec 12, 2009 10:57 am
by tko211
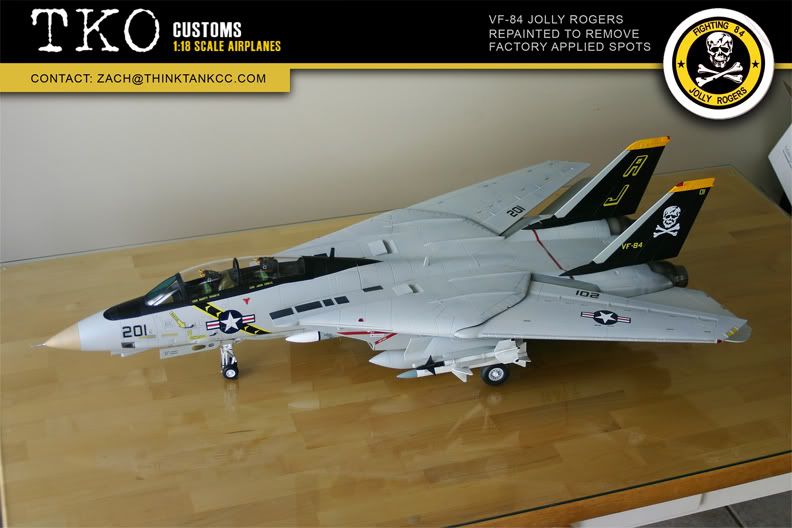
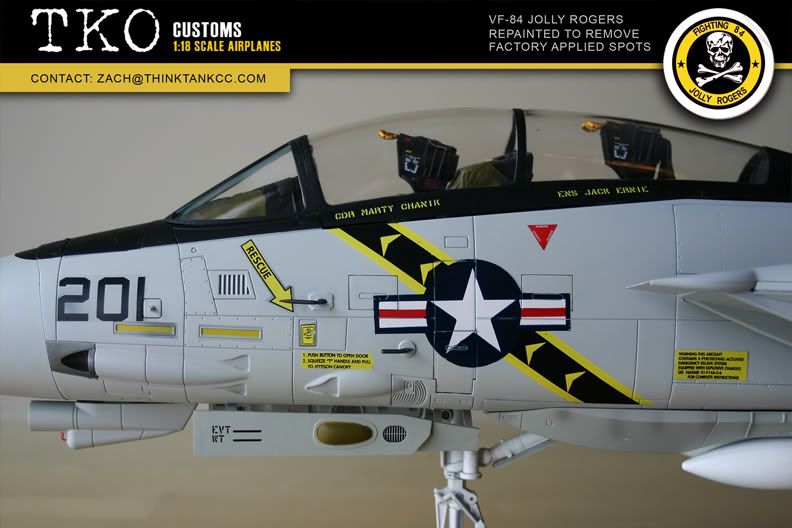
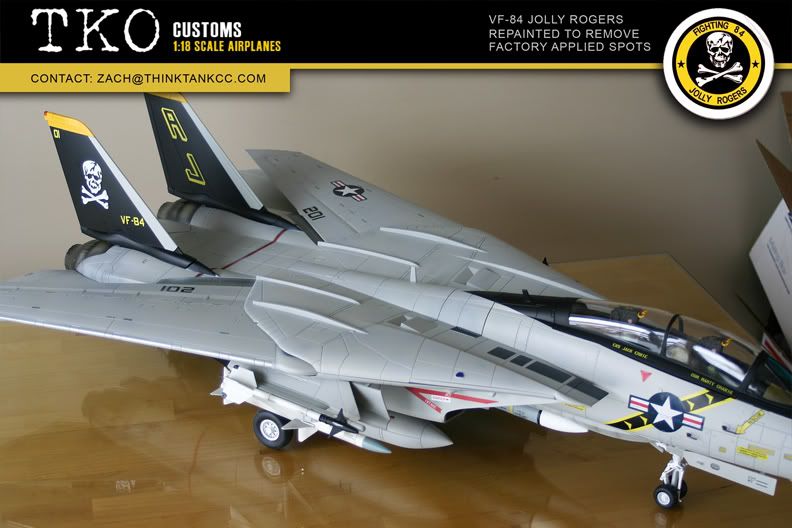
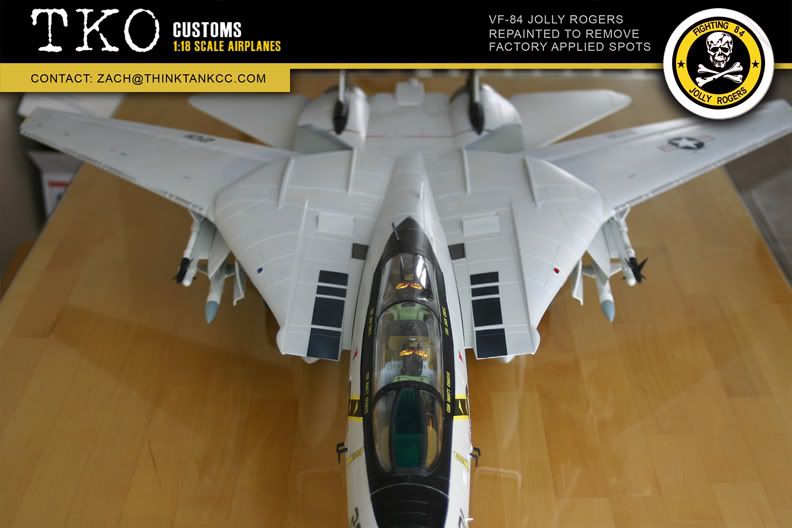
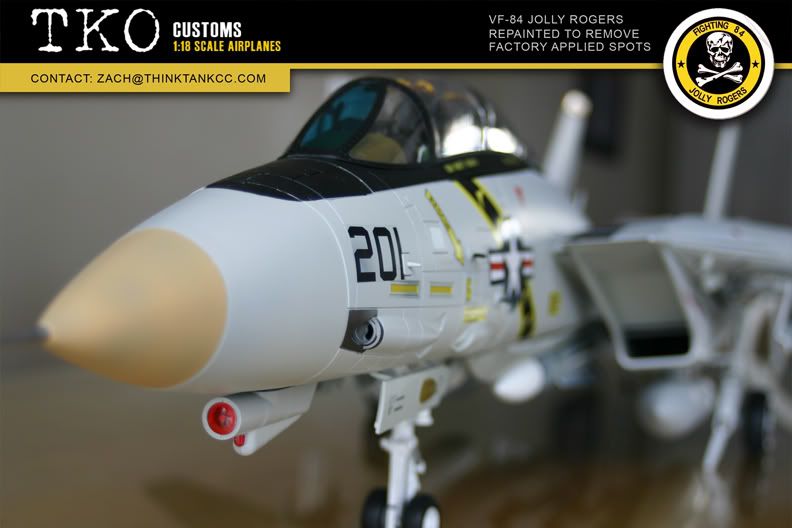
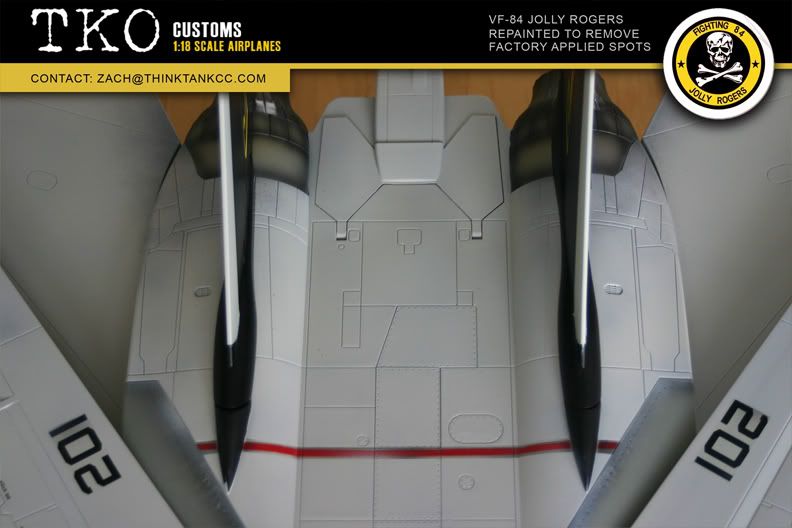
Well guys the big Tomcat is done! I can officially restore it's proud name TOMCAT-as the "spotcat paint" is now long gone. Just a brief painful memory of 24 hours from the time I got the box on my door to the finished product repainted and displayed proudly on my wife's kitchen table. She immediately reminded me that it was not to become a holiday center piece but allowed for the big bird to rest there for the weekend for all of us to enjoy. All she asked was that I display it with the lights on as it felt a little more like christmas lights! LOL
So, how was it to paint? well I learned some things about the plane that helped the process to go faster and I bumped into some things that made the project go slower than I had hoped. It's not too difficult to do but there is no mistaking the fact that 2 years of painting 1:18 customs gave me the confidence and some skill to get it done. I was glad the Cat was not my first custom. It's BIG! and lot's of stuff to mask off!
The project took 3.5 hours and all of the following to complete with very little left over:
1 can of Tamyia Primer
1 can of Tamyia Paint (AS-16 light gray)
1/2 roll of med width Tamyia tape
1/10 of a can of Tamyia Paint (light sand)
1/10 of a can of Tamyia Paint (light gun metal)
1 set of Vinyl Stencil masks.
The finished product is amazing and brings the glory back to the quality of the model itself. I will post pictures this afternoon, including the cost including shipping back to the rightful owners.
more to come.
Posted: Sat Dec 12, 2009 11:01 am
by thatf14guy
thats great, look forward to seeing what it should have looked like all along.
Posted: Sat Dec 12, 2009 11:09 am
by diegomenendez
Oh boy oh boy I can't wait to see how amazing it turned out!
You Da Man!
please
Posted: Sat Dec 12, 2009 12:03 pm
by supersonicfifi
Yes me too ! i can't wait for the pictures ! Please TKO post before i go to bed !!!!!

Phil
Posted: Sat Dec 12, 2009 2:32 pm
by tko211
Posted: Sat Dec 12, 2009 2:35 pm
by Jericoeagle1
Nice TKO, It looks 1000% better, but for some reason it looks smaller. Funny! I think its because the weathering adds a little depth to the model. I think its great though, how much do you think you'll charge for the vinyl masks? I can't wait to tackle mine now.
Posted: Sat Dec 12, 2009 2:47 pm
by trex0770
Looks great TKO! Will the cost of the Black Aces repaint be the same as the JR repaint?
Thanks in advance!
Posted: Sat Dec 12, 2009 2:52 pm
by tko211
Jericoeagle1 wrote:Nice TKO, I like it. But for some reason it looks smaller. Funny! I think its because the weathering adds a little depth to the model. I think its great though, how much do you think you'll charge for the vinyl masks? Also do you plan on replacing the numerous "No Step" warnings that were all over the wings? I can't wait to tackle mine now.
Believe me the plane is still VERY large! But I know what you mean. For reference, the table is a standard 6' table if that helps for size

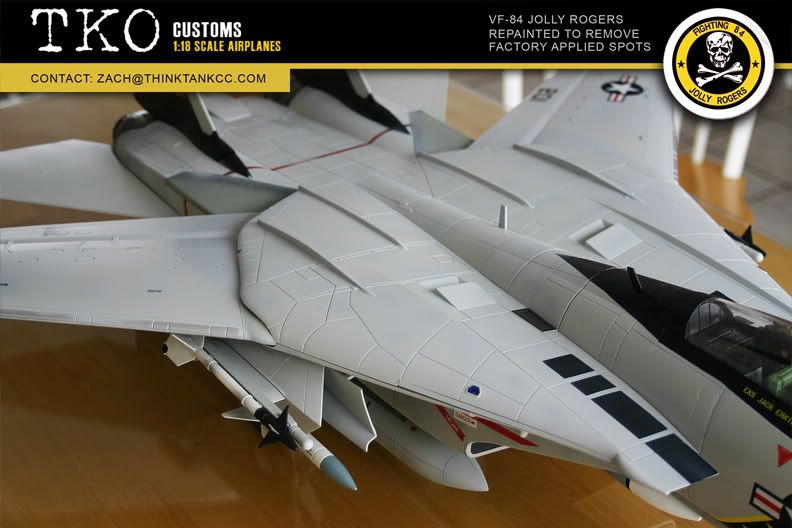
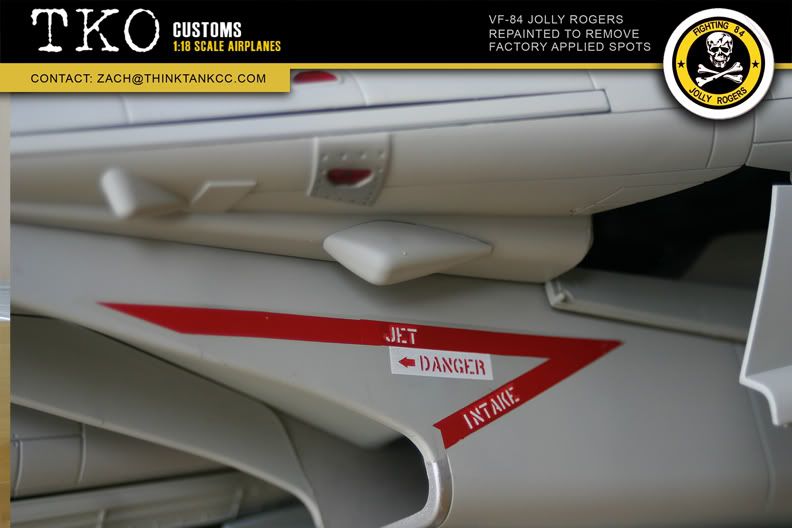
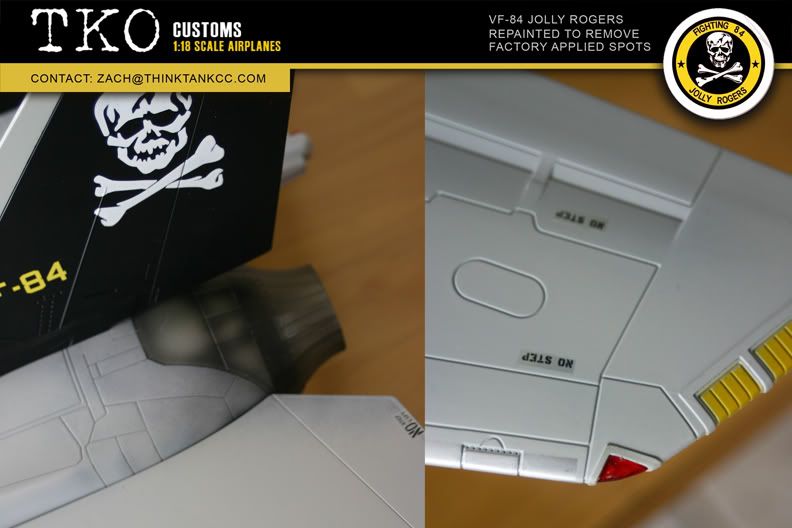
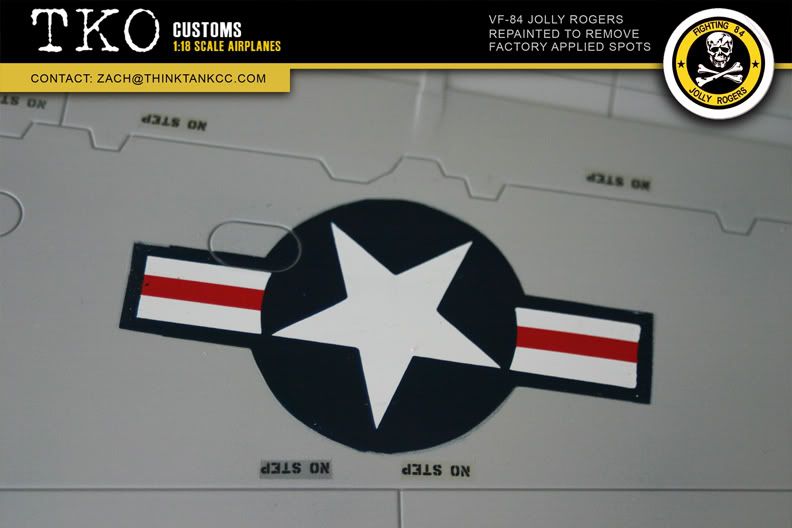
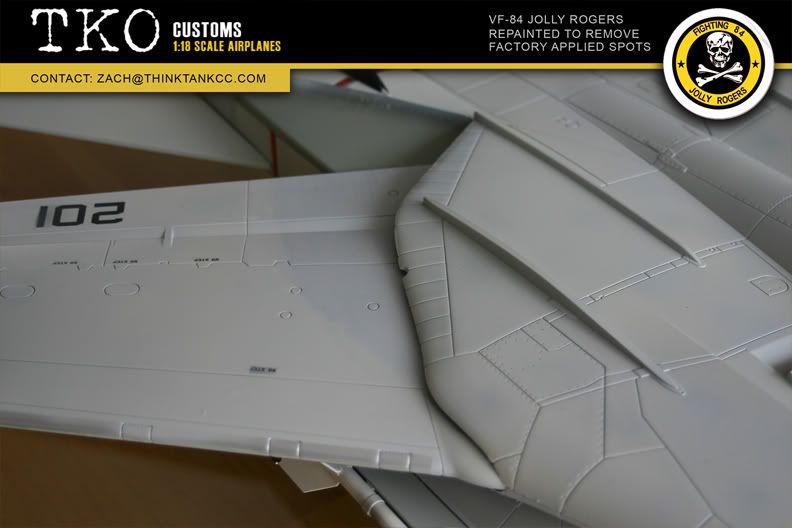
All the No Steps are still there just as the model ships to us. I just masked off each area with a small piece of vinyl. Funny thing though, in doing this repaint I noticed that the NAVY marking is missing all together on one side of the plane. I don't know if it was just mine or if they are all that way. I will fix it someday later. I am not sure yet about the stencils, I want to work with them a little more before I could stand behind selling them. They still need a little work as they were not ideal in some of the cases on this plane. It still requires a lot of hand masking with tape and a surgical hand to cut on the model with an exacto. So it's still unfortunately a bit of a skill thing and not a straight, sticker and go thing!

I discovered that if you carefully apply the primer and paint layers that the existing spots and weathering can still work well to provide some depth and some nice weathering effects through the paint. You just have to not overdo the spray paint which is easy to do if you haven't had a lot of rattle can experience. This F-14 has that very slightly worn look that I think everyone will like.
Posted: Sat Dec 12, 2009 2:52 pm
by pcoughran
Zach,
Very nice. Can't wait to see the VF-41.
Oh, yeah - can't wait to see the price too.
Phil
Posted: Sat Dec 12, 2009 2:59 pm
by tko211
trex0770 wrote:Looks great TKO! Will the cost of the Black Aces repaint be the same as the JR repaint?
Thanks in advance!
No it will have to be more. To make the black Aces you have to do almost all of the work that you see on the JR. But that just gets it started. You have to paint a lot more parts on the Black Aces. Tails, Elevators, Wings, Nose cone, and the whole underside.
The underside will actually require the most work for sure. Even more that the tails! It's going to require that I use the airbrush for get the control needed for the wavy white line. All said and done it's going to take easily twice as much time.
For now we are going to start ripping into JR repaint production. I will then do the Black Aces on a case by case basis as I don't expect to do to many. I am doing mine next week. I will have a cost then, but I expect it to be twice as much as this one.
Posted: Sat Dec 12, 2009 3:03 pm
by exether_mega
Congrats Zach ! Fantastic job ! Maybe you could send pics to JSI.
phil
Posted: Sat Dec 12, 2009 3:15 pm
by SierraMikeBravo
Zach,
Sent you a PM regarding getting my plane done as well. Looks fantastic! Great job!
Posted: Sat Dec 12, 2009 3:15 pm
by tko211
exether_mega wrote:Congrats Zach ! Fantastic job ! Maybe you could send pics to JSI.
phil
LOL LOL LOL Funny!
Posted: Sat Dec 12, 2009 3:15 pm
by thatf14guy
how much? cause i've got that one we talked about then another one, just spots removed, man that thing looks alot better.
Posted: Sat Dec 12, 2009 3:22 pm
by tko211
I edited my picture post to include the price structure. See above! It describes all the materials involved and the time required. the only way for me to do this is to cover my costs, and give about 20.00 an hour for my time. I hope that members understand. I have never really wanted to use this forum to make a business or to sell stuff to you guys. Truth is I make a lot more per hour running my design firm in Salt Lake City. So please understand that my motivation was to fix the Tomcat for those of us who had expectations that were not met.
Right now I am moving the list over from soft commitment to firm commitment mode. If you want this service for your plane contact me at my email address as shown in the photos. I will provide you your production number and you will need to make arrangements to send your plane to me one way or another. I am starting the process of emailing the people who have connected with me thus far.
Posted: Sat Dec 12, 2009 3:22 pm
by NWarty
Zach,
OMG....That looks FANTASTIC!!!!

Posted: Sat Dec 12, 2009 3:23 pm
by vulgarvulture
Now THAT's what I'm talkin' about. Beautiful. Thanks for taking on this project Zach!

Posted: Sat Dec 12, 2009 3:29 pm
by CW4USARMY
Outstanding!! Just sent another PM to get my order in. Quick question though, do you put any kind of a dull coat or sealer on afterwards? Does it matter?
Thanks again!<
Andy
Posted: Sat Dec 12, 2009 3:38 pm
by pcoughran
QUOTE
"I noticed that the NAVY marking is missing all together on one side of the plane. I don't know if it was just mine or if they are all that way. I will fix it someday later."
It doesn't surprise me JSI messed up again - I'm sure all the production models are just like yours. I checked pics and the paintmaster shows the NAVY on both sides. I could only find "suppossed" pics of the production version that showed one side (left) and it was there, so I'm guessing yours is missing the right side. Are you considering "fixing" this mistake along with the $100 repaint? Will this increase the cost any? Your numbers came in right where I thought they'd be, you're being generous actually
Thanks,
Phil
Posted: Sat Dec 12, 2009 4:07 pm
by tko211
CW4USARMY wrote:Outstanding!! Just sent another PM to get my order in. Quick question though, do you put any kind of a dull coat or sealer on afterwards? Does it matter?
Thanks again!<
Andy
I do a very light, very quick flat tamyia sealer on it. It can build up pretty quick and it creates problems as the masked areas get an edge on them and it becomes more obvious.
That said, Tamyia paints are SUPERIOR! They hold up REALLY well. Especially when used with the primer coat. It has a fantastic flat gray appearance that is so even and professional that it looks just like factory paint, maybe even a little better.
It will hold up to extensive handling no problem! Just have clean hands! LOL.
Posted: Sat Dec 12, 2009 4:10 pm
by tko211
pcoughran wrote:QUOTE
"I noticed that the NAVY marking is missing all together on one side of the plane. I don't know if it was just mine or if they are all that way. I will fix it someday later."
It doesn't surprise me JSI messed up again - I'm sure all the production models are just like yours. I checked pics and the paintmaster shows the NAVY on both sides. I could only find "suppossed" pics of the production version that showed one side (left) and it was there, so I'm guessing yours is missing the right side. Are you considering "fixing" this mistake along with the $100 repaint? Will this increase the cost any? Your numbers came in right where I thought they'd be, you're being generous actually
Thanks,
Phil
Sorry, The NAVY fix would require another stencil and second color paint / masking process on the largest part of the plane (the main body) So to keep it at the 100 turn key price I opted to just live with it. Too bad it's not there... Oh well. The spots are gone and that is good!
Posted: Sat Dec 12, 2009 4:24 pm
by pcoughran
tko211 wrote:pcoughran wrote:QUOTE
"I noticed that the NAVY marking is missing all together on one side of the plane. I don't know if it was just mine or if they are all that way. I will fix it someday later."
It doesn't surprise me JSI messed up again - I'm sure all the production models are just like yours. I checked pics and the paintmaster shows the NAVY on both sides. I could only find "suppossed" pics of the production version that showed one side (left) and it was there, so I'm guessing yours is missing the right side. Are you considering "fixing" this mistake along with the $100 repaint? Will this increase the cost any? Your numbers came in right where I thought they'd be, you're being generous actually
Thanks,
Phil
Sorry, The NAVY fix would require another stencil and second color paint / masking process on the largest part of the plane (the main body) So to keep it at the 100 turn key price I opted to just live with it. Too bad it's not there... Oh well. The spots are gone and that is good!
Are you going to leave it off the VF-41 as well? Just curious as I'm not sure yet which one I'd prefer if I go ahead with it.
Posted: Sat Dec 12, 2009 4:25 pm
by Jericoeagle1
tko211 wrote:pcoughran wrote:QUOTE
"I noticed that the NAVY marking is missing all together on one side of the plane. I don't know if it was just mine or if they are all that way. I will fix it someday later."
It doesn't surprise me JSI messed up again - I'm sure all the production models are just like yours. I checked pics and the paintmaster shows the NAVY on both sides. I could only find "suppossed" pics of the production version that showed one side (left) and it was there, so I'm guessing yours is missing the right side. Are you considering "fixing" this mistake along with the $100 repaint? Will this increase the cost any? Your numbers came in right where I thought they'd be, you're being generous actually
Thanks,
Phil
Sorry, The NAVY fix would require another stencil and second color paint / masking process on the largest part of the plane (the main body) So to keep it at the 100 turn key price I opted to just live with it. Too bad it's not there... Oh well. The spots are gone and that is good!
Maybe a decal would do?