Page 10 of 19
Posted: Sat Dec 26, 2009 7:01 pm
by deankleines
mountian-man wrote:Tried Dean's method with Model Master Acryl. Started on a drop tank and found that paint was very thin. I couldn't achieve a mark free surface with the makeup wedges. I image Dean's enamel paint works better, maybe it is a bit thicker in consistency? Brushes may work better with Acryl.
I've decided to airbrush instead, here are a couple more useful links for those who want to use Acrylic paint or live in Canada!
About thinning Acrylics for airbrush:
http://www.reapermini.com/TheCraft/15
and by Testors (A bit bias):
http://www.hubhobbyshop.com/hint21.htm
Dean here: Lost in holiday festivities for a bit - did have another despotting session this morning - works perfect with the enamel- I will test the acrylic on something to see if I get the same results - I have a full airbrush set up too. Just like the make-up dabbing for this application. I'll try to pst some pics in a bit.
Acrylic vs Enamel
Posted: Sat Dec 26, 2009 8:03 pm
by deankleines
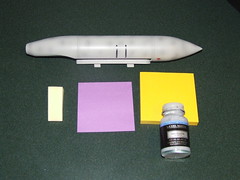
Being a professional car painter back in the day, I liken the difference between acrylic and enamel Model Master flats to the difference lacquer and enamel paints use to be on cars. Night and Day. You have viscosity issues and a whole host of other factors. With that said, I decided to just quickly check what the acrylic would be like using the make-up sponge as an applicator. I have many very old bottles of acrylic and pulled down a bottle of Dark Gull Grey. After vilently shaking and stiring it, I used the sponge to apply it to a sample sheet of styrene, which already had a gloss coat of gull grey from years ago.
The key to using the sponge applicator is NOT to brush the paint onto the surface, but to use a tapping motion to apply it to the surface.
The acrylic was markedly thinner than the enamel out of the bottle.
The result was breath taking. Coverage was instantaneous and you would never know it was not air brushed!!!!!
Got to go for now.
Stay posted!
Dean
Best method
Posted: Sat Dec 26, 2009 9:19 pm
by bpxbrian
Dean, based on your paint expertise - do you recommend using the acrylic or the enamel bottles for a "first timer?" Which would provide the best result and appear the most seamless - sans an airbrush?
Posted: Sun Dec 27, 2009 12:16 am
by tko211
Finished 2 Cats for members tonight! Gonna get 3 more done tomorrow hopefully. Shipping back to rightful owners this week!
"A Little Dab L Do Ya" Enamel of Acrylic?
Posted: Sun Dec 27, 2009 3:54 am
by deankleines
BPX Brian and all: The way this has progressed since bird delivery last week has been incredibly fun!
Just did another test with a very ancient bottle of Model Master acrylic. I did not have gull grey so next closest off the shelf was light ghost grey FS 36375.
Hands down, the acrylic wins over the enamel on the following points:
1. It's viscosity is much "wetter" than the enamel. This gives you a longer application time range with the sponge pad. It also "loads" the sponge a little deeper than the enamel, allowing you to cover more area.
2. It covers a little more translucent than the enamel, thus allowing you to keep some of the spot areas slightly showing through if you wish. A second dabbing session after the first has set up will eliminate the spot.
3. When the acrylic "flashes off"(solvent evaporates/drys), the sheen of the finish matches what is on the Tomcat "EXACTLY". This is a huge advantage over the enamel. The enamel dried "dead flat" and you can see where you spot repaired in the light. It is not bad, just evident.
OK - so here is the bottom line- My investment in despotting the big bird is less than 10 bucks!! It is totally simple and totally fun!!!!
Using post it notes and blue tape where needed guarantees you will have a professional finish!
I have airbrushed my models all my life and will continue to do so. This method, however, has opened my eyes to the real beauty of thinking "outside the box" or bottle if you prefere.
For those of you who wish do despot your birds and do not have an airbrush, this is the way to go, hands down!!!!
Tomorrow, I will go get a new bottle of the Gull Grey Acrylic and provide another update.
Please remember that the sponge make-up pads are soft, non-pourous closed cell sponge and are not like the sponge paint brushes you find in the stores. Gentle dabbing action "peppers" the surface with the paint and you will never know that it was not airbrushed.
I am available to help any of you should you need further guidance.
Best regards,
Dean
Posted: Sun Dec 27, 2009 12:23 pm
by chunks
tko211 wrote:Finished 2 Cats for members tonight! Gonna get 3 more done tomorrow hopefully. Shipping back to rightful owners this week!
Awesome!!
Posted: Sun Dec 27, 2009 2:36 pm
by deankleines
Posted: Sun Dec 27, 2009 3:18 pm
by deankleines
deankleines wrote:New pics on my flickr page
Dean
This link works -
http://www.flickr.com/photos/maranatha_ ... 7/sizes/l/
Then click:
deankleines@sbcglo bal.net's photostream
Today's pics should come right up
Dean
Nice work
Posted: Sun Dec 27, 2009 4:21 pm
by bpxbrian
Looks great Dean!
I know there has been some back and forth about which Model Master color is the dead on color.
Is it the Gull Grey flat or the Light Ghost Gray?
Which is the best match? Thanks!
Brian
Posted: Sun Dec 27, 2009 7:24 pm
by CessnaDriver
Experiments for today.......
I bought both acryl MM Flat Gull Gray 4763 and Light Ghost Gray 4762.
Flat Gull Gray 4763 was the better color match on my bird, really really close.
4762 was a little too much on the darker side of gray.
Maybe mixing in a little 4762 into the 4763 would be a good idea though.
The sheen seemed to match nicely.
But who knows how consistant the paint is on these birds, maybe they vary.
My wife had some make up sponges, I tried using them on the bottom of a drop tank, and I was not able to get a smooth appearance, bubbles were a bit of a problem too, it worked ok, and I could see with practice maybe nailing down the tecnique, but I think will go ahead and use the airbrush.
Posted: Sun Dec 27, 2009 7:39 pm
by vulgarvulture
Dean, the picture with you holding the F-14 by the xmas tree, you look like one damn happy SOB. Thanks for posting all the pics.
Posted: Sun Dec 27, 2009 7:50 pm
by tkjaer21
My post was either ignored or skipped, please let me know on this question as I want to get my plane finished asap. Many thanks.
Has any tried the Tamiya, Moder Master or Testors spray cans? If so, how far away do you spray the plane so that the paint will not blotch or run. Also, should it painted with the enamel or acrylic paint cans?
Posted: Sun Dec 27, 2009 8:13 pm
by Shin Densetsu
deankleines wrote:Thanks so much for posting the pic!
This method is so simple!!!
The Model Master Flat FS36440 Gull Grey is a dead on match
and you can dab out the spots completely or hide them so that
just a bit shows through.
Just finished one of the rear elevators and it is awesome!!!!
E-mail me if you have any questions
[email protected]
Dean,
I saw your pics on flickr, your tutorial and tips are great! However I would suggest not using sharpie though, I used those before on old Gundam figures and a year or so later they turned
PURPLE! The ink on sharpies isn't archival, it will go from black to purple in a year or less.
Re: Nice work
Posted: Sun Dec 27, 2009 8:54 pm
by deankleines
bpxbrian wrote:Looks great Dean!
I know there has been some back and forth about which Model Master color is the dead on color.
Is it the Gull Grey flat or the Light Ghost Gray?
Which is the best match? Thanks!
The Gull Grey is the match. I only tested the light ghost grey because I did not have the gull grey in acrylic. Plan on trying to get some tomorrow.
Dean
Brian
Posted: Sun Dec 27, 2009 8:58 pm
by CessnaDriver
Just a quick test mixing of 4762 fifty fifty with 4763 looks like a damn solid match.
Posted: Sun Dec 27, 2009 10:45 pm
by tmanthegreat
tkjaer21 wrote:My post was either ignored or skipped, please let me know on this question as I want to get my plane finished asap. Many thanks.
Has any tried the Tamiya, Moder Master or Testors spray cans? If so, how far away do you spray the plane so that the paint will not blotch or run. Also, should it painted with the enamel or acrylic paint cans?
If it helps, I've used both types, though not on my F-14. I tend to prefer the Tamiya spray paints and that is all my local hobbystore carries at the moment.
Spraying should be done about 12-18 inches away from the surface. When you spray closer, you tend to get the blotching and paint running. You will also want to do multiple coats, so you would spray lightly the first time, then gradually thicken the color on the next coats. You can paint something completely on the first coat, but risk the paint running.
I would suggest using acrylic paints if possible, though spray paints often tend to be enamel based. Either acrylic or enamel should go on the F-14 without serious problem.
Posted: Sun Dec 27, 2009 11:03 pm
by wolfman1973
I used the Tamiya spry cans like someon here suggested and then went over it with a Pro modeller black weathering wash. Someone on here also suggested that too. It worked great I thought. First I did go over some of the darker spots with gojoes and then did the painting. After all was done I then went over it with a tamiya flat clear coat. The paint colors that someone suggested were tamiya light grey (AS-16) and the nose cone color light sand(TS-46) I will post some pics when I get them taken.
Posted: Mon Dec 28, 2009 9:23 am
by raymond woods
wolfman1973 wrote:I used the Tamiya spry cans like someon here suggested and then went over it with a Pro modeller black weathering wash. Someone on here also suggested that too. It worked great I thought. First I did go over some of the darker spots with gojoes and then did the painting. After all was done I then went over it with a tamiya flat clear coat. The paint colors that someone suggested were tamiya light grey (AS-16) and the nose cone color light sand(TS-46) I will post some pics when I get them taken.
I am new to this, but will the black weathering wash cause any problems with the decals? Also, how did you apply the flat clear coat? Thanks!
Posted: Mon Dec 28, 2009 9:28 am
by wolfman1973
The black weathering wash did not effect the decals on the plane. The flat clear coat was tamiya in a spray can.
Posted: Mon Dec 28, 2009 9:44 am
by raymond woods
wolfman1973 wrote:The black weathering wash did not effect the decals on the plane. The flat clear coat was tamiya in a spray can.
Thank for the information. One other quick question....Do I need to only mask the clear part of the canopy before I add the clear coat?
Posted: Mon Dec 28, 2009 9:56 am
by pcoughran
Thanks out to Deankleines for his easy "makeup pad" method. I went ahead and masked the tampo prints and was going to airbrush but decided to try the makeup pad idea. It works great. I just dabbed the whole plane since I had it all masked off anyway. That way I didn't have any spots that were shiny vs flat. It was all one even coat of dabbed paint and looked as good as if it was airbrushed. The masking took about 3 hours (because I'm meticulous). The dabbing took about an hour and then after it dried I had to touch up some spots. I used the enamel Flat Gull Grey by Model Master.
It looks so good "factory fresh" without spots I'm almost hesitant to add weathering. I probably will add the Promodeller's Wash in the future.
The first pic is canopy done fuselage not:


Thanks again Dean for the idea and tips.
Posted: Mon Dec 28, 2009 9:57 am
by CENT-ONE
If you're using rattle cans try to aim for 65 to 85 degrees with low humidity.
Posted: Mon Dec 28, 2009 1:18 pm
by corsair bob
I painted half the plane this weekend with a spray can. I used light Gull Gray and it came out really nice. All I need to paint is the cockpit section.
A Little Dab L Do Ya!!!
Posted: Mon Dec 28, 2009 4:15 pm
by deankleines
pcoughran wrote:Thanks out to Deankleines for his easy "makeup pad" method. I went ahead and masked the tampo prints and was going to airbrush but decided to try the makeup pad idea. It works great. I just dabbed the whole plane since I had it all masked off anyway. That way I didn't have any spots that were shiny vs flat. It was all one even coat of dabbed paint and looked as good as if it was airbrushed. The masking took about 3 hours (because I'm meticulous). The dabbing took about an hour and then after it dried I had to touch up some spots. I used the enamel Flat Gull Grey by Model Master.
It looks so good "factory fresh" without spots I'm almost hesitant to add weathering. I probably will add the Promodeller's Wash in the future.
The first pic is canopy done fuselage not:
Thanks again Dean for the idea and tips.
You are most welcome!
I very proud of you!!!!
She looks fantastic!
Hello Kitty!!!!
I can't wait to learn about the Promodeler wash system!
Dean
Posted: Mon Dec 28, 2009 4:37 pm
by pcoughran
Here's the final resting place. It's my son's Christmas present so goes in his room. I convinced him to wait to weather it till it gets warmer and I can actually use the garage to put a clear coat for the wash (don't have a paint booth).
It took up the room of 2 1/18 planes and 15 1/72 planes which I now have to find room for somewhere else - probably end up putting more shelves in his room.
